March 1, 2021
Autodesk Inventor: Get A Different Perspective
In this modern age of software, it seems that there is a specific software or tool for just about anything, but our main asset for accomplishing our CAD work is still our eyes. The way we view things has a major impact on our workflows.

The common navigation tools inside Autodesk Inventor can become second nature. There are many ways to go about navigating around a model and every user has his preferences. Some use the Navigation Bar, some use the View Cube, some use the F keys or the mouse wheel just to name a few. Out of all the navigation options we have one command is more than often left out and that is Perspective View.
Why using the Perspective View?
Perspective View projects the model’s view to a vanishing point adding perspective and parallax in the scene. This gives a better comprehension of space, depth and volume. This helps create a more realistic and compelling view for any conception. While this effect is used widely for visualization and rendering, most users pass on its most useful asset: navigation.
While working in parallel projection (Orthographic) we can work precisely on our model without the distortion of a real-world view. This is where most work is done. But sometimes the geometry we are working on becomes our obstacle. One might have to work inside of something requiring creating hide situations on some parts to access the working area or create section views to access very small space in between geometry.
These situations require the creation of work planes, adding extra sketches in our model, creating and managing view representations or just plainly utilizing commands such as Slice Graphics repetitively. All these manipulations are redundant and can soon become an irritant in a day-to-day routine. Here comes perspective to the rescue. Perspective view has a ghost behavior that enables the camera to go through geometry.
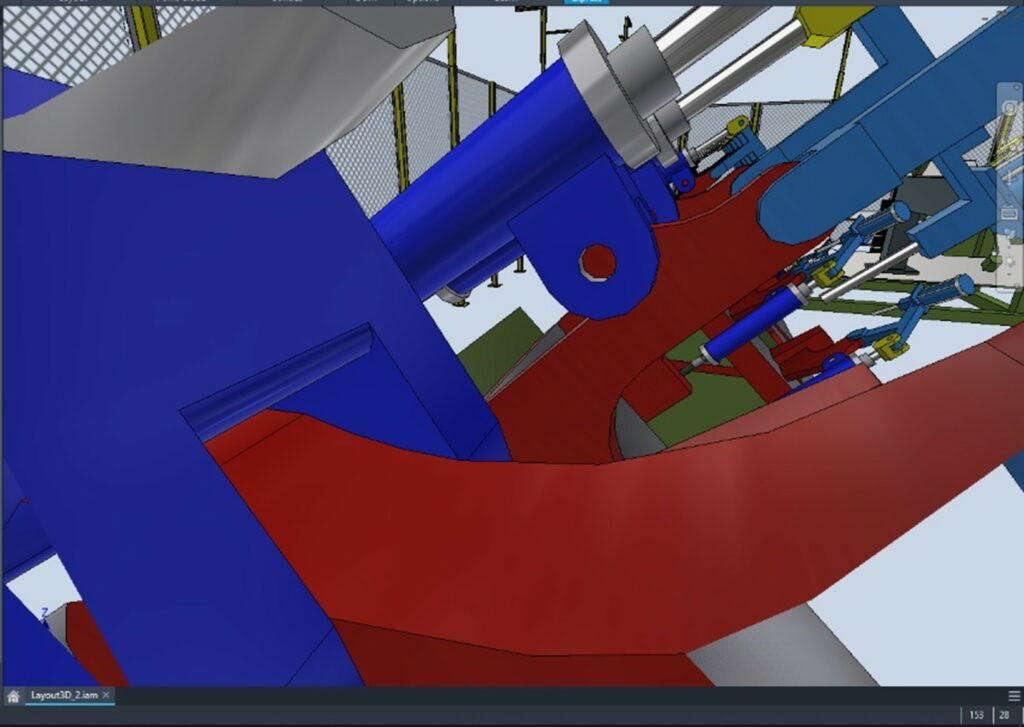
You need to select a face inside an assembled drive shaft’s keyway?
Not a problem, just toggle Perspective on and navigate through the gearbox, gears and bearing to select the face you want. Simple!
The images below show how we can go through the objects to select the inside face of a keyway without any other manipulation than a simple Zoom.


What about working in a tight space?
Once again toggle Perspective on and navigate to the desired position.
The image below shows the same viewpoint, one orthographic and the second in perspective. Obviously, the perspective view offers much more headroom with a better visual comprehension.

Here are my extra 3 tips for easier navigation of the Perspective View:
1. While navigating in perspective view it is a good practice to select a model or a feature so that selection becomes the center of interest. This will make the navigation focused to that selection.
2. The default zoom factor of the mouse wheel scroll is intended for broad movement. While in perspective, the dolly zoom might be a better companion. You can press F3 to activate this zoom on the fly or assign this zoom behavior to the mouse wheel in your preferences in Inventor 2021.
3. To adjust the field of view of your perspective press Ctrl+Shift+F3 and click and drag in your viewport, you will notice that this increase or decreases your field of view. You can go from almost orthographic to a super wide-angle view with this option.
Don’t get stuck in a sterile square world, push your horizon, widen your perspective and be more efficient!
Related Posts
-
The Future of Manufacturing: iLogic & CPQ Software Unleashed
The Future of Manufacturing: iLogic & CPQ Software Unleashed In the ever-changing world of manufacturing, the emergence of iLogic-based CPQ (Configure, Price, Quote) technologies, such as SolidCAD’s ...
-
The Role of PLM in Streamlining New Product Development
Introduction: The Importance of NPI in Product Development In today’s fast-paced and competitive market, the ability to innovate and bring new products to market swiftly is not just an advantage; it’s ...
-
Reflections on CIM Symposium 2023: Navigating Digital Transformation in Mining
Having recently attended the CIM Symposium 2023 in Vancouver, I find myself reflecting on the digital transformation that the mining industry is undertaking. The conference served as a beacon, illuminating the ...

- Accruent
- Advanced Manufacturing
- Architecture
- AutoCAD
- Blog Posts
- Civil 3D
- Civil Infrastructure
- Community Spotlight
- Construction
- CTC Software
- Data Management
- Engineering
- Formation
- General
- Implementation
- Infrastructure
- Inventor
- Manufacturing
- Mentoring
- News
- News Covid 19
- PLM
- Programming
- Revit
- Scan-to-BIM
- Support
- Tip & Tricks
- Training
- Variant
- Visualization
- Workflow Analysis