fbpx
  • These Australian Hiking Cabins Are a Sight to Behold

    This story was originally published by on the Bluebeam Blog.

    Roughing it in the great outdoors is a little more luxurious in these cabins, which underwent a painstakingly detailed and complex design and construction process (from 2023)

    hen it comes to roughing it in the great outdoors, most of us would be excited to spend the night in a simple log cabin or lean-to. But in Australia, which boasts thousands of miles of hiking and camping trails throughout its many national parks and wilderness areas, they do things a little differently.

    So when it came time to design and construct the campsites along the challenging 13-day Grampian Peaks Trail route, planners knew they needed something special to match the natural scenery. But how could they create breathtaking structures in remote areas, many of which are unreachable by road?

    Nick Griffin, Melbourne Co-Studio lead and associate director at McGregor Coxall, and Justin Noxon, architect and studio partner at Noxon Giffen, were ready to rise to the challenge.

    An unmatched location

    For Griffin and Noxon, the natural beauty of the site inspired an expansive creativity in the team’s approach to the design process. Also known by its aboriginal name, Gariwerd, Griffin described the area as “a significant landscape,” adding, “The environmental and cultural significance of Gariwerd drew us to the project.”

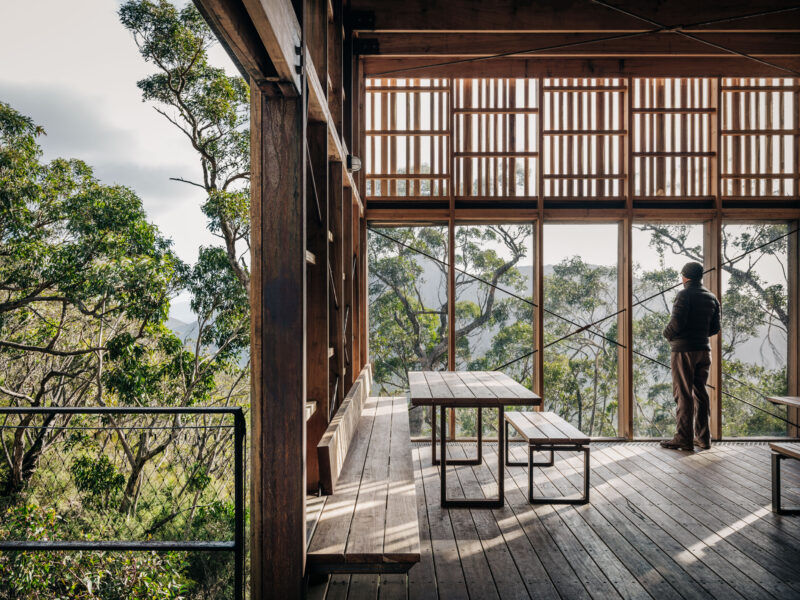
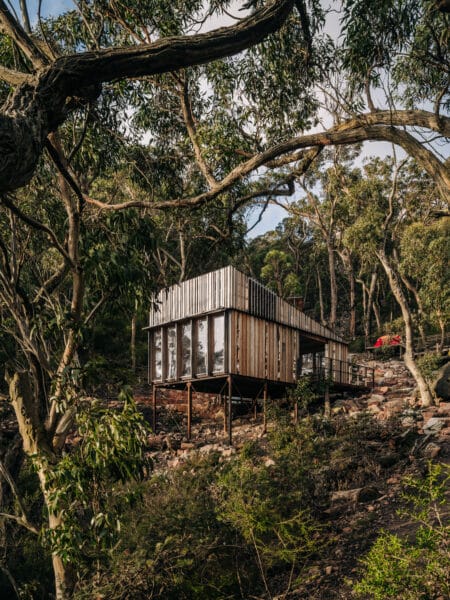
    A look inside one of the cabins. Photo: Adam Gibson.

    One of the most biodiverse places in Victoria and home to about a third of all native area plant species, there’s a reason this remote trail has been so perennially popular with ambitious hikers from all over the globe. “With such diverse terrain and unique natural resilience, the landscape and its systems form the primary inspiration for our design response,” Griffin said.

    For Griffin and his associates, taking the time to truly immerse themselves in this landscape was an essential part of the design process. “The design team made multiple trips out to Gariwerd to spend time observing and documenting site conditions,” he said. “Immersion in each individual site took place to gain a holistic appreciation for and knowledge of the landscape in different weather conditions and at times of day.”

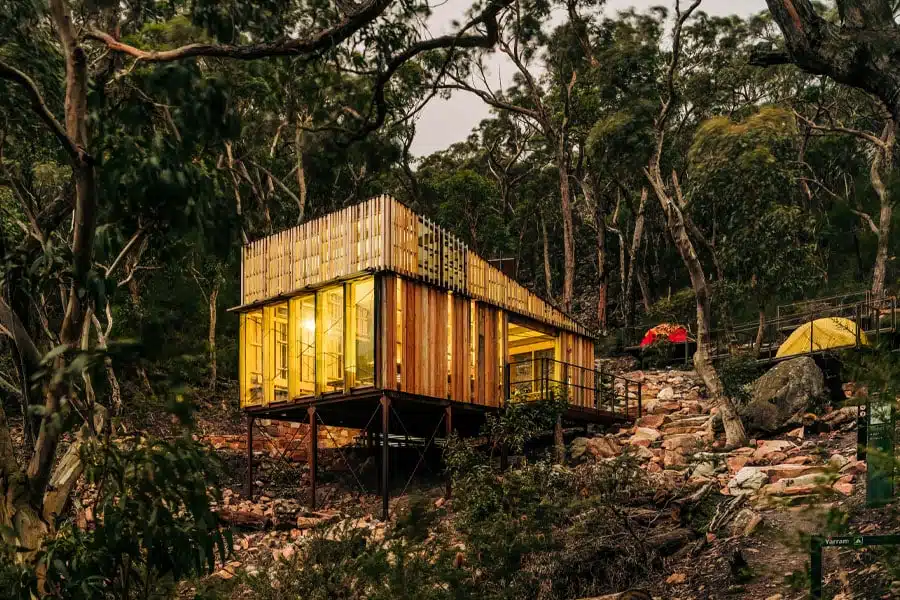
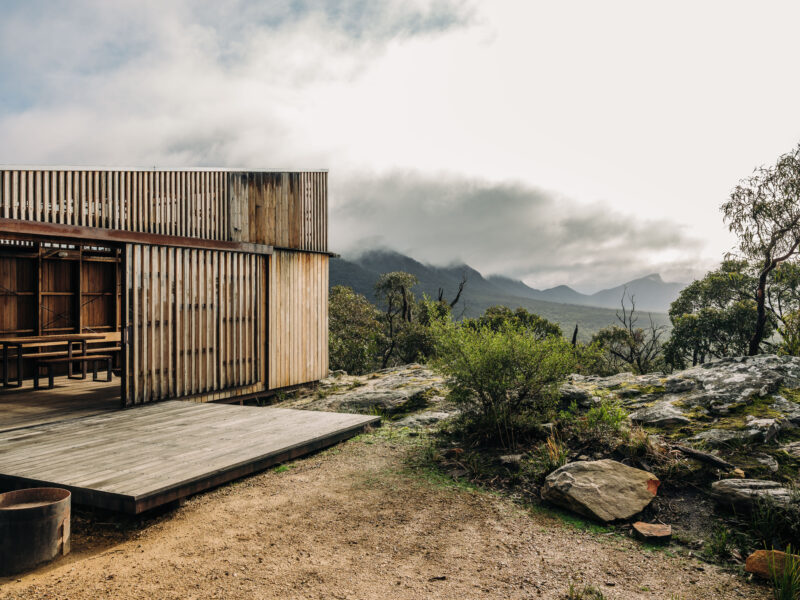
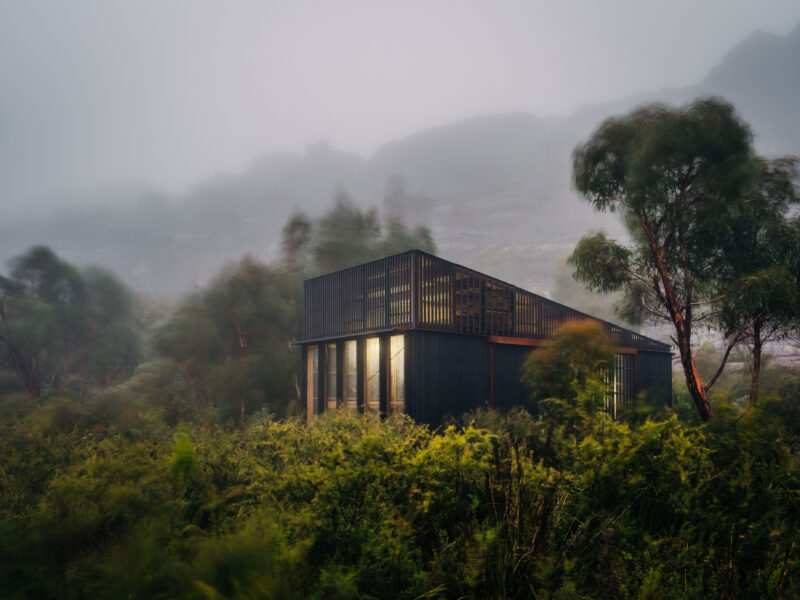
    After spending time within each site, Griffin said the team created structures that mirrored the natural landscape that surrounded them, drawing both visually and materially from the park. “The form and placement of the architecture were inspired by the large-scale sandstone uplift evident throughout the Grampians; this is echoed in the single pitch of roof elements,” Griffin explained.

    Photo: Adam Gibson.

    Each structure even makes use of materials drawn naturally from the landscape. “The design vision included a robust and natural materials palette, considered in response to each individual site’s nature, colors and textures,” Griffin said. “For example, all rock was sourced from within each campsite.”

    Designing with hikers in mind

    The team knew how its structures needed to respond to the landscape—but what about the people who would be using them? Griffin said that throughout the project, the design team kept the specific experience of hikers at the forefront of their processes.

    “The experiential design of all campsite elements was mindful to be specific to that of a hiking experience, therefore the comfort target for architectural elements sought to elevate only slightly from that of a tent,” he explained. “The aim was to feature architecture that would grow in parallel with the nature that surrounds it, minimizing harm to environments and keeping Gariwerd’s stunning landscape as the hero.”

    Noxon said this commitment was clear from the moment the team read the key parameters that would define the project. “The brief called for the campsites to ‘touch the ground lightly,’ minimizing the impact on the environment and maintaining Gariwerd’s iconic, biodiverse landscape as the hero,” he said. “The structures were built to provide comfort and amenities for hikers, using materials that would blend into the landscape over time. Structures provide the essentials of weather protection and basic shelter, collect water, treat wastewater on-site and provide solar-powered battery charges for hiker safety for mobile phone navigation and safety within the context of a remote hiker trail experience.”


    Photo: Adam Gibson.

    Where and how the cabins were constructed was as important as the amenities they contained.

    “Off-grid campsites are designed with mindfulness to guidelines and tracks—intuitive circulation allows for more sustainable campsites that minimize public access to dense vegetation,” Noxon said. “Accommodating to a variety of users, abilities and intensities, the walk will conserve and protect Gariwerd’s beauty, achieving the highest possible grade of environmental sensitivity through the protection of site-specific conditions such as biotope preservation, overland flow management and microclimate.”

    Construction complexities

    Once construction began, Griffin said the complexity of the project became clear. “The remoteness of the 11 sites represented a lot of obstacles,” he said. “One of the major challenges was to ensure a consistent quality was achieved across several sites under construction concurrently.”

    Collaborating closely with their contractor and Parks Victoria, which backed the project, Griffin and his team made regular visits to the Gariwerd sites throughout the construction process, which used a modular approach that allowed for the prefabrication of all of the elements, which could then be transported via airlift or vehicle to their designated sites.

    Several sites were constructed concurrently as part of a prototyping process whose lessons would be applied to the next batch of sites—a unique method that allowed the team to meet their timing and budgetary goals. When lockdowns made in-person site visits challenging, the team figured out how to do virtual inspections from afar, so construction could stay on track.


    Photo: Adam Gibson.

    Now that the project is open to the public, Griffin and Noxon say the response has been enthusiastic. “The feedback that the project team have received on the project has been largely positive,” Griffin said. The campsites provide a great level of amenity for hikers without inhibiting the sense of nature. The campsite interventions are true to the brief of being subservient to the natural landscape; they simply add a layer of comfort to those seeking to immerse themselves in the magical Gariwerd landscape.

    Noxon added that he hopes the structures will enhance hikers’ appreciation for the beauty of the region. “The campsites are designed to support the hiker experience of Gariwerd; to become part of the landscape; to promote connection and understanding of Gariwerd,” he said. “The architectural response fosters a slow, gentle and quiet interaction, an elemental experience of place.”

    How Modern Fire Protection Is Revolutionizing Fire Safety with Bluebeam

    This story was originally published by on the Bluebeam Blog.

    By combining Bluebeam’s digital tools with a commitment to Indigenous partnerships, Modern Fire Protection is setting new industry standards

    Australia-based Modern Fire Protection is a family owned and operated fire protection company that has been providing high quality services since 2015. Delivering comprehensive, cost-effective fire protection solutions, Modern Fire Protection works alongside its partners from concept design and supply to installation and ongoing service and maintenance for any size project.

    Recognized as a Certified Supplier for Supply Nation, Modern Fire Protection has developed a range of partnerships with other Indigenous-controlled organizations and is focused on developing a culturally safe and capable environment.

    “We are continually striving to increase our Indigenous workforce and the employment of women undertaking apprenticeships,” said Bill Hockley, the company’s managing director.

    With extensive experience across diverse requirements such as high-rise residential buildings, shopping centers, major commercial buildings, mine sites and complex special hazard installations, Modern Fire has a broad footprint across southeast Queensland. Robina Shopping Centre, Sunshine Coast Plaza, Brisbane Airport, Logan Hospital and Brisbane Racing Club are among the sites its expert service has helped protect.

    A trusted solution

    Trust is central in a business where its stock and trade is building safety.

    Modern Fire ensures its trusted reputation is backed by accreditations and industry certifications, and that its workers are all suitably qualified in their roles.

    Alongside its strong team presence, the organization is firmly focused on implementing tools that enhance its reputation through increased transparency, accuracy and productivity, including Bluebeam.

    Crossing the digital divide

    Modern Fire first deployed Bluebeam tools in early 2023. “Before Bluebeam we printed everything out and used highlighters,” Hockley said. “It meant that after the bid was developed, the project manager didn’t have easy access to all the information he needed.”

    Deploying Bluebeam not only built time and accuracy improvements into the bidding process, but it also meant digital information was accessible when projects came to life.

    “Bluebeam has revolutionised how we operate; it is one of our foundational tools,” Hockley said. “Through using its tools we minimise redundancy, boost accuracy and expedite critical tasks—all of which cultivate trust with our customers.”

    Designing success through Bluebeam

    Construction Manager Dan Sawyer implements Bluebeam from the inception of the design process.

    “I use if for everything I touch—I live in it,” he said. “When competing for tenders I am able to save the detailed drawings and all detail that underpins our bid development. We then use this detail to inform and develop an accurate project plan when we win the contract.”

    Bluebeam offers a plug-in for Revit that enhances the design process by integrating 3D components with 2D drafting annotations. This tool facilitates coordination with design teams and streamlines the development of design solutions.

    Managing multiple and diverse priorities with ease

    Project Manager Josh Hall considers real-time collaboration as key to his successful delivery of multiple and concurrent priorities. “The simple fact is that Bluebeam does exactly what I need it to do—it makes my job easier to do and do well,” he said. “It should be a non-negotiable tool across all organizations in the construction industry.

    The key tasks Hall deploys Bluebeam for include:

    – To communicate clearly using AEC-specific tools to mark up contracts, drawings, photos and documents.

    – To complete drawing overlays and dimension planning up to scale.

    – To review detailed planning and information and confirm project delivery requirements.

    A long-term Bluebeam user, Hall joined Modern Fire on the condition that the product was a key tool he could access. “I’ve been using it for five years across various roles and it underpins my success in delivering optimized outcomes in project delivery,” he said.

    Modern Fire Project Administrator Hanna Greaves first began harnessing the capability of Bluebeam and its tools six months ago.

    “I do all of the quantity takeoffs for tender submissions—it’s a critical tool to ensure accuracy,” she said. “It is relatively straightforward to use and quite intuitive—it was easy to self-teach and to build my skills in unlocking the Bluebeam tools as I go. Before this everything was printed out and counted out using a highlighter. Time saving and accuracy has been a great outcome for me—in particular thanks to the search tool capability and categorization tools.”

    Looking toward the future

    “Tools such as Bluebeam mean we are better able to position Modern Fire Protection as a trusted and permanent force in the industry,” Sawyer said. “It provides the opportunity to embed better systems and processes and reinforce the foundation of our business as we head into the longer term.”

    Bluebeam is a tool that is deployed prolifically among Modern Fire’s project partners.

    “When working across projects such as staged medical or shopping center precincts with multiple partners, we are all able to talk to a common language, so to speak,” Sawyer said. “These tools enable real-time agility and responsiveness—enhancing our professionalism and elevating our position in the industry. It underpins our value and supports our future growth.”

    OpenBIM: Bridging the Gap Between Design and Operations in Canada

    OpenBIM was a key topic at the Building Transformations conference, with Claudia from buildingSMART Canada leading a panel discussion with industry leaders from HOK, EllisDon, and Turner Fleischer. The consensus among the design community is that openBIM, particularly the use of Industry Foundation Classes (IFC), should be more predominant in North America. However, this vision is at odds with the demands of many building owners, who prefer deliverables in more commonly used formats such as Revit, AutoCAD, MicroStation, and PDFs.

    Construction drawing board with house

    The OpenBIM Challenge

    • Design vs. Operations: While architects and engineers are advocating for openBIM, operations teams, who are focused on the lifecycle of a building, prefer simple and popular formats. This disconnect between design and operations is one of the main barriers to the widespread adoption of openBIM.
    • Owner Preferences: Building owners often prioritize practicality over innovation. They prefer deliverables that are easy to use and integrate with existing systems, which often means sticking with industry standards like Revit and AutoCAD.
    • The Push for Change: Despite these challenges, there is a growing movement within the design community to change owner perspectives and highlight the long-term benefits of openBIM, including improved collaboration, data exchange, and project outcomes.

    What Does the Future Hold for openBIM in Canada?

    The path to openBIM adoption in Canada is a complex one, requiring a shift in mindset from both the design and operations sides of the industry. While the transition may be slow, the potential benefits make it a worthwhile endeavor.

    Sources:

    How DarkSky Standards Combat Light Pollution and Protect the Night Sky

    This story was originally published by on the Bluebeam Blog.

    DarkSky International, an education, advocacy and conservation organization protecting the night sky, approves new luminary standards, lighting programs and policy language

    At one time, nightfall plunged our ancestors into darkness and let them marvel at celestial objects in an inky sky. But in recent times, our ability to alter natural light levels has advanced to the point that stars, planets and galaxies are fading from view. Of the 2,500 stars that should be visible, the typical American suburbanite can see only a few hundred.

    Instead of starlight, the night is filled with streetlights, spotlights, stadium lights, neon signs, billboards and parking lot towers—all contributing to light pollution, defined by National Geographic as the excessive or inappropriate use of outdoor light. Light pollution damages human health, alters wildlife behavior and wastes energy and money as light blazes when and where it’s not needed. The result is glare that blinds drivers, light trespass that disturbs sleep, eerie orange skyglow over metro areas and confusing and garish groupings reminiscent of Times Square.

    Until light is policed in the same way as air, water and land pollution, it falls to architects, engineers and designers to select lighting systems that perform their function while still preserving the night sky—with the help of manufacturers whose fixtures meet the specs for responsible lighting and governments that support policies to protect darkness.

    “I think people are understanding the urgency of lighting design, because it’s become more and more difficult to see a clear night sky from anywhere,” said James Brigagliano, lighting program manager at DarkSky International.

    The harmful effects of too much light

    Light where it doesn’t belong disrupts the night and day rhythm encoded in the DNA of all animals and plants. That impacts behaviors from feeding and sleep to reproducing and evading predators.

    Human circadian rhythms are attuned to outdoor light during the day and darkness at night. Breaking that cycle with artificial light increases the risk for obesity, depression, sleep disorders, diabetes and other diseases, according to research reported in Environmental Health Perspectives.

    For wildlife, prey use darkness as cover and predators use light to hunt, so illumination dramatically alters the environment and the odds. For instance, newborn sea turtles need to turn toward the ocean and safety after hatching on the beach, but often they’re confounded by light on shore. Birds that migrate or hunt at night are lured by brightly lit cities and veer from their flight patterns. And after dark, the insects that birds depend on are drawn to burning bulbs and their deadly heat.

    Worse still, lights are often pointless, adding economic waste to ecosystem harm. DarkSky International estimates that at least 30% of all outdoor lighting in the United States serves no purpose and is emitted by lights that don’t have shields to prevent spillage. Wasting light costs $33 billion each year and uses about 120 terawatt-hours of energy—enough to meet New York City’s electricity needs for two years. Quality outdoor lighting could cut energy use by 60% to 70%, saving billions of dollars and reducing carbon emissions. But that depends on lighting responsibly.

    Five principles for responsible outdoor lighting

    DarkSky and the Illuminating Engineering Society jointly published the Five Principles for Responsible Outdoor Lighting to prevent and reduce light pollution. Designing new projects or retrofits using the principles can create beautiful, functional, healthy lighting that minimizes harmful effects and saves energy and money.

    1. Useful: If it’s not serving a function, you shouldn’t have it.

    Identify the purpose of lighting and its impact on everything in the vicinity, including wildlife and habitats.

    • Targeted: Aim light so it falls only where it’s needed.

    Direct and shield light beams so they point down and don’t spill outside the area being lit.

    • Low level: Light should be no brighter than necessary.

    Use only the light required and make sure nearby surfaces don’t reflect light and create excess.

    • Controlled: Use light only when it’s needed.

    Install motion detectors, dimmers and timers to allow only the minimum light needed available at any time.

    • Warm-colored: Use warmer-color lights where possible.

    Cut back on shorter wavelength light (blue-violet) to the least amount needed.

    New standards, programs and policies to bring back the night

    The DarkSky Approved program provides objective, third-party certification for lighting design,  products and installed projects that reduce light pollution. Designers can search products by manufacturer, use, retailer, light temperature and residential use. Project standards fulfill requirements for Leadership in Energy and Environmental Design (LEED) certification as well, but requirements continually evolve based on new information.

    “We’re cutting down on what we allow for high-angle lighting—from 90 to 80 degrees,” Brigagliano said. “So now we’re allowing only 1% of the total light output of a fixture to be between 80 and 180 degrees. There’s no benefit to light between 80 to 90 degrees and the new cutoff will help reduce uplight and sky glow.”

    DarkSky Approved programs now include pedestrian lighting as well as sea turtles, sports venues and lodging. The new program addresses glare from light fixtures used in areas like campuses where people need lower-level lighting for safety at night.

    “We also have wildlife-tuned luminaries, with subcategories like sea turtles,” Brigagliano said. “That’s needed because different species have different sensitivities to wavelengths. However, if we control brightness and shield the light source, we’ve taken care of much of the issue and the color of light is less important.”

    In addition, DarkSky recently released an updated and simplified model policy that was written to make it easy for states and municipalities to adopt. “Just a little bit of improvement is better than none,” Brigagliano noted.

    Every place a dark sky place

    The International Dark Sky Places program certifies areas worldwide that preserve and protect darkness through responsible lighting policies and public education. Not all are remote parks and sanctuaries—a neighborhood or city can earn recognition as a Dark Sky Community or Urban Night Sky Place if residents are committed to a healthful and beautiful night.

    “Anywhere where there’s a DarkSky-approved place, there’s been a fair amount of dark sky conceptual lighting design,” Brigagliano said. That work may soon be required as part of state or local regulations. At least 19 states and a number of municipalities have laws in place to reduce light pollution.

    To be ready, architects, engineers and designers must recognize that light can be a pollutant—and balance providing light with protecting the dark.

    Hero image courtesy Mark Eichenberger

    Building Castles in the Air: Can Top-Down Construction Go Mainstream?

    This story was originally published by on the Bluebeam Blog.

    One construction firm thinks so—and has a proof-of-concept project to prove it

    The way we construct buildings in the United States hasn’t changed much in decades. But with the confluence of high materials prices, a skilled labor shortage, high mortgage rates and sustainability challenges, the construction industry has a need for change.

    In short, there’s “an importance of trying to figure out new ways of doing things,” said Joe Benvenuto, chief operating officer for contractor LIFTbuild. The Southfield, Michigan-based company is finding success with an unconventional construction process: building from the top down, with a patented method that LIFTbuild refers to as “vertical manufacturing.”

    Elevated idea

    To be sure, top-down construction—where the top floor is built first and the process works its way down—isn’t totally new. Architect David Termohlen is credited with having invented the concept and further developing it in the 1970s with Charles H. Thornton, founder of Thornton Tomasetti structural engineering firm. A few buildings such as the Russian Diplomatic Compound in Riverdale, New York City, were built in the early 1970s. But then the idea—and the patent—languished, with some exceptions.

    In 2017, Detroit-based Barton Malow, a now-100-year-old construction company, made an investment in the top-down approach to construction, “which fueled the effort to innovate the concept of building a building starting at the top and working downward,” Benvenuto said.

    The company established LIFTbuild to meet its goal of doubling construction efficiency, and it spent about three years in research and development to improve the concept, the way the building is designed and constructed, the way the floor plates are connected and the way they’re lifted.

    “In some cases, we sent the engineering methods through destructive testing to validate the process. What LIFTbuild is trying to do elevates the process to create a safer and less expensive way to build commercial buildings,” Benvenuto said. “These R&D efforts have resulted in more than 15 US patents, which protect LIFTbuild’s unique technological and delivery means and methods.”

    Benvenuto added, “by 2020, LIFTbuild had significantly improved system safety with innovative means, methods and technologies centered on the superstructure, façade, assembly pad and lifting. Improved safety, increased efficiency and higher quality all lead to a better and more sustainable product for our end user.”

    The Exchange

    Built on a small, tight, triangular site surrounded by streets, businesses and the elevated light rail system known as People Mover, the 16-story high-rise called the Exchange in Detroit is LIFTbuild’s first proof of concept. It comprises 153 residential rental units, 12 condominiums, ground-level office space and approximately 6,000 square feet of commercial space.

    The structural steel and concrete building took extensive planning, with much of the engineering done in a 3D model and a virtual environment. LIFTbuild then created a kind of manufacturing environment on the site. “Picture more of an assembly line in which a vehicle gets created. It’s very rapid. All the critical parts and pieces come into the process at just the right time,” Benvenuto said.

    The build works this way:

    Builders start on site by completing the foundation and underground work consistent with a conventional building. They then begin erecting concrete and steel “spines.” The spines are structural elements and could include stairwells, bathrooms, kitchens—anything, really, depending on the design, according to Benvenuto.

    Next, they begin placing the concrete assembly pad, what LIFTbuild refers to as the factory floor. The assembly pad is located exactly where the building footprint is. A building’s design and geometry determine the number of spines needed. The Exchange has two, each of which encase elevators, stairs, storage and mechanical rooms.

    Strand jacks, linear winches that pull heavy loads from above, are staged at the top of the spines. The floor plates are then built around the spines, about three feet off the ground with metal decking and concrete. The jacks lift the floor plates just above the builders’ heads to install the underdeck mechanicals—no need for scaffolding or ladders.

    The façade and rough mechanical, electrical and plumbing go in before the floor plate is lifted. After the floor is locked into place, interior fit out begins, which includes interior walls and ceilings. Once the façade and fire protection are installed, the floor plate is lifted by the strand jack into place. Each floor in the Exchange weighs about 1 million pounds, and during placement rose about 30 feet an hour. The highest lift on the Exchange was about 200 feet.

    “Placement is a cantilevered approach where we structurally connect that floor plate to the spine,” Benvenuto said. “From there the floor plate is able to provide structural stability out all the way to the exterior of the building without columns.” Every floor plate is individually supported.

    Lift and learn

    The foremost reason to use this method is safety, Benvenuto said. According to the Bureau of Labor Statistics, in 2022 the construction industry accounted for 1,092 deaths by falling, slipping or tripping—47.4% of all workplace fatal falls, slips and trips. “We eliminate the hazards when we install the façade at ground level. Fall protection is naturally built into it,” Benvenuto said.

    Benvenuto cites increased productivity as the next major benefit, pointing to the difficulty of finding available, qualified tradespeople, rising construction costs and material pricing. “Projects have a hard time meeting financial feasibility at times,” he said. With LIFTbuild, because assemblies are done on site, often using prefabricated products and with little need for large cranes, there are fewer people needed for a build.

    The method also saves time. Although builders could customize individual floors, each floor is basically a repeat of the one above. There’s more of a manufacturing process—which also can instill better quality, said Mark Tamaro, managing director of Thornton Tomasetti, who consulted on the Exchange.

    Tamaro also points out that these projects can be more sustainable. Because the floor system uses steel frames, it requires less material than concrete construction. “There’s a significantly lower amount of embodied carbon than in a typical concrete product,” he said. Additionally, Tamaro said that as they learn more, there may be ways to incorporate mass timber or other materials.

    Ultimately, LIFTbuild can be less expensive when compared to conventional building. Benvenuto said that using LIFTbuild, the company aims to provide savings of 10% to 20% on cost and 20% to 30% in schedule savings.

    Nothing is without its challenges, however. There’s a certain level of education—for municipalities, lenders, insurance companies, builders and tradespeople—that must happen. Benvenuto said the company went through some “pretty intensive education sessions to make sure they truly understand what’s happening and address any concerns or what they would perceive as a risk.”

    Tradespeople and others working onsite had safety training and “education around optimizing their time on site to make sure they were the most productive,” Benvenuto said. “But realistically, the work conditions are better and easier than you would see on a conventional project,” he added.

    The education piece helped with permit applications and inspections. “Some of the preliminary inspections can happen at grade level, so it’s advantageous for them,” Benvenuto said.

    LIFTbuild also collaborated closely with MIOSHA to adhere to all safety standards. The strand jack system is safe, able to take four to five times the amount of capacity needed to lift the floor plates.

    Not just a novelty

    Top-down construction can work beyond commercial building. There’s need for more housing, and the LIFTbuild method is “well-suited for residential construction,” Tamaro said. The method could be a game changer for the industry.

    “This is something that can truly transform the way we build buildings,” Benvenuto said. “About 10 years ago, Barton Malow set the goal of doubling our efficiency by our 100th anniversary [in 2024]. The investment into LIFTbuild is a significant effort to accomplish that.”

    While the Exchange is LIFTbuild’s first completed building, Benvenuto said they have a handful of opportunities coming. “With the Exchange, we’ve been able to validate the technology. Now our focus is to commercialize LIFTbuild on a broader scale throughout North America.”

    Top-down in action: A different take

    In 2014, Thornton Tomasetti used the “traditional” top-down build method to build the Marriott Marquis in Washington, D.C., said Tamaro, who was the project’s engineer of record. “We constructed the building both upward from the ground level and downward simultaneously.”

    Builders drill into the site and install shafts, called piers or plunge columns, Tamaro said. In the case of the Marriott these were dug down about 130 feet to get below the lowest basement level. The piers stop at the floor level of the first floor. The build continues upward in the traditional way with concrete columns.

    At the same time workers are building up, others are excavating below, around the piers. “If you do it right, you can top out the building before you get to the bottom of the basement,” Tamaro said.

    Why do it this way? “In the case of the Marriott job, there were two fundamental reasons,” Tamaro said. “One is speed of construction.” In a conventional build you’d dig all the way to the bottom and then come back out. With this top-down method, you effectively start in the middle and work down and up at the same time. There’s no wait time.

    The other reason to choose this method is that this particular site was constrained with both a high water table and the need to go extremely deep as there were multiple basement levels. “This method of construction allowed us to build deeper and avoid having to address the groundwater,” Tamaro said. “Doing things this way made an otherwise very challenging project feasible.”

    Working with the Bluebeam Tool Chest: A Guide for Electricians

    This story was originally published by  on the Bluebeam Blog.

    Discover how the Bluebeam Tool Chest can revolutionize your workflow as an electrician by providing a streamlined, efficient way to manage and reuse your most frequently used markups, ensuring precision and productivity in all your projects.

    As an electrician, your work demands precision and efficiency, especially when marking up electrical plans and blueprints. The Tool Chest in Bluebeam Revu can be your best ally, helping you streamline your markup process. This guide will show you how to leverage this powerful tool to enhance your productivity and accuracy.

    Understanding the Tool Chest

    The Tool Chest is designed to store and organize your frequently used markups, making them easily accessible whenever you need them. It automatically remembers your recent markups and can reapply them with their original properties or scale them to fit different drawings. This feature is especially useful for electricians, as it ensures that your tools are always at the right scale, saving you from the hassle of recreating them for each new project. And with the latest release of Revu 21.2, Tool Chest is even better, as users can now use search to quickly find and use markups based on Subject, Comment and Label search parameters (See more of what’s new in the latest release here).​

    Saving Markups to the Tool Chest

    Saving a markup from a PDF to the Tool Chest is straightforward. Right-click the markup, go to “Add to Tool Chest,” and select the desired tool set. This way, your electrical symbols and notes are always ready for reuse.

    Placing Markups on a PDF

    When you need to place a markup on a PDF, select the tool from the Tool Chest and click on the document. This quick and easy access ensures that you can efficiently mark up your electrical plans.

    Managing Tools within Tool Sets

    Organizing your tools is crucial for maintaining efficiency. To copy a tool from one set to another, simply drag its icon. You can also reorder tools by dragging them to your desired location. Deleting a saved tool is easy:

    – Click the tool and hit the delete icon on the toolbar.

    – Select the tool and press the DELETE key.

    – Right-click the tool icon and choose “Delete.”

    If you need a duplicate tool or want to change its color, right-click the tool icon and select “Duplicate” or “Change Colors” to customize your toolkit.

    Reusing Recent Tools

    The Recent Tools set automatically records markups as they are added to your PDF. To reuse a tool, click its icon and place the markup on your document. This feature is particularly handy for repetitive tasks, such as marking circuit paths or labeling outlets.

    When the number of saved tools exceeds the display capacity, an arrow appears on the right. Clicking this arrow reveals all your recent tools. You can configure the maximum number of tools stored in Recent Tools by clicking the properties gear and adjusting the “Maximum Recents” setting.

    If you need to clear your recent tools before closing Bluebeam Revu, click the properties gear and select “Clear Recents.”

    Permanently Saving a Tool to be Reused

    To ensure a tool remains available after Revu is closed, you have a couple of options:

    – Drag the tool’s icon from Recent Tools into another tool set.

    – Right-click the tool icon in Recent Tools and select “Add Item to My Tools,” which saves it to the My Tools tool set. Use the drag-and-drop method to save it to a different set if needed.

    To save a markup on the document as a reusable tool, right-click the markup, go to “Add to Tool Chest,” and select the desired tool set.

    Special Properties of the My Tools Tool Set

    The My Tools tool set is a customizable collection of frequently used tools, offering easy access and special properties. Tools in this set are assigned numeric hot keys for quick access, shown in the upper right corner of the icon. Changing a tool’s position in the set automatically updates its hot key.

    The My Tools set is a permanent feature in Revu, available in all profiles by default. While it can be hidden, it cannot be completely removed. Tools in this set can toggle between Properties Mode and Drawing Mode for versatile use.

    Properties Mode vs. Drawing Mode

    Tools in My Tools, Recent Tools, and custom tool sets can operate in two modes: Drawing Mode and Properties Mode.

    – Properties Mode: Adds a new markup with the same appearance properties as the saved markup, retaining properties like color and border, but not exact dimensions or text.

    – Drawing Mode: Adds an exact duplicate of the saved markup, perfect for repetitive tasks where precision is key.

    Switching modes is easy—double-click the tool or use the Toggle Mode icon on the Tool Chest toolbar. This flexibility allows you to choose the best mode for your needs.

    Pinning, Scaling Tool Sets

    For quick access, you can pin a tool set to any toolbar. Click the properties gear next to the section name, go to “Pin,” and select the specific toolbar.

    Tool sets can also scale automatically when placed in a calibrated drawing, thanks to Revu’s Dynamic Tool Set Scaler. This feature is particularly useful for electricians, as it ensures your markups, like conduit paths or switch locations, are accurately scaled.

    Generating a Markups Legend

    Creating a Markups Legend based on a tool set is a powerful feature, enabling you to keep track of all your tools and their uses. Refer to the Markups Legend section in Revu for detailed instructions.

    The Tool Chest in Bluebeam Revu is a game-changer for electricians and other construction workers looking to enhance their productivity. By efficiently organizing, saving and scaling your tools, workers can focus more on the critical aspects of their job and less on repetitive tasks. Explore these features to make the most of the document markup experience, ensuring electrical plans are always clear, precise and professional.

    Artificial Intelligence in Architecture: The World Beyond Visual Generative Models

    This story was originally published by  on the Bluebeam Blog.

    Today’s AI applications offer far more than phantasmal images of structures that will never exist. But concerns continue over intellectual property, dataset quality and the changing definition of creativity (from 2023).

    In 2022, the visual generative artificial intelligence (AI) tools Midjourney and DALL-E hit the scene, both letting creators input text prompts to bring wild conjurings to life as realistic renderings. According to Stanislas Chaillou, author of “Artificial Intelligence and Architecture,” AI is the latest major development in architectural technology. Although it’s easy to get swept up in the glitzy generative side, designers are finding many more ways that AI can expand creativity while saving time, money and brainpower for more rewarding tasks.

    In London, for example, the Applied Research and Development Group (ARD) at Foster + Partners began applying AI and its offshoot machine learning (ML) in 2017. The group used it for models ranging from design-assist, surrogates, knowledge dissemination, business insight—and, yes, its own take on diffusion models that generates images from natural language. Los Angeles-based Verse Design tapped AI to meet aesthetic and performance criteria for a structure that recently won a 2023 A&D Museum Design Award.

    But implementing AI doesn’t come without obstacles—including questions about protecting intellectual property (IP), training with appropriate datasets and defining creativity when it seems to lie with the designer of the AI script.

    Depending on vantage point and sun angle, the AI-generated louver shadowing changes the appearance of the Thirty75 Tech Building in Silicon Valley. The result is a façade that uses only one color of paint but shimmers.

    AI design assistance arrives

    One ARD Group study involved laminates that self-deform when subject to temperature, light or humidity. The materials would enable a façade that responds differently depending on conditions to provide shading, prevent overheating or increase privacy. But to simulate the laminates’ nonlinear and unpredictable response, the group turned to ML.

    “We used ML to predict how a passively actuated material would react to variable temperature changes,” said Martha Tsigkari, senior partner. “With the help of our bespoke distributed computing and optimization system, Hydra, we ran thousands of simulations to understand how thermoactivated laminates behave under varied heat conditions. We then used that data to train a deep neural network to tell us what the laminate layering should be, given a particular deformation that we required.”

    Predicting material deformation was just one application. To help automate mundane tasks and turbo-power productivity, the ARD Group is working on many more ideas around AI-powered design assist tools.

    Samples of different layering patterns display their deformations when exposed to direct heat. A still taken from a custom, interactive design assistant application, into which the trained neural network for designing laminates is embedded. Credit: Foster + Partners

    Verse Design faced similar performance constraints when designing the façade of Thirty75 Tech. The designers needed to find the optimal pattern of louvers to mitigate heat gain and meet California’s Title 24 energy efficiency standards.

    “The final geometries were generated parametrically with real-time simulation data,” Tang explained. “The geometries were fed back to the energy model to find and confirm the most energy-efficient combination of louver variations that met the intent of the visual expression and performance objectives.”

    Extraordinary content delivered faster

    Foster + Partners has also used surrogate models to replace slow analytical processes—and keep costs in check—when exploring the impact of changing design variables. These ML models train on huge datasets to deliver a prediction that is sufficiently exact and, most critically, available in real time. In early design stages, the surrogate model lets designers balance accuracy with the ability to make sound decisions sooner.

    Foster + Partners’ in-house application programming interface (API) lets clients connect from digital content creation tools. With these plug-ins, users can run predictions directly. The interface also lets designers deploy diffusion models like Midjourney to stir imaginings.

    “The capability of these transformers-based models to describe images, understand their context and make suggestions based on it has moved the discussion from image manipulation to natural language processing for content creation,” Tsigkari said.

    Intellectual property creates a conundrum

    Some creators express concern about losing control of intellectual property when feeding their own assets into AI apps. For instance, class-action lawsuits against software providers contest use of copyrighted images to train systems. Tsigkari stressed the need to understand security and IP considerations and read terms and conditions before using any software. But the challenges go beyond IP.

    “It is not only the fuzzy boundaries around IP that are argued,” she said. “The lack of robust legal frameworks to deal with AI and ringfence how data may be used are going to challenge how these technologies are implemented.”

    Tang doesn’t have the same concerns about IP. “As Voltaire said, ‘Originality is nothing but judicious imitation,’” he commented. “The idea is not to mindlessly copy but to critically apply the technology as a tool with generative capabilities. It requires that human intellectual and critical content to tease out the real meaning to us as designers and therefore become something slightly different.”

    Input determines outcome

    Given the dependence of AI output on the data that are input for training, another consideration for Tsigkari is the quality of AEC datasets. “There is one universal truth behind AI: data is king,” she said. “If we want to use and control these technologies to the best of our ability, we need to learn to control the data that drives them first.”

    She noted the need for consistent tagged building datasets that are “contextualized, socially appropriate, structurally viable, sustainability sensitive and code complying. Our first challenge is to collect, organize and process our data across disciplines in a meaningful manner so that we can leverage it. Deploying in-house trained—rather than pre-trained—models is also a very robust way of ensuring the quality of your results,” she added.

    Creativity balances AI and CHI

    As AI becomes more embedded in the work of architecture, how does the definition of creativity change? Tang evoked the “Star Trek” character Data when discussing the imperative of human agency to refine the outcomes AI generates. “Data is an artificial intelligent being constantly looking for the human side of himself,” Tang explained. “I don’t think AI can ever supersede or replace human intelligence, particularly CHI.”

    Tsigkari noted that humans have the upper hand on several qualities that enable creativity—including aesthetics, emotion, collaboration, communication and responsibility. “We should be focusing on how AI can become a creative assistant that is augmenting, rather than replacing, creativity—and the values we bring to the table are driving the changes we want to see.”

    How to Use Colors to Enhance Drawings in Bluebeam

    This story was originally published by on the Bluebeam Blog.

    Several features allow users to use color to make plan documents more efficient to work with

    Bluebeam offers a lot of ways to modify the colors of various objects. The markup and text colors are the simplest to modify. But what escapes many users are the advanced color manipulation features available for images of all kinds.

    Snapshots

    As an engineer, I often must overlay two images over one another to compare them. Whether it’s structural drawings over architectural drawings, or new over existing, or revisions over original scope, you’re sure to benefit from overlays. I’ve watched senior engineers print documents to scale and then use transparent paper to painstakingly sketch out objects of interest that they then awkwardly try to transfer to the other paper.

    Bluebeam simplifies this process and provides high-fidelity options for overlays. First, you need a snapshot to modify. Use the “g” hotkey to take a snapshot of a PDF document that you want to use as the overlay image. Then use “ctrl + v” to paste it on the other image. You can drag the snapshot around to align it exactly where it needs to go.

    As every engineer knows, this can be much harder than it sounds, especially if both images are the same color or if the snapshot turned out opaque. You can click the snapshot and adjust the opacity so you can more easily see what’s behind it. If it has a white background, you can click the snapshot and click the “Change Colors…” button (or right click the snapshot and select “Change Colors…” from the drop-down menu) and then change white to transparent (the box with the red slash through it). This is through the “Modify Colors” Process Type—see image below.

    Changing black to red, removing white from an image

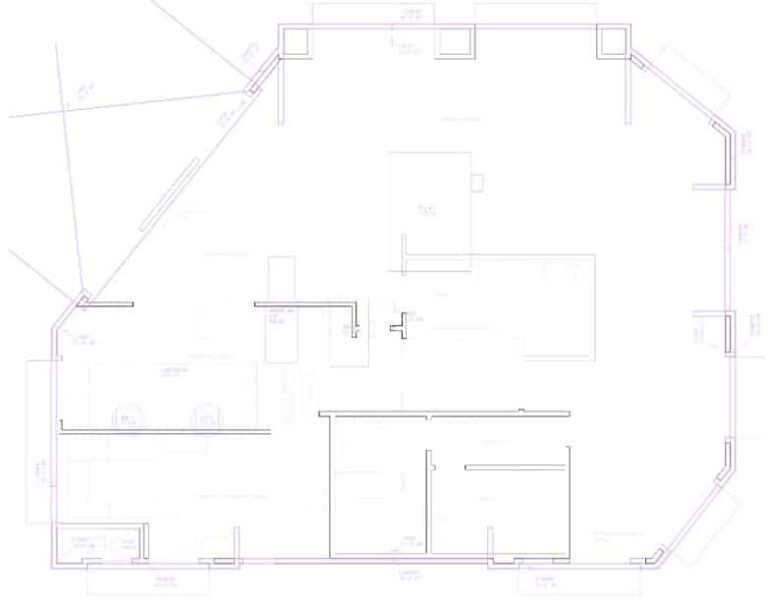
    My personal favorite way to do snapshot overlays is to use the “Colorize” option and change the overlay image to light purple and 70% opacity. The image below shows an example of overlaying mechanical drawings onto the structural backgrounds to locate the mechanical units.

    Sometimes I need more than two things overlaid and I can use different colors for each image to keep it all organized in my mind and on the screen. You can place markups on the screen and trace things as needed and then delete the overlay when you’re done.

    Purple mechanical overlay on structural background

    Photos, Scans

    Right click a photo file, select “Open with,” and then select Bluebeam. Similarly to the snapshot section, you can click the “Document” menu in the toolbar and then select “Color Processing…” to access the same color modification features except that they apply to the document itself (not just markups or snapshot objects). Sometimes I will set a photo from a site visit to grayscale and lighten it up and then markup solutions on top of it for a contractor. Watermarks or similar can also be added to documents in this way. It’s a nice touch to flatten it once it’s in position.

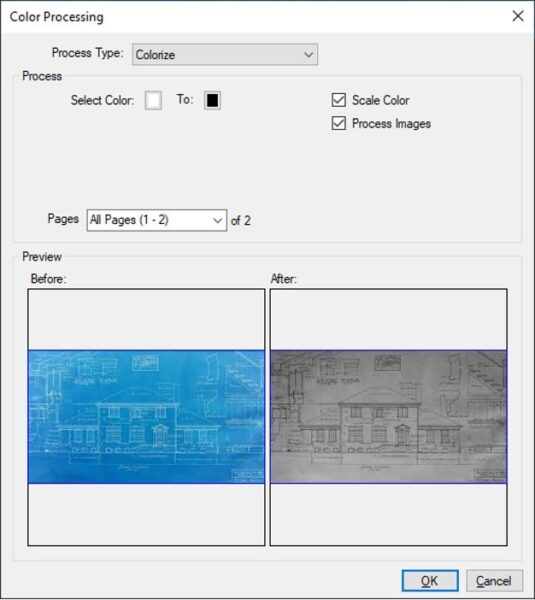
    Another incredibly useful way to use this feature is to make scanned documents (including as-builts) more legible. Look at the difference in legibility between the original blueprint image (left) and the colorized white-to-black version (right). The left image has literally had an acid trip in a basin to create that eyesore, and the right image looks clean.

    Once you have the colors the way you want them, you can also use the “Mask Images” Process Type to then hide the gray artifacts that are residual from the smearing and scanning. What you’re left with is a fresh and clean-looking black-and-white image without all the noise. Then to complete the ouroboros, you can snapshot the image and then adjust its color and opacity as a snapshot overlay.

    Colorizing as-built blueprints

    Color Magic

    There are straightforward color modification features available for standard markups, but Bluebeam isn’t constrained to modifying these objects; it can also modify snapshots, photos and scans in robust ways. Creating overlays is a staple for an engineering office. Fixing up a dark photo or grainy scan is something we can all relate to. I use these features multiple times a day to stay efficient, and you are certain to find relevant applications in your work and daily life, too.

    Bluebeam Compare Documents vs. Overlay Pages

    This story was originally published by on the Bluebeam Blog.

    Discover how Compare Documents and Overlay Pages by Bluebeam transforms managing documents with precision and visual clarity.

    In the world of digital document management in the architectural, engineering and construction (AEC) industry, precision and efficiency are paramount. Professionals across the industry rely on tools that streamline their workflows and enhance collaboration.

    Bluebeam offers two powerful features—Compare Documents and Overlay Pages—each designed to serve specific purposes. In this article, we’ll delve into the intricacies of these tools to help users make informed decisions on which to use, and when.

    Compare Documents: A Closer Look

    Bluebeam’s Compare Documents feature is a robust tool designed to highlight the differences between two versions of a document. This can be especially invaluable in scenarios where document revisions are frequent.

    When a user initiates the Compare Documents function, Bluebeam Revu meticulously analyzes the content of the selected documents and generates a comprehensive report highlighting any discrepancies. This includes additions, deletions and modifications made between the two versions. The software employs a color-coded system, making it easy for users to identify changes at a glance. Typically, additions are highlighted in green, deletions in red and modifications in blue; for Compare Documents, cloud markups are added around the differences.

    The utility of Compare Documents extends beyond textual content. It can also identify changes in graphical elements, providing a holistic overview of alterations in the document. This feature not only accelerates the review process but also minimizes the risk of oversight.

    Overlay Pages: Unveiling the Integration

    Overlay Pages is another powerful feature within Bluebeam’s arsenal, designed to facilitate precise document comparisons and analysis. Unlike Compare Documents, Overlay Pages allows users to superimpose two versions of a document on top of each other, providing a visual representation of their differences.

    This feature is particularly beneficial when dealing with architectural plans or any document where graphical elements are of utmost importance. By overlaying the pages, users can visually assess discrepancies in the placement of elements, ensuring that the design conforms to specifications. This method of visual inspection can be more intuitive for certain types of documents, providing a complementary approach to the text-centric Compare Documents feature.

    Integration for Comprehensive Analysis

    While Compare Documents and Overlay Pages serve distinct purposes, their integration can offer a comprehensive solution for users seeking an exhaustive analysis of document revisions.

    By first employing Compare Documents to identify textual changes, users can then turn to Overlay Pages to visually inspect the graphical alterations. This combined approach ensures a thorough examination of both textual and visual elements, leaving no room for oversight. The seamless integration of these features in Bluebeam empowers users to achieve meticulous precision in their document review processes.

    Auto Align Makes Compare Documents and Overlay Pages Even Better

    Released in April 2024, Revu 21.1 gives Compare Documents and Overlay Pages an overhaul. Not only has the user interface been greatly improved for easier navigation and previews of the results, but Bluebeam has also added AI. Auto Align is an AI-enabled capability allowing for documents and pages to align automatically.

    Auto Align reduces the tedious, error-prone steps of manually aligning three points on each drawing revision, so users can understand the differences between them faster. Bluebeam customers currently use the Overlay and Compare features more than 5 million times a year. With the Auto Align option, users can now understand the differences in their documents and pages up to 80% faster.

    6 Bluebeam Features Perfect for Steel Professionals

    This story was originally published by on the Bluebeam Blog.

    Bluebeam has many capabilities that are ideal for the steel industry to get bids done faster and more efficiently.

    Steel is an essential building material. The people who work to procure and supply steel for construction projects spend a lot of time in the pre-construction phase tabulating the amount of the material the project will require based off plan documents, along with the estimated cost.

    Historically, steel professionals were left to do this work the old-fashioned way—off paper plans, with highlighters, pen and a host of other analog tools to calculate a project’s needed supply and estimated costs. Thanks to the advent of digital tools, that is no longer the case.

    Tools like Bluebeam now allow steel professionals the opportunity to reduce the time it takes to complete project bids with analog workflows from weeks down to a matter of days, giving them a tremendous competitive advantage.

    “The biggest advantage of using Bluebeam for steel is in the pre-construction phase of a project,” said Charles Todd, a Bluebeam industry consultant who previously spent several years working in steel fabrication. “Doing it the old, paper-based way is like doing twice the work.”

    Here are six features in Bluebeam that make it essential for the steel industry: 

    Markup List

    The Markup List adopts a table format, where each row corresponds to a markup added to an active PDF, and each column displays specific information about the markup.

    Selecting a row prompts the PDF view in the workspace to jump to the associated markup location, facilitating navigation through markups using the UP ARROW and DOWN ARROW keys.

    For steel professionals, this tool is paramount for organizing markups for quick and easy reference, especially for pre-construction estimations that go a long way toward winning bids. The list can also be exported in various document types, allowing for quick record-keeping and information sharing among colleagues.

    Measure

    The Measure tool facilitates the creation of measurements in various modes. These measurements can either persist as markups, helping in processing and summarization through the Markup List, particularly valuable for estimation and takeoffs. Alternatively, they can be temporary, providing a swift means to measure without generating a visual record on the PDF.

    Measuring and creating cost estimates for steel beams are critical in the pre-construction estimation process. Not only can steel professionals find massive time savings in using the measurement tool, but customization capability also allows users to associate accurate weights for steel quantities. This can help steel workers calculate accurate materials costs with the click of a button.

    Count

    The Count tool generates a markup with every mouse click, linking a cumulative count with each placed markup. It resembles Sequences in the Tool Chest, differing in that it introduces a preconfigured (typically less conspicuous) or personalized symbol onto the PDF. Moreover, the Count tool maintains an ongoing tally, either per page or Space, for each item counted. In contrast, Sequences count on the PDF without maintaining a continuous tally, treating each markup independently and refraining from grouping them in the Markup List.

    For drawings that need to identify and count the specific number of steel beams, for instance, this tool can be incredibly helpful. Simply clicking each beam or other building element in a digital plan document allows the tool to automatically tally a total number.

    Tool Sets

    Tool Sets in Bluebeam can be generated and exchanged seamlessly among various users. These sets are versatile, allowing for local saving, network sharing or exportation to other users. Sharing Tool Sets proves invaluable for establishing consistent markups tailored to diverse projects, job roles, clients and beyond. Effectively managing these Tool Sets is a crucial aspect of maximizing the utility of Bluebeam.

    Steel fabricators can establish Custom Tool Sets specific for their needs during the pre-construction estimation process, allowing for a cleaner and more efficient workflow for creating job-winning bids faster.

    Profiles

    Profiles offer a convenient method to save preferred toolbars, menus and display settings, ensuring that the most essential tools are easily accessible every time Bluebeam opens.

    What’s more, as with Tool Sets, Profiles can be customized for steel workers’ specific needs. Doing so allows workers maximum levels of efficiency for all specific steel-industry uses of the software, such that workers don’t have to toggle between unfamiliar or unnecessary tools to get the job done.

    Integration with External Digital Tools

    Finally, many of these tools in Bluebeam can be integrated with other essential steel industry digital tools. For example, exporting the Markup List to a Microsoft Excel file is one way to then upload that information into another piece of complementary software. Such seamless integration allows steel workers to complete complex estimation tasks in a fraction of the time that it would take with old, analog processes. What’s more, calculations are more likely to be accurate, leading to fewer errors or costly and time-consuming rework.

    Bluebeam is an essential tool for anyone in the architecture, engineering and construction (AEC) industry, but it is especially useful for those working in steel.