
September 16, 2021
15 time-saving labeling shortcuts with CTC’s Label Genie (Part 1)
Label Genie can save you a ton of time by creating all sorts of useful labels quickly. Here’s 15 examples that you can use right now.
Descriptions of the settings are included, but to really get up and running quickly Label Genie template files and the sample DWGs have been made available as well. Simply copy the .lg files into %AppData%\CTC\Label Genie then open up Label Genie. They will then show up in the dropdown box in the Label Genie template section.
If the labels you are creating are for design purposes, you may want to set their layers to a non-plotting style that you can ignore, or a layer that you can just freeze without affecting others.
Labelling for Corridor Design (*Corridor Design.dwg)
1. Label Assemblies (*Assembly Name.lg)
Make it easier to which assembly is which at a glance by label their names. The labelling is done with a field, so that if the assembly name changes, a simple regen will update the label.
- Type = Multiline Text
- Anchor Object = Assemblies (Layer filter = *)
- Formatting, contents = (Assemblies).(Name)
- Formatting, Y offset = -4
2. Label Alignment Names (*Alignment Name.lg)
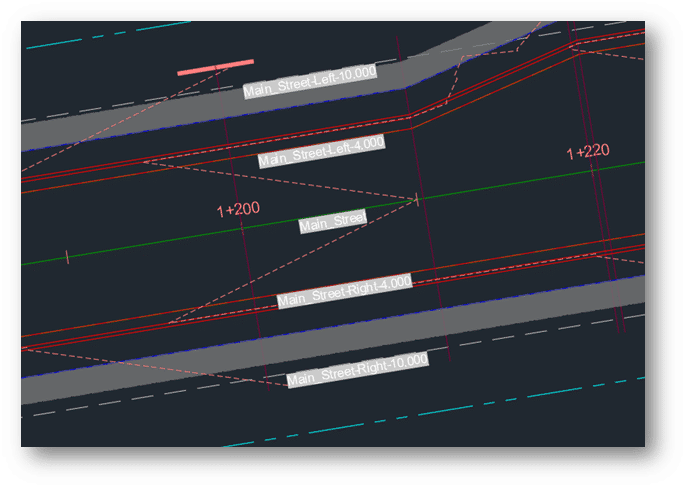
When doing corridor work, we may want to see alignment names at a glance. This is especially true if setting up a lot of labels with the Corridor Mapper, for instance. Label the alignment names at regular intervals, oriented with the lines to avoid having to check the property palette constantly.
- Label Type = Multiline Text
- Anchor Object = Alignments (Layer filter = *)
- Anchor Point = Vertices (Interval = 100, rest unchecked)
- Formatting, contents = (Alignments).(Name)
- Formatting, orientation = To Objects
- Formatting, Y Offset = -0.5
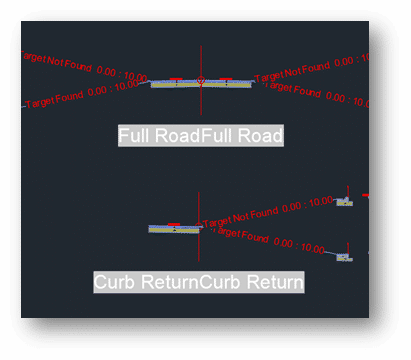
3. Label Feature Line and Polyline Layers (*Feature Line Layer.lg / Polyline Layer.lg)
Continuing the theme of adding some labels to corridor target objects, we can label feature line (and polylines) layer names at intervals. For feature lines, you may want to switch the Contents to the feature line’s name instead of the layer name – depending on how you like to use feature lines.
- Label Type = Multiline Text
- Anchor Object = Feature Lines (Layer filter = *)
- Anchor Point = Vertices (Interval = 100, rest unchecked)
- Formatting, contents = (Feature Lines).(Layer)
- Formatting, orientation = To Objects
- Formatting, Y Offset = -0.5
If you have a lot of polylines for use for horizontal target condition subassemblies, you can label those as well, to make it easier to see what layer names they have. They tend to be shorter, so instead of intervals, midpoints might be more appropriate.
- Label Type = Multiline Text
- Anchor Object = Feature Lines (Layer filter = *)
- Anchor Point = Vertices (Interval = 100, rest unchecked)
- Formatting, contents = (Feature Lines).(Layer)
- Formatting, orientation = To Objects
- Formatting, Y Offset = -0.5
Labelling for Presentation (*Presentation.dwg)
Sometimes, we need to fill in some objects in the drawing for conceptual presentation. At the conceptual stage, we can forego precise placement and mass populate objects such as trees, lights, and structures quickly. These objects, in turn, can be exported to InfraWorks for even greater visual impact.
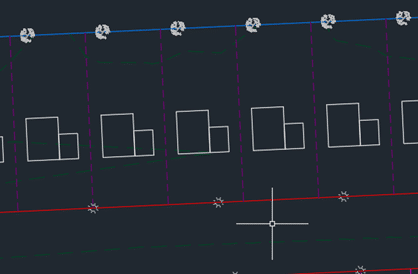
4. Place Tree Blocks at Back of Lots (*Place Trees.lg)

First, we can place some trees at an interval at the back lot line.
- Label Type = Blocks
- Anchor Object = Feature lines (Layer filter = _LOTS BACK, C-PROP-BNDY)
- Vertices = Interval 60
- Format, Block Definition = Deciduous Tree
- Format, Scale = 60
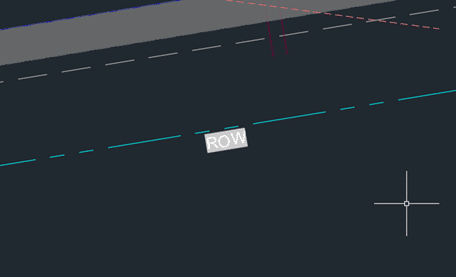
5. Place Lights (*Place Lights.lg)
Lights are place along the right of way with an offset at intervals.
- Label Type = Blocks
- Anchor Object = Feature Lines (Filter = *ROW*)
- Anchor Point = Vertices (Interval 100)
- Formatting, Block Definition = SL
- Formatting, Scale = 30
6. Place Building Footprints (*Place House.lg)
Next, we can place some house block representing structure footprints in lots.
- Label Type = Blocks
- Anchor Object = manually select a row of side lot lines at the North end of subdivision
- Anchor Point = Vertices (Begin of Object)
- Formatting, Block Definition = House
- Formatting, Scale = 0.8
- Formatting, Orientation = To Object
- Formatting, Rotation/X Offset/Y Offset = 270 / 40 / 30
Measuring and Quantifying (*Measure and Quantify.dwg)
7. Dimension a Building (*Dimension Building.lg)
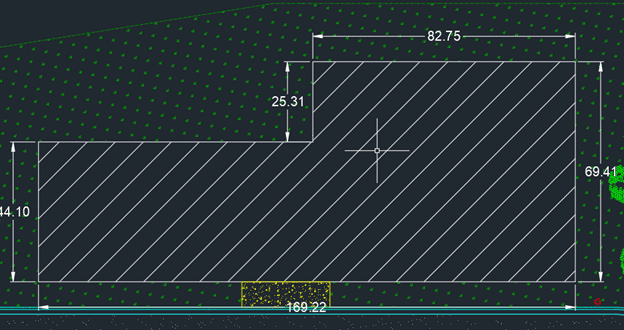
We can automatically apply dimensions to objects using the Label Genie. Let’s try it on a building footprint.
- Label Type = Dimensions
- Anchor Object = Polylines (Layer filter = A-BLDG)
- Anchor Point: Segments
- Formatting, style = Annotative
- Formatting, annotative = checked on
- Formatting, Orientation = To Object
- Formatting, Rotation / X Offset / Y Offset = 0 / 0 / -8
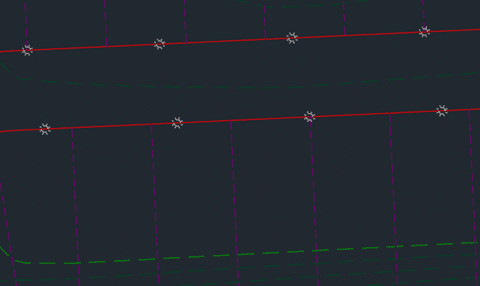
8. Dimension Curb (*Dimension Curb.dwg)
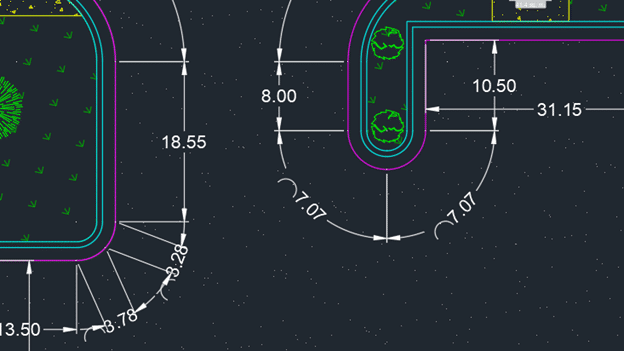
We can dimension curb feature lines as well. Key to success is consistent stationing direction – always counter-clockwise or clockwise.
- Label type: dimensions
- Anchor object: feature lines (Layer filter = C-PRAVE-CURB-EOA)
- Anchor point: segments
- Formatting, style = annotative
- Formatting, orientation = to object
- Formatting, rotation / x offset / y offset = 0 / 0 / -8
9. Measure Areas (*measure areas.lg)
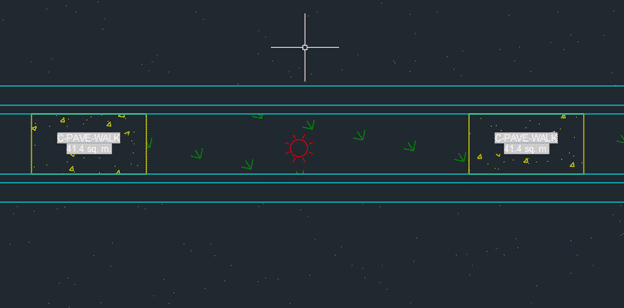
Next, we generate area quantity labels for various hatching in the drawing. Note that labels are created in the centroids of hatches. This means that if you have an “L” shaped hatch, such as the grass in this drawing, the label may end up being outside the hatch. Some manual repositioning may be required.
- Label Type = MultilineText
- Anchor Object = Hatches (layer filter = *)
- Anchor Point = Centroid
- View Type = Plan
- Formatting contents =
- (Hatches).(Layer)
- <New Line>
- (Hatches).(Area)
- Field customization: Format = Decimal, Precision = 0.0, Suffix = sq. m.
- Formatting, Style = Annotative
- Formatting, display width = 12
More Labelling Tips On the Way
That concludes the first 9 of the 15 time-saving shortcuts using the CTC Label Genie. It can help us quickly generate labels that can help us find the design information we need, place blocks to flesh out a conceptual design drawing, and dimension and measure various objects.
Keep an eye out for Part 2, where we cover locating points and objects, as well as communication key surface information.
*Please email us at info@solidcad.ca to request the data sets.
Related Posts

-
Crozier & Associates Inc. Success Story
Crozier’s rapid expansion across Ontario brought bigger projects, more disciplines, and rising complexity. To keep delivering at the highest standard, they doubled down on digital transformation with BIM and ...
-
Civil 3D 2025.1 Update
The Civil team at Autodesk has released the latest update to Civil 3D 2025. Click here to see Release Notes and click here for the Online Help page. As usual, the update can be installed via the Autodesk Access ...
-
Enhancing Revit Workflows with CTC Tools: A Deep Dive into Spreadsheets
In the modern world of Building Information Modeling (BIM), Excel remains a cornerstone of data management and analysis. Whether it’s for budgeting, scheduling, or data tracking, most professionals are ...

- Accruent
- Advanced Manufacturing
- Architecture
- Architecture
- Architecture - Blog
- Assembly Line Automation
- AutoCAD
- Autodesk
- Autodesk Construction Cloud
- Automotive
- BIM
- Blog
- Blog Posts
- Building Design & Engineering Services
- Building Engineering
- Building Engineering - Blog
- Building Product & Fabrication
- CAD
- CAM, CNC & Machining
- Civil 3D
- Civil Infrastructure
- Civil Infrastructure & GIS Services
- Civil, Survey & GIS
- CNC Machining Services
- Construction
- Construction
- Construction Project Lifecycle
- Consulting Services
- Consumer Products
- CPQ & Aftermarket
- CTC Software
- Data Management
- Digital Transformation
- Energy & Utilities
- Engineering
- Engineering
- General
- Government & Public Sector
- Industrial Machinery
- Industries
- Industry
- Industry Topics
- Infrastructure
- Inventor
- KnowledgeSmart
- Manufacturing
- Mining
- News
- Pinnacle Series
- PLM
- PLM & PDM
- Product Lifecycle Management
- Revit
- Sales and Aftermarket for Manufacturers
- Simulation & Analysis
- Software & Technology
- Software Development
- Thought Leadership
- Tips & Tricks
- Visualization
- Visualization & Reality Capture Services