
November 20, 2020
Bluebeam: PROFILES
What is a profile?
One of the most essential features in Bluebeam that will help all users to organize themself is maybe one of the less known; Profiles.
Profiles in Bluebeam are important. It is not just about having a custom interface. It’s more about having an organized tool that will make you more efficient to work and you will be able to deploy at large in your department. In addition to the interface, by exporting a profile, you export everything you customized in Bluebeam (including Tool Sets and Markup list columns). So everybody is unified in their work.
How to create a profile
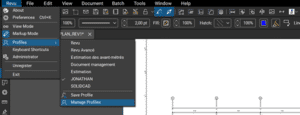
When you start Bluebeam, you will first go to the Revu menu and click to see the menu show up. Then go to Profiles and select Manage profiles:
A dialog box will open, and you will be able to add a new profile:
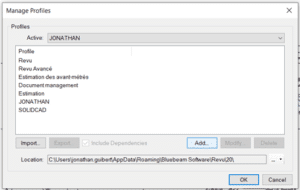
Click on Add… and another window will open (don’t worry there is no more after that)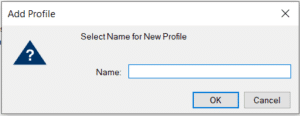
Add your name or your service/department name and click OK. Your screen will flash (don’t worry it is not exploding) and now you are in your profile.
You will notice it looks like the previous one you were in. That’s normal. Revu doesn’t want you to create everything from scratch so it uses the last profile as a canvas you will work on.
But the first step is done. Let’s customize it:
How to custom my interface?
Before customizing your profile, you will need to ask yourself what you need to do with Bluebeam. This little brainstorm will be valuable to know what we will show and we will hide.
From there you have 3 ways to do it.
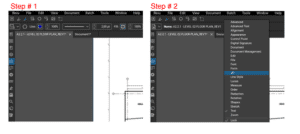
The first will simply consist of right-clicking where the current icons are to bring up the toolbar’s menu.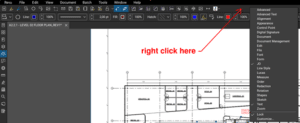
Then select from the available menu the toolbars you think you need. When you have done this, the selected bar will be displayed in your interface.
Now we will see how to create your own toolbar.
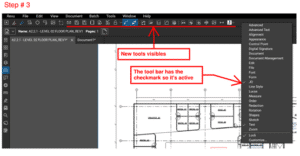
To do this, right-click at the top of the screen to bring up the toolbar menu and select Customize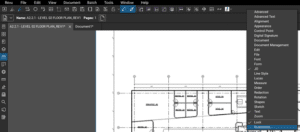
A dialog box will open to allow you to customize existing toolbars and create your own toolbar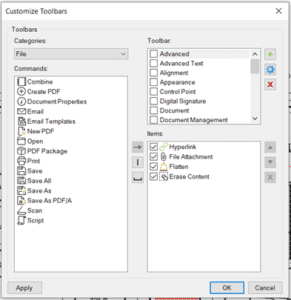
In order to facilitate the understanding of this part, we will identify each part and detail them:
1- Toolbars
These are all the toolbars that currently exist in Bluebeam and this is also where you will be able to create your own
2- Items
These are the tools which are the toolbars that we select in part 1.
3 – Orders (and Categories)
This is where all the tools Bluebeam offers are located. These are classified by category
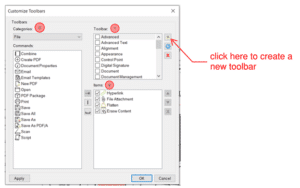
To create your own personalized toolbar, click on the ![]() icon and a window will show up
icon and a window will show up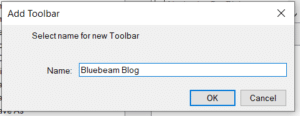
Name your toolbar as you wish and click OK
After that, we are going to select the tools that we are going to need for our most common tasks and add them to our custom bar.
The tools that we will put must be the ones we want to have at hand because they are the ones we will use most often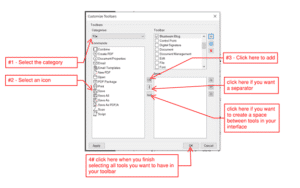
Finally, let’s see the 3rd and final way to add tools to your custom bar.
When you navigate the Bluebeam menus to choose a tool, you will notice a pushpin next to the name of the tool. Click on it to bring up the menu of toolbars.
Select where you want to add this tool (in which bar) and now the tool is available on your toolbar.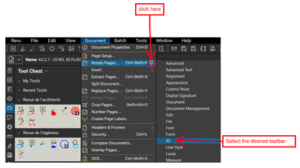
Remember to save everything by going in Revu →Profiles→ Save Profiles before closing Bluebeam.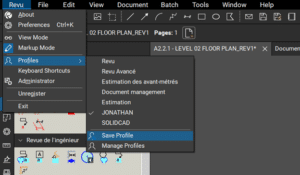
Export a profile
To export a profile and everything in it, go to Revu → Profiles → Manage profiles.
Select the profiles to export and click on Export. Choose the location where your profile will be exported. Copy/paste it into an email and send it to everyone who will work with it from now on.
Related Posts

-
How Municipalities Can Use Digital Tools to Meet CHIPS Act Challenges
This story was originally published by Parth Tikiwala on the Bluebeam Blog. Municipalities must adopt digital collaboration tools to streamline permitting and meet CHIPS Act demands. Here’s how they can start ...
-
Artificial Intelligence in Architecture: The World Beyond Visual Generative Models
This story was originally published by Diana Kightlinger on the Bluebeam Blog. Today’s AI applications offer far more than phantasmal images of structures that will never exist. But concerns continue over ...
-
These Australian Hiking Cabins Are a Sight to Behold
This story was originally published by Emily Beyda on the Bluebeam Blog. Roughing it in the great outdoors is a little more luxurious in these cabins, which underwent a painstakingly detailed and complex design ...

- Accruent
- Advanced Manufacturing
- Architecture
- Architecture
- Architecture - Blog
- Assembly Line Automation
- AutoCAD
- Autodesk
- Autodesk Construction Cloud
- Automotive
- BIM
- Blog
- Blog Posts
- Building Design & Engineering Services
- Building Engineering
- Building Engineering - Blog
- Building Product & Fabrication
- CAD
- CAM, CNC & Machining
- Civil 3D
- Civil Infrastructure
- Civil Infrastructure & GIS Services
- Civil, Survey & GIS
- CNC Machining Services
- Construction
- Construction
- Construction Project Lifecycle
- Consulting Services
- Consumer Products
- CPQ & Aftermarket
- CTC Software
- Data Management
- Digital Transformation
- Energy & Utilities
- Engineering
- Engineering
- General
- Government & Public Sector
- Industrial Machinery
- Industries
- Industry
- Industry Topics
- Infrastructure
- Inventor
- KnowledgeSmart
- Manufacturing
- Mining
- News
- Pinnacle Series
- PLM
- PLM & PDM
- Product Lifecycle Management
- Revit
- Sales and Aftermarket for Manufacturers
- Simulation & Analysis
- Software & Technology
- Software Development
- Thought Leadership
- Tips & Tricks
- Visualization
- Visualization & Reality Capture Services