
November 18, 2022
Civil 3D: Recreate your Template
Recreating a Civil 3D template from scratch is not something we look forward to, but it may be necessary at times. Read on to find out more.
You may ask why one would need to do this. Some users will do this when they upgrade to a new Civil 3D release. I have not seen any evidence that would convince me to do this. The only time I would recreate a template is if there is a serious problem that can’t be fixed without it. The recover command does a very good job at removing anomalies that may arise between Civil 3D releases.
So, you’ve decided to do it. What to do? There may be further steps that what you see below, but these will go a long way to making this arduous task a little more pleasant. The workflow below assumes that your original template is not completely pooched and can be successfully inserted into your new file.
1. Open problem template:
-
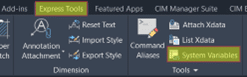
- Export system variables to a file.


- Export system variables to a file.
-
- Note the assigned coordinate system in Civil 3D Settings, Files tab.
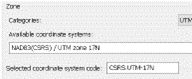
- Note the assigned coordinate system in Civil 3D Settings, Files tab.
-
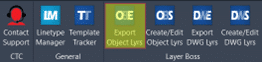
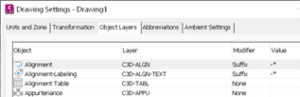
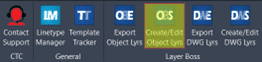
- Use this CTC tool to export the Civil 3D Object Layers to a file. It is found in the CIM Manager Suite.
Civil 3D’s Import Styles and Settings tool does a poor job of restoring these. If you don’t own CTC tools, enter Civil 3D Settings and note all the object layer settings so they can be restored in the new file.
- Use this CTC tool to export the Civil 3D Object Layers to a file. It is found in the CIM Manager Suite.
-
- Export any Layer Filters. If you’re using Civil 3D, this is easy.
- Export any Layer States.
- Export any Property Sets (if you are using Civil 3D).
2. Begin a new blank drawing using the acad,dwt or dwt files, and save the drawing.
3. Import system variables from the file you saved earlier. There are many settings saved in a DWG that must be restored.
![]()
4. Import the Layer Filters.
5. Import the Layer States.
6. Import the Property Sets and check any label styles where they are referenced to ensure they operate properly.
7. Insert problem file and explode. Purge anomalous blocks if necessary.
- This step will insert most of the styles and any pre-configured objects like Point Grous, Surfaces, Pipe and Pressure Networks.
- If the original file is too far gone, skip this step. You will need to recreate any pre-configured Prospector objects.
8. Set the coordinate system if there was one set in the original template.
9. Import styles and settings from problem file.
If you skipped step 4, note that this command DOES NOT import everything. See this document for more information. These may need to be dragged and dropped form the original or recreated. ![]()
10. In the Prospector, inspect the names of any pre-configured objects and adjust if necessary.
11. Use this CTC tool to import object layers from the file you exported previously.
- Restore them manually if you do not own CTC Tools.
12. Import paper space layouts from problem file.
13. Close the new file and run the RECOVER file to open it and check for problems.
14. Recreate the Scale List.
- This can be easily done by creating some text in the original file and assigning all the scales to it. Copy this text and paste it into the new file then delete the text. New scales will now be available.

15. Test, test, test. To make sure everything works as it should.
16. Of course, make a backup of the original file and SAVE the new file with the original name.
Related Posts

-
Crozier & Associates Inc. Success Story
Crozier’s rapid expansion across Ontario brought bigger projects, more disciplines, and rising complexity. To keep delivering at the highest standard, they doubled down on digital transformation with BIM and ...
-
Civil 3D 2025.1 Update
The Civil team at Autodesk has released the latest update to Civil 3D 2025. Click here to see Release Notes and click here for the Online Help page. As usual, the update can be installed via the Autodesk Access ...
-
Autodesk Desktop Connector
Version 16.9 of the ADC is now available to download. You can find information about it and download it from this link. If you’re upgrading from 15.x, it would be best that you read this document as there have ...

- Accruent
- Advanced Manufacturing
- Architecture
- Architecture
- Architecture - Blog
- Assembly Line Automation
- AutoCAD
- Autodesk
- Autodesk Construction Cloud
- Automotive
- BIM
- Blog
- Blog Posts
- Building Design & Engineering Services
- Building Engineering
- Building Engineering - Blog
- Building Product & Fabrication
- CAD
- CAM, CNC & Machining
- Civil 3D
- Civil Infrastructure
- Civil Infrastructure & GIS Services
- Civil, Survey & GIS
- CNC Machining Services
- Construction
- Construction
- Construction Project Lifecycle
- Consulting Services
- Consumer Products
- CPQ & Aftermarket
- CTC Software
- Data Management
- Digital Transformation
- Energy & Utilities
- Engineering
- Engineering
- General
- Government & Public Sector
- Industrial Machinery
- Industries
- Industry
- Industry Topics
- Infrastructure
- Inventor
- KnowledgeSmart
- Manufacturing
- Mining
- News
- Pinnacle Series
- PLM
- PLM & PDM
- Product Lifecycle Management
- Revit
- Sales and Aftermarket for Manufacturers
- Simulation & Analysis
- Software & Technology
- Software Development
- Thought Leadership
- Tips & Tricks
- Visualization
- Visualization & Reality Capture Services