
November 12, 2021
Infraworks: Custom Assemblies
It’s relatively easy to create a custom component road assembly within an Infraworks model. But how does one save that custom assembly for use later? Read on to find out!
The answer depends on how you’d like it to be shared:
- Export for use in other existing models.
- Save for use when new models are created.
Saving the Assembly
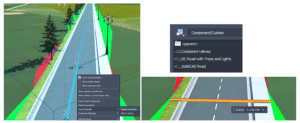
First, to save a custom assembly, simply right click the component road and choose Add to Library. Choose a station to copy and give the new assembly a name. The new assembly will appear in the style palette.
Choose a station to copy and give the new assembly a name. The new assembly will appear in the style palette.
Export for Existing Models
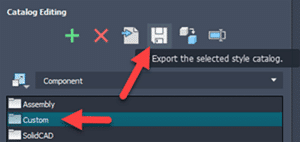
The individual assembly cannot be exported, but the catalog can. Select the catalog, in this case, Custom, and click to export to a JSON file.
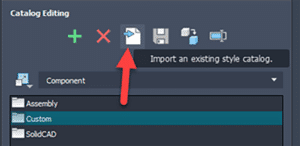
The JSON file can then be imported into a different existing model using the import button. The assembly will be available in the styles palette.
Save for Future Models
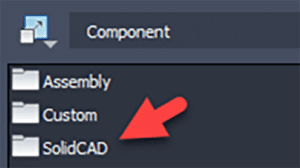
There is no “tool” for this, but if one copies the appropriate files from and to the correct locations, then it works just fine. The custom assembly files can be found in the model’s folder path.
…model.files\unver\Content\Styles\Component\ . Possibly in a Custom sub-folder.
There will be 2 files for each assembly. A PNG image and a ACItem file.

Copy these two files to the Infraworks standard folder. Feel free to create a sub-folder here to place your custom assemblies. This folder will appear within Infraworks.
C:\ProgramData\Autodesk\InfraWorks\Resources\LocalLibrary\Styles\Component\
The JSON file can then be imported into a different existing model using the import button. The assembly will be available in the styles palette.
Related Posts

-
Crozier & Associates Inc. Success Story
Crozier’s rapid expansion across Ontario brought bigger projects, more disciplines, and rising complexity. To keep delivering at the highest standard, they doubled down on digital transformation with BIM and ...
-
Can Climate Proofing Structures Help Reverse Climate Change?
This story was originally published by HAMISH CHAMP on the Bluebeam Blog. With the built environment such a prominent source of carbon emissions, it is vital that the industry recognizes the urgent need to ‘climate ...
-
HIVE Revit Family Standards
What are HIVE Revit Family Standards? HIVE Standards is a system that helps BIM managers check and maintain the quality of Revit family content for the organization. It is set up in the HIVE Portal and runs automatic ...

- Accruent
- Advanced Manufacturing
- Architecture
- Architecture
- Architecture - Blog
- Assembly Line Automation
- AutoCAD
- Autodesk
- Autodesk Construction Cloud
- Automotive
- BIM
- Blog
- Blog Posts
- Building Design & Engineering Services
- Building Engineering
- Building Engineering - Blog
- Building Product & Fabrication
- CAD
- CAM, CNC & Machining
- Civil 3D
- Civil Infrastructure
- Civil Infrastructure & GIS Services
- Civil, Survey & GIS
- CNC Machining Services
- Construction
- Construction
- Construction Project Lifecycle
- Consulting Services
- Consumer Products
- CPQ & Aftermarket
- CTC Software
- Data Management
- Digital Transformation
- Energy & Utilities
- Engineering
- Engineering
- General
- Government & Public Sector
- Industrial Machinery
- Industries
- Industry
- Industry Topics
- Infrastructure
- Inventor
- KnowledgeSmart
- Manufacturing
- Mining
- News
- Pinnacle Series
- PLM
- PLM & PDM
- Product Lifecycle Management
- Revit
- Sales and Aftermarket for Manufacturers
- Simulation & Analysis
- Software & Technology
- Software Development
- Thought Leadership
- Tips & Tricks
- Visualization
- Visualization & Reality Capture Services