• Revit Data Corruption

    Let’s talk about data corruption in Revit. In this post I will look at these 4 points:

    1. File crashes before opening
    2. Crashes when opening a new view
    3. Looking for corrupt families
    4. Higher level investigation

    As always you should make sure you save a copy of your file for testing while trying to resolve corruption issues.

    File crashes before opening

    Sometimes a file cannot open because of a simple issue that can easily be overcome. Each of the following actions have the potential to get past a different issue. If your file crashes when you try to open it ask yourself:

    • Can the file be opened with or without audit checked?
    • Will the file open without the worksets loaded? Can I narrow it down to a specific workset that keeps the file from opening?
    • Can I open the file in a different build, or a newer version of Revit?
    • Sometimes new name allows you to bypass the issue, copy-paste file to new location
    • Isolate the file from the network save to a location where the links cannot be accessed.

    Crashes when opening a new view

    If your file crashes when you try to open or create new views, try these suggestions:

    • Turn off hardware acceleration and try each location one at a time.
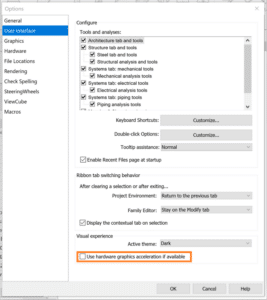
    • Reset Revit settings
      • Customized settings are stored in the app data folder, when removed from this location the defaults are regenerated.
    • Repair the installation
      • This won’t change any user setting.
    • Open Revit without add-ins
      • Locate the following folder: C:\ProgramData\Autodesk\Revit\Addins\[Version].
      • Temporarily move the addin files from the folder above to another location.

    If any of these work for you take note, this is where the issue resides and you’ll want to know the exact cause whenever possible.

    Looking for Corrupt Families

    Sometimes the behavior you see in a file is caused by corrupt families follow this process to identify corrupt families.
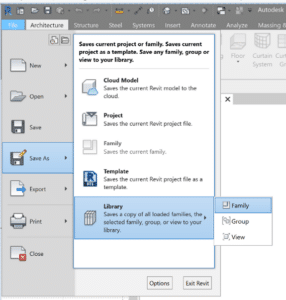
    • Save a copy of the corrupt file
    • Open and save all families as a library, this process will fail when it reaches the 1st corrupt family.
    • Record the family named on the bottom left hand corner of the screen & delete the family and run again, repeat until the process completes successfully.
    • Open the original corrupt file and reload all the families on your list with versions that predate the corruption. If you’ don’t have a previous version of the family, you’ll need to recreate them.


    Higher level investigation & troubleshooting

    Many issues can also be fixed by returning to Revit’s original settings.  Try these steps one at a time, testing the file after each change.

    • Rename the .INI file (_old) which is in the AppData Roaming folder.
    • Rename App Data Folders (_old)
      • C:\Users\<username>\AppData\Local\Autodesk\Revit\Autodesk Revit 201x
      • C:\Users\<username>\AppData\Roaming\Autodesk\Revit\Autodesk Revit 201x
    • Rename Workspace in the registry editor
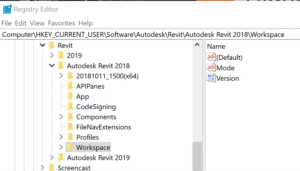
    When these folders/files don’t exist, they are recreated the next time the user opens Revit. Be sure rename and not remove these files/folders, as they will server as backups for the user original setting including keyboard shortcuts and font maps.

    Happy Reviting!

    Be sure to check my other videos in this series for more information.

    While you wait why not follow us @SolidCAD on Twitter, check out our other videos on YouTube, and see what our experts have to say on our BIM Blog!

    ___________________________________________________________________________________________________________________

    Additional Reading

    AKN: Revit – What Causes data Corruption

    AKN: Revit – Alternative Uninstall Directions

    Revit Family Creation: Family with Adjustable Built-in Label

    Usually Tags are added separate from the Components we place, but in certain situations the “tag” needs to be part of the family. To push this further occasionally a request is made for flexibility in the placement due to text overlap.

    This post explains how create a family with a built-in label with adjustable positioning.

    Prepare the Model Family to Receive the Label

    • Open the model family that requires the built-in label.
    • Create a vertical and a horizontal Reference Line to mark the center of the default label location.

    • Create a vertical and a horizontal Reference Plane offset slightly from the reference lines. These will be the anchors for the label. Both Reference Planes must be set as “Not a reference” for the grips to show properly in the project.

    • Dimension between the new horizontal references, and the between the new vertical references. These dimensions need to be assigned separate instance parameters. To allow the label to slide in the project.

    • Choose which existing reference planes you will Align and Lock your anchor Reference Planes to. I prefer to lock them to the planes the model uses as origins. The plane you lock to must be stationary (not controlled by an instance parameter), the label will not be able to cross the horizontal anchor plane.
    • Save the family.

    HINT: To make working in a complicated family simpler follow a few best practices.

    1. Set the origin planes, then pin them.
    2. Name reference planes clearly and remove temporary planes ASAP.
    3. Dimension to the reference planes, not geometry.
    4. Flex the parameters of the family before adding geometry.
    5. Geometry to be locked to reference plans after confirming the parameters work as expected.

    Create the Label Family

    • Using the Generic Annotation Family Template, create a new “label” family.
    • Place a label, you will be prompted to create/assign a parameter to the label.
    • Edit the label type properties, so the text size & style meets the company standards.
    • Save the label & load it into the model family you started with.

    Combining the Two Families

    • Place the label family near the geometry in the project.
    • Align the horizontal reference in the label to the horizontal Reference line, and lock.
    • Align the vertical reference in the label to the vertical Reference line, and lock.

    • Select the label and Edit Type, associate the Family Parameter for the Label to the Family Parameter in the host family which will control the text, often Description or Type Comments.

    • If you have chosen to have a visibility Parameter to control the Label Visibility, associate those parameters to one another as well.

    Using the Family

    • Save the Model Family and load into a blank project to test the flexibility of the label location.
    • Select the family, the grips for the label location will become visible. Slide then around in turn.

    NOTE: Look for unexpected changes to the geometry or the overall placement of the family, this indicate the need to change the anchor alignment.