
July 16, 2021
Migrating Versions in AutoCAD Electrical
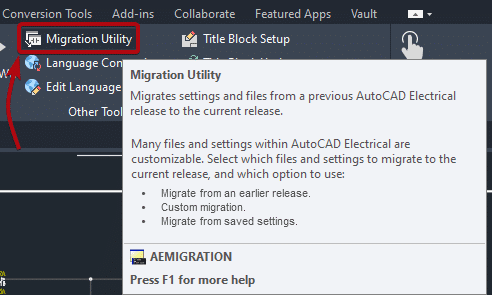
Every year Autodesk releases a new version of the software which often contains new features, bug fixes and overall improved stability, so a common question that we get from our customer is: how do I move all my custom settings, symbols, databases, etc. to the new version of AutoCAD Electrical. Included with AutoCAD Electrical is the “Migration Utility” which allows the user to move all your customized settings, custom libraries (symbols + icon menus), databases, etc. This utility can be found inside the “Project” tab as displayed on Figure 1.
In this blog article we will cover the steps requires for us to upgrade and migrate from one version to another. Once we have downloaded and installed the new version of AutoCAD Electrical, we close all other Autodesk software that so we can start the “Migration Utility”.
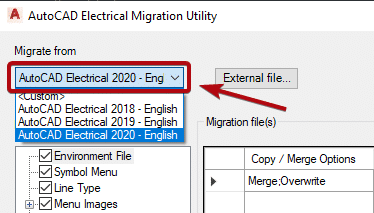
In this configuration window we are required to select the previous version that we want to migrate from. Clicking on the dropdown arrow will display all the previous versions installed on the local machine. If you have more than one version installed, you need to select the software version that has all the latest customization/libraries of the software as seen on Figure 2.
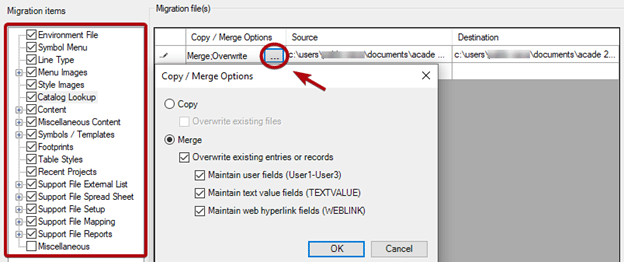
After we select the version that we want to migrate from, the next step is to select the items we want to migrate. Those items can be found under “Migration items” and, by default, all of them are going to be selected as seen on Figure 3. If we click on any of the individual items, we will find the option to copy or merge the pre-existing information. Keep in mind that each migration item might have a different preset value here so make sure you review all the items that need to be migrated.
Once we have reviewed all the migration items we need to click “OK” so the migration process can start.
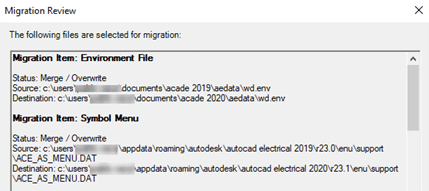
Before the migration gets started, a “Migration Review” window is going to popup with a summary of all the files that are about to be migrated as seen on Figure 4.
After a final review we are ready to click “OK” so the migration process can start.
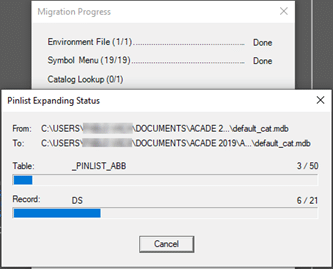
While the migration is in progress, a window is going to popup showing the file currently being migrated and the current progress status as seen on Figure 5. Keep in mind that depending on the size of your customized files (databases, etc.), this process could take from minutes to several hours.
When the Migration is complete a summary window similar to the migration review will popup specifying, once again, all the files that were migrated.
The last step is to restart the software so you will be ready to use your new version of AutoCAD Electrical without losing any preexisting customized files/settings.
Related Posts

-
Plasman Success Story
Plasman didn’t just improve productivity — they reshaped the way their team works. Explore the complete story to see what changed and why it mattered.[…]
-
Built to Scale: How Greenlane Reinvented Its Operations for Sustainable Expansion
From PLM implementation to real-world impact, Greenlane reshaped their manufacturing and sustainability strategy. Read more.[…]
-
Northern Transformer Corporation
Northern Transformer took a bold step toward smarter, more scalable manufacturing. Explore the complete case study to learn what changed, why it worked, and how it’s shaping their future.[…]

- Accruent
- Advanced Manufacturing
- Architecture
- Architecture
- Architecture - Blog
- Assembly Line Automation
- AutoCAD
- Autodesk
- Autodesk Construction Cloud
- Automotive
- BIM
- Blog
- Blog Posts
- Building Design & Engineering Services
- Building Engineering
- Building Engineering - Blog
- Building Product & Fabrication
- CAD
- CAM, CNC & Machining
- Civil 3D
- Civil Infrastructure
- Civil Infrastructure & GIS Services
- Civil, Survey & GIS
- CNC Machining Services
- Construction
- Construction
- Construction Project Lifecycle
- Consulting Services
- Consumer Products
- CPQ & Aftermarket
- CTC Software
- Data Management
- Digital Transformation
- Energy & Utilities
- Engineering
- Engineering
- General
- Government & Public Sector
- Industrial Machinery
- Industries
- Industry
- Industry Topics
- Infrastructure
- Inventor
- KnowledgeSmart
- Manufacturing
- Mining
- News
- Pinnacle Series
- PLM
- PLM & PDM
- Product Lifecycle Management
- Revit
- Sales and Aftermarket for Manufacturers
- Simulation & Analysis
- Software & Technology
- Software Development
- Thought Leadership
- Tips & Tricks
- Visualization
- Visualization & Reality Capture Services