
February 2, 2024
Mastering Point Clouds in Civil 3D: A Three-Part Guide to Efficiency: Part 3
Most survey and design firms these days rely on point cloud data to some degree. It is often faster, easier, and safer to survey using aerial or ground-based scanners compared with traditional survey methods.
“But these clouds clog up my Civil 3D drawing when I make a surface.” You say. I’m here to tell you that they don’t have to! The dataset is always huge, tens or even hundreds of millions of points. When the deliverable is a surface model in Civil 3D, 3 things must happen.
This is the third and final in a series of three articles outlining how Autodesk Recap and Civil 3D are used to carry out these tasks. Click here for the first article in this series. Click here for the second.
Task 3: Import to Civil 3D and model a surface. You may already know this step, but since Recap has been used to classify and decimate the points, there is a new task in Civil 3D.
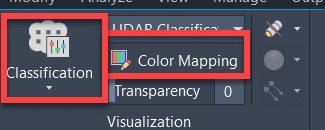
Once the point cloud has been attached, all the points will show, and it seems logical to go here and ensure that ONLY the decimated points (Key) are visible so we can model the surface using only those points.
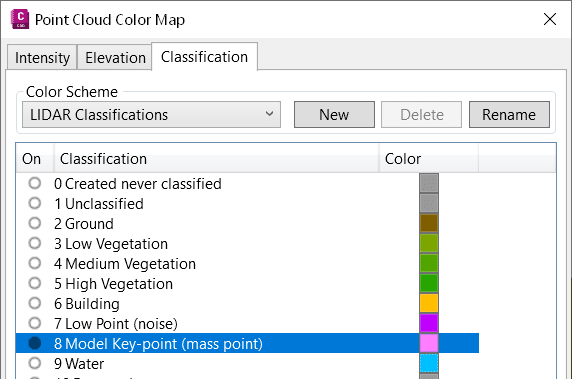
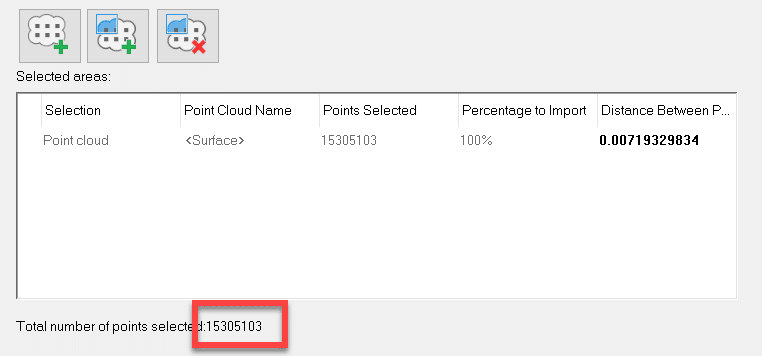
Yes, only the Key points are visible, but when we try to model the surface, Civil 3D is using all 15 million of them, not the 10,000 that was specified during the decimation process. Autodesk is aware of this “defect”. When or if it will be rectified is unknown.

But don’t fret, there is a workaround.
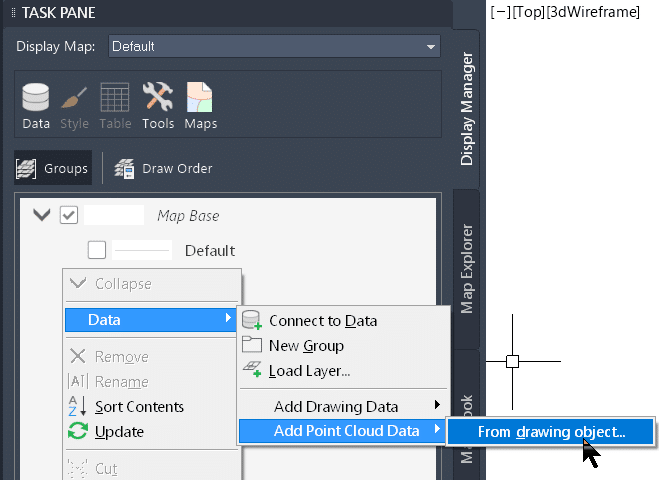
Turn on the map Workspace (MAPWPACE) and create a new layer from the point cloud.
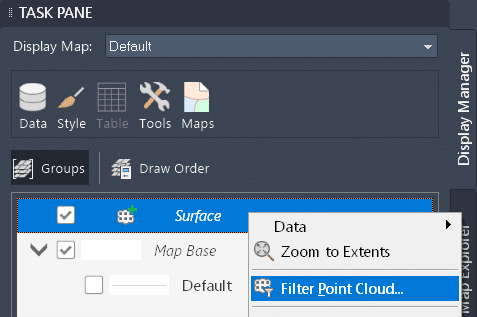
Filter the Key points in that new layer.
Then create the surface normally. Only the Key points will be used.
Stay tuned for the BONUS article… Yes, you read that right. There is one more.
Related Posts

-
Civil 3D 2025.1 Update
The Civil team at Autodesk has released the latest update to Civil 3D 2025. Click here to see Release Notes and click here for the Online Help page. As usual, the update can be installed via the Autodesk Access ...
-
Autodesk Desktop Connector
Version 16.9 of the ADC is now available to download. You can find information about it and download it from this link. If you’re upgrading from 15.x, it would be best that you read this document as there have ...
-
Civil 3D: Subassembly Composer Tip of the Year
Good day folks, do we have a tip for you today! If you create custom subassemblies with the Subassembly Composer, you’ll want to read on… I’ve created maybe a couple hundred subassemblies for myself and ...

- Accruent
- Advanced Manufacturing
- Architecture
- Architecture
- Architecture - Blog
- Assembly Line Automation
- AutoCAD
- Autodesk
- Autodesk Construction Cloud
- Automotive
- BIM
- Blog
- Blog Posts
- Building Design & Engineering Services
- Building Engineering
- Building Engineering - Blog
- Building Product & Fabrication
- CAD
- CAM, CNC & Machining
- Civil 3D
- Civil Infrastructure
- Civil Infrastructure & GIS Services
- Civil, Survey & GIS
- CNC Machining Services
- Construction
- Construction
- Construction Project Lifecycle
- Consulting Services
- Consumer Products
- CPQ & Aftermarket
- CTC Software
- Data Management
- Digital Transformation
- Energy & Utilities
- Engineering
- Engineering
- General
- Government & Public Sector
- Industrial Machinery
- Industries
- Industry
- Industry Topics
- Infrastructure
- Inventor
- KnowledgeSmart
- Manufacturing
- Mining
- News
- Pinnacle Series
- PLM
- PLM & PDM
- Product Lifecycle Management
- Revit
- Sales and Aftermarket for Manufacturers
- Simulation & Analysis
- Software & Technology
- Software Development
- Thought Leadership
- Tips & Tricks
- Visualization
- Visualization & Reality Capture Services