fbpx
  • Doing more with Location Codes and the Location View in AutoCAD Electrical

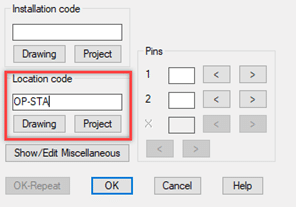
    A feature that is sometimes overlooked when working with AutoCAD Electrical, is the “Location Code”. This field shown on Figure 1, and can be found inside the edit component window inside the schematic or panel footprints.

    The Location Code can be used to help us better organize our drawings, specially when we are working with large projects that can contain dozens of drawings and hundreds of components.

    Figure 1

    By making sure that we use the location code in all our components, it helps us create more precise “Reports”, like a Bill of Material for a specific location, and it gives us more control on how we manage and explore our drawings by using the “Location View”.

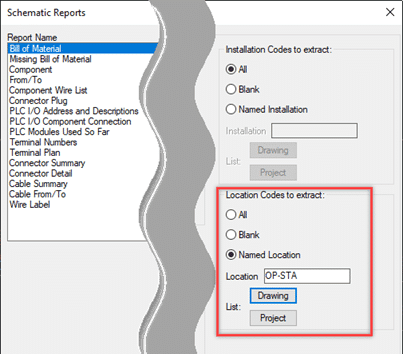
    When we are creating any kind of report, we have the option to select specific “Location Codes to Extract” as seen in Figure 2. This will help us narrow down the report to only the components that have been to be used in that specific location, helping us create a more precise report that focuses in only the components that we need to see instead of all the components of a specific drawing or project.

    Figure 2
    Figure 3

    Another useful tool that is rarely used with AutoCAD Electrical, is the “Location View” that becomes useful only when you start using location codes as part of your components.

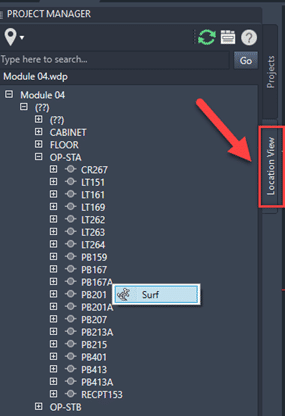
    The Location View can be found inside the Project Manager and its grouped as follows: project name > installation code > names of the locations.

    In Figure 3 we can see an example of a project called “Module 04”, no installation code (depicted as questions marks), then all the available location codes used in that project. From here we see that above the “CABINET” location we have a location named (??), which indicates that there are schematic components that do not have been assigned a location code.

    From this Location View we can also expand any of the existing locations so we can see all the components that have been assigned to that specific location. We also have the ability to “Surf” and navigate to that specific component directly from this tab making it easier to search and find any specific components directly from this view. The surf command is also available for all the components labeled as (??) so we can navigate to where they are located inside our drawings and proceed to assign a specific location, until all the components have a location code.

    For more information on AutoCAD Electrical, contact us today!

    Migrating Versions in AutoCAD Electrical

    Every year Autodesk releases a new version of the software which often contains new features, bug fixes and overall improved stability, so a common question that we get from our customer is: how do I move all my custom settings, symbols, databases, etc. to the new version of AutoCAD Electrical. Included with AutoCAD Electrical is the “Migration Utility” which allows the user to move all your customized settings, custom libraries (symbols + icon menus), databases, etc. This utility can be found inside the “Project” tab as displayed on Figure 1.

    Figure 1

    In this blog article we will cover the steps requires for us to upgrade and migrate from one version to another. Once we have downloaded and installed the new version of AutoCAD Electrical, we close all other Autodesk software that so we can start the “Migration Utility”.

    Figure 2

    In this configuration window we are required to select the previous version that we want to migrate from. Clicking on the dropdown arrow will display all the previous versions installed on the local machine. If you have more than one version installed, you need to select the software version that has all the latest customization/libraries of the software as seen on Figure 2.

    After we select the version that we want to migrate from, the next step is to select the items we want to migrate. Those items can be found under “Migration items” and, by default, all of them are going to be selected as seen on Figure 3. If we click on any of the individual items, we will find the option to copy or merge the pre-existing information. Keep in mind that each migration item might have a different preset value here so make sure you review all the items that need to be migrated.

    Figure 3

    Once we have reviewed all the migration items we need to click “OK” so the migration process can start.

    Figure 4

    Before the migration gets started, a “Migration Review” window is going to popup with a summary of all the files that are about to be migrated as seen on Figure 4.

    After a final review we are ready to click “OK” so the migration process can start.

    While the migration is in progress, a window is going to popup showing the file currently being migrated and the current progress status as seen on Figure 5. Keep in mind that depending on the size of your customized files (databases, etc.), this process could take from minutes to several hours.

    Figure 5

    When the Migration is complete a summary window similar to the migration review will popup specifying, once again, all the files that were migrated.

    The last step is to restart the software so you will be ready to use your new version of AutoCAD Electrical without losing any preexisting customized files/settings.

    How to add a new Table/Family in AutoCAD Electrical

    A very common question that we get asked is how we can add a custom table inside the catalog browser. As you already know, the catalog browser consists of several different “families” or categories that divide all the components by type, which store all the relevant catalog information as you can see from the image on Figure 1.

    In many cases there might be a specific type of component that might be missing, or you want to create a new table for anything that might be build/available in-house such as parts that you build on your own floor shop.

    Figure 1


    In this blog article, we will cover how to add/create a new table/family inside the catalog browser.

    For us to achieve this, we need to make sure that we are working on an active project that has the main catalog database which we want to edit.

    Next we need to go to the “Project” tab and select go to the “Other Tools” panel. There you will notice that on that panel there is an arrow with a drop-down menu.

    In that menu we can find the command “Add Table to Catalog Database,” we need to click on that command as seen on Figure 2 or type AEADDCATALOGTABLE from the command line

    Figure 2

    Once we activate this command, a pop-up window is going to appear asking us to select the catalog database which we want to edit. If we want to modify the main default catalog database, we select the file “default_cat.mdb” as seen on Figure 3 (left). We select the database we wish to modify and we click on OK. A new window is going to come up displaying all the available tables found inside the catalog browser. If we want to add a new family, we need to enter a Table Name in the available field and if we desire we can add a Table Description, which is optional as you can see on Figure 3 (right) and click OK.

    Figure 3

    Those are all the steps needed to create a new table inside the catalog database. Now for us to see the changes reflected on the catalog browser, we need to switch the active project or re-start the software as this will force the software to reload all the files. Then will be able to see your custom created tables inside your database ready to be populated as seen on Figure 4


    Figure 4

    How to Create an Empty/Smaller Catalog Database in AutoCAD Electrical

    When we are working with AutoCAD Electrical, one of the keys features of the software is the ability to quickly grab information from the catalog browser so it can be later on be used in our reporting tools such as the Bill of Materials. We can also quickly add custom part number as the manufacturers keep adding new components to their catalogs.

    What is lesser known to a lot of users is the fact that this database (default_cat) has a considerable size of approx. 550Mb, as seen on Figure 1 and that file size can quickly add up if we constantly have the need to add custom part numbers to the catalog.

    Figure 1

    Depending on the speed and reliability of your internal network, having multiple users share this file can be quite taxing on the network’s resources and if you require to access the file over a VPN, you could see some serious lagging.

    If you are experiencing this kind of issues, AutoCAD Electrical comes with a feature that will allow you to create an empty database so you can significantly reduce the size of your custom database. As a best practice, we can work with a primary database which contains the main part numbers that come from the installation, and work with a secondary database which will only contain your custom/new part numbers with a much smaller file size.

    For us to create an empty database we need to fist create a brand new project and the proceed to create Project Specific Catalog Database, which will contain a database with only the part numbers used in that project, and since its new, the project’s catalog database will be empty. This command can be found in the Project tab, inside the Other Tools drop-down menu as seen on Figure 2.

    Figure 2

    Once we start this command we need to keep this new database as separate, as seen on Figure 3, and we will be able to create an empty database for us to us exclusively for or custom/new parts and we can rename it to custom_cat or secondary_cat so it’s easier for other users to understand its use. As default, the new database will be saved inside the project folder of the active project.

    Figure 3

    The last step is to compress the database by using MS Access, selecting the Database Tools, and use the command Compact and Repair Database. When the command is complete you can safely close MS Access and the database will have been compressed to a much more manageable size. As you can see on Figure 4, the database file size has been considerably reduced.

    Figure 4

    With a new empty catalog database, now we are ready to set it up as a secondary database for our project and start using it exclusively for our new/custom part numbers in AutoCAD Electrical.