fbpx
  • WHAT’S NEW IN REVIT ARCHITECTURE 2024.1

    BY: Mahsan Omid

    The latest version of Autodesk Revit (2024.1) is just out!

    Soon after the last release of version 2024 in April this year, Revit 24.1 continues to promote some of the most intriguing and much awaited enhancements. This release includes features and enhancements for data management, visualization capabilities, more accurate documentation, design efficiency and reduce re-work. Let’s take a look:

    Search and zoom in the project browser.


    The latest update introduces improved zoom functionality in the Project Browser by utilizing the CTRL key + mouse scroll. This allows users to easily zoom in and out, providing a seamless and consistent zooming experience throughout the application.


    2- Up/Down navigation after searching in Project Browser

    Explore Project Browser search results using the Up and Down arrow keys. Get faster to a selected search result.

    3- Apply Area Rules setting

    In Revit 2024.1, Revit now remembers the “Apply Area Rules” settings shows up in options bar when creating or modifying Area Boundaries. The remembered values is stored in the Revit.ini files, under the ‘AreaBoundary_ApplyAreaRule’ variable.

    4- Add visual style in type preview

    To better visualize how an element is displayed in your model, apply a visual style to the element in the Type Properties dialog.

    Use the control in the lower left corner of the preview pane of the Type Properties dialog to change the visual style of the preview.

    5- Site Design- Simplify Toposolid

    You can adjust the number of internal points in a Toposolid by inputting the percentage of points to preserve.

    Input number ranges between 0-100% Revit will provide instant point number changes responding to the input text. Input 0% will remove all the internal points, but please note the points on boundary will be preserved and remain untouched during the simplify process.

    6- Site Design- Add Split Line enhancement and Chain Line Selection

    Now users can have consistent behavior between Add Point and Add Split Line

    Split Line Enhancements

    You can create Chain lines Along the surface with the same offset to create Path along the existing Topo. ​You can create Chain lines with Absolute height to easily shape the Topo to a flatten area.

    Chain Selection on Split Line

    In the previous version of Revit, you were limited on selecting the uppermost split line in a triangulation facet, or select a triangulation facets. ​

    In Revit 2024.1, you can Chain select any split lines. The splines do not need to form a closed loop. You can also modify the elevation of a chain line selection at once.

    7- Export Patterns to a .pat file

    In Revit 2024.1 you can export drafting and model patterns from your model to a PAT file.

    In the Fill Patterns dialog, accessed from the Manage tab, select a pattern or multiple patterns to export to a PAT file. The exported file contains pattern definitions of each pattern selected. Drafting patterns and model patterns must be exported to separate PAT files.

    8- Performance improvement on placing

    Provided a fix to reported lag when placing, pasting, and moving floor-based families and room, area and space tags

    9- Enhance Link IFC fidelity

    Autodesk is using ATF (Autodesk Translation Framework)  to better support the resolution of external geometry for large IFC models, and accurately represent geometry edited with Boolean operations.

    10- Change text alignment property for multiple selected elements using the ribbon

    This improvement allows users to the control text alignment property for multiple selected text elements – this could be done previously in the properties palette, but that was difficult for users to discover and had difficult drop downs without icons.​

    11- Warning for Delete Views in workshared models

    Deleting views in a workshared environment cannot be undone.

    To prevent any accidental loss of data, Revit now displays a warning for deleting views from the Project Browser. The warning message can be optionally disabled.

    If you want to learn more about Revit feel free to Contact us 

    Autodesk Desktop Connector

    An update to the ADC app is now available and you can read about it and download it from here.

    As usual, there have been several defect fixes and a few notable new features.

    • If you plan to use  AutoCAD 2024 products, you MUST install ADC 16.0 or above. (this new release is version 16.2)
    • The Change Workspace option is back. See this document for details.
    • Improved messaging regarding Long Paths.


    To learn more about Autodesk applications, feel free to contact us and one of our representatives will reach out to you shortly.

    Civil 3D 2024

    Well, it’s that time of year again when Autodesk bestows us with the latest release of their flagship Civil Design application. Click here for Autodesk’s documentation. Read on to see which features speak to this blogger.

    File Format

    This is probably the most-asked question, and I’m happy to say that there is yet again, no format change. We are still on the 2018 format. Good news for everyone!

    Performance

    Considerable improvements have been made to:

    • Installation
    • Switching between paper space layout tabs
    • Corridors

    ArcGIS Connector

    We can now save configurations for importing data. Arc objects can now be imported. Objects can be imported as AutoCAD entities if required.

    IFC

    IFC 4.3, which has been available for 2022, is now available for 2024.

    Project Explorer

    This tool is now native to Civil 3D. No need to download and install separate from Civil 3D.

    Subassemblies

    A major change has been made regarding managing custom subassemblies (PKT files).

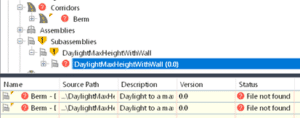
    • PKT files can be saved to a shared folder on a network or even a cloud service such as Autodesk Docs. Civil 3D accesses these in place, no longer in C:\Program Data.
    • If a PKT file cannot be found, Civil 3D will notify you.

    • Tool palettes containing custom subassemblies are far easier to manage now and they are less error prone.
    • Subassembly versioning was added in 2023, but there was no obvious reason for it. Well, now we have a reason. PKT versions can be managed in Civil 3D and new versions can be reloaded and implemented WITHOUT restarting Civil 3D.

    • Since we are on the subject, the eTransmit tool still DOES NOT recognize custom PKT files. Click here to upvote this wish list item.

    Pressure Networks

    • Fitting and appurtenance styles now have an annotative option. Pro Tip: spend some time considering the options. Sizing may not be what you expect. Contact us for some advice when you’re ready.
                                         
    • Fitting and appurtenance styles now support hatching.


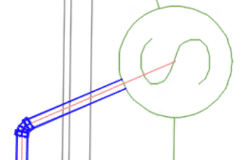
    • Pipe runs can be merged and broken.
    • Pipe segments can quickly be toggled between line or an arc.


    • Bend styles now have a vertical bend option for visibility in plan view.


    Point Clouds

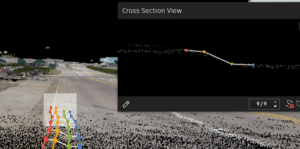
    • Recap can now automatically classify points for any scan type.
    • Point clouds can be manipulated in Autodesk Docs; measured, linear curb features extracted, before inserting into a drawing.


    To learn more about Civil 3D, feel free to contact us.

    Civil 3D: 2022.2.2 and 2023.2 Updates

    As always, if you are able, I recommend always installing the latest updates as they are released. There was a recent Civil 3D update, 2022.2.2, which provides a host of fixes. The 2023.2 update contains many of the same fixes.

    One of the fixes was particularly notable to me as I’ve been working through a support issue with one of my customers. This fix completely resolves his issue.

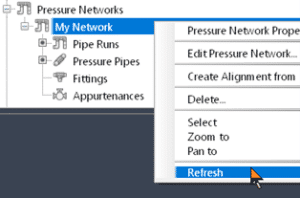
    When I use Quick properties to select pressure pipes, fittings, and appurtenances, there are many.

    Looking in the Prospector, however, there are few. Just 3 pipes and none of the other parts.

    Where are they? With this new fix, I can Refresh the pressure network and all the parts return.


    To learn more about Civil 3D, feel free to contact us.

    CTC Licensing Model Change – What you need to know!

    With the release of the 23.0.0 version of all the CTC Software tools, CTC has taken the opportunity to update their licensing model.

    Licensing for any of the CTC suites of tools was broken up into tiers of licensing with maintenance attached or differences depending on how many employees were in the company. It was tedious to explain, and not too efficient to implement.

    Starting with the 23.0.0 release of the suites, CTC is moving to a CSL model of licensing. This Cloud Shared Licensing is much more in line with the SaS model of software delivery. However, this is deliberately not the named user licensing that Autodesk has moved to. The CSL model is intended to simplify access to the tools while maintaining the flexibility of the network licensing style of license.

    Put simply, the CSL model is a cloud hosted version of the network licensing most of us are familiar with. Which means there is no need for installing license managers on local servers, all users need is internet access to use the CTC tools. The CSL is hosted on the new CTC website that was launched in conjunction with the 23.0.0 suite releases.

    With the new website, there have been additional efficiencies added by automating tasks like the option to renew automatically and automatic fulfillment of orders. The new website will also give administrators detailed insight into their teams’ suite usage and the ability to control the allocation of licenses with the creation of Groups of users on the website.

    The move to CSL was done for efficiency for everyone. This simplifies and standardizes access to the tools, allows for instant license allocation, offers reporting on usage of suites and tools, and simplifies pricing models.


    One thing to note is that the 2022 and older versions of the CTC Suites still only work with the legacy licensing and cannot use the CSL model.


    If you have any questions regarding this new licensing model for the CTC Software, your SolidCAD Account Manager will be more than happy to help.

    Desktop Connector Update

    If you’re an Autodesk Docs/BIM 360/ACC user, this update is for you. A major update is now available. Previous versions were numbered 15.x.x. We are now on 16.x.x.
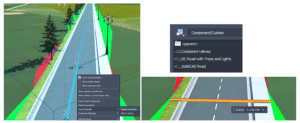
    Read on to find out what’s new.

    It is not recommended to have some users on 16.x and some on 15.x. It is not a requirement to upgrade all users to 16.x, but it is recommended due to workspace and permissions changes.

    New Behavior:

    Let’s start out by outlining some new behavior that will stump you if you didn’t know. In previous versions, when a design file is dragged into a Docs folder, all reference files would be uploaded automatically. Now, only the design file is uploaded, no references. There are options, however which I will outline next.

    Upload Files and References tool:

    This is the tool you should be using to upload files. That same design file can be dragged into this new interface and its references will be listed and uploaded. It’s your chance to visualize all file relationships prior to uploading.

    Performance:

    File saving, opening, locking, and other file access tools are now faster.

    Home Screen Changes:

    Current processes can be easily viewed after clicking the DC tray in Windows.

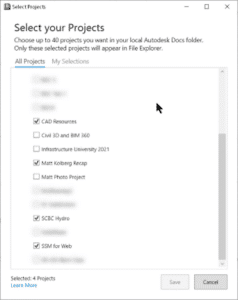
    Select Projects:

    You no longer need to have all your projects displayed and sync’d. Let’s say you’re invited to 30 projects. Previously, all 30 would be shown in Windows File Explorer. Now, only selected projects are shown. Up to 40 projects can be sync’d.

    File Explorer:

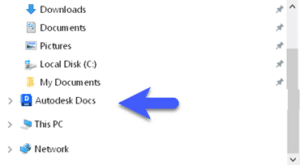
    Autodesk Docs is now in line with “My PC”. Also, the default workspace has been changed to C:\users\USERPROFILE\DC.

    File Explorer:

    Most of the usual right click options now exist for folders and files. Delete, create shortcut, etc. One new one could be a game changer. Always keep on this device. Folders and files can be selected to automatically synchronize to your local drive without having to open the file or click Sync. When Free Up Space is used, folders tagged with Always keep… are retained.

    This is significant for al least one good reason: CAD Resource files. CTB, Blocks, Civil 3D Pipe Catalogs, etc. can now be stored in an ACC folder and forced to be sync’d at all times locally.

    File Locking:

    Most non-Autodesk files get locked when opened. MS Word DOCX files, for example. Notepad documents and PDFs opened from within a browser window are not locked.  PDFs opened from Bluebeam or Adobe are locked.

    Free Up Space:

    Using a Windows setting, space can be freed automatically. See this document.

    Recap 23.1 Update

    Autodesk’s point cloud management app, Recap, has a new update. Read about it here. Download it from your Desktop App, or at https://manage.autodesk.com/

    All these features are welcome, but two of them are great news to many, especially Civil 3D users. Specifically, the features related to point classification.

    Notable changes are:

    • Scans are now imported and indexed in parallel, meaning faster imports.
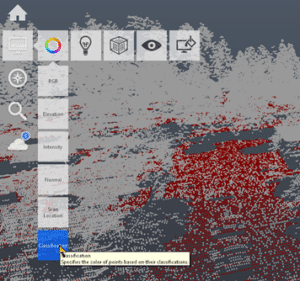
    • Clouds can be displayed using their classification if any exist in the imported file.

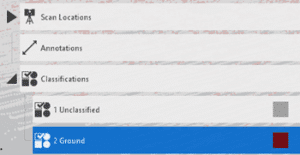
    • Classifications appear in the Project Explorer. These can be managed as needed. All points except, ground points, for example, can then be exported for use in other apps, like Civil 3D.

    • Unclassified points can be Automatically Classified. Scans must be structured, or the classification will fail.

    Civil 3D: 2023.2 Update

    Autodesk has released the next update for Civil 3D 2023.  Find the release notes here. Install it from the Desktop App or download it from https://manage.autodesk.com

    In this blogger’s opinion, this is one of the most complete mid-cycle updates in recent memory. Here are some highlights:

    Performance

    Always welcome!

    • Up to 60% Improvement
      During various operations including switching between drawings, corridor rebuild, and editing pipe networks.

    Labels

    Labels, especially when many exist in a Civil 3D drawing, can affect performance. All these settings are designed to boost performance.

    • Toggle labels on or off in Paper Space or Model Space
      If you don’t need to see labels right now, turn them off with a new setting.
    • Level of Detail on or off
      As you zoom out, labels will disappear.
    • Redraw options
      Choose when and how labels are redrawn.

    Corridors

    Users have been asking for this one for quite a while.

    • Transitions
      Use a tabular interface to define how subassemblies’ parameters transition between stations. For example, the daylight slope can be 2:1 at 0+000, transitioning to 4:1 at 0+050. Bus bays, or any lane widening can be defined this way. We are no longer limited to using polylines or alignments as width targets.

    Profile Views

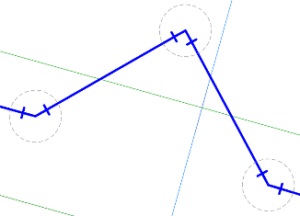
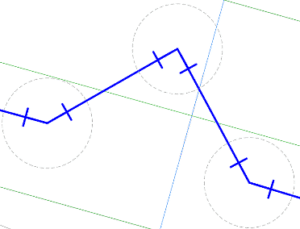
    Display additional information about objects and their proximity to a parent alignment.

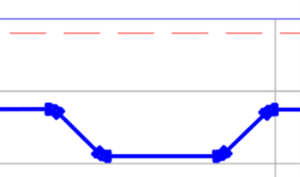
    • Point Proximity Band
      Show the distance between points and the alignment, and labels distances within the alert distance in red:
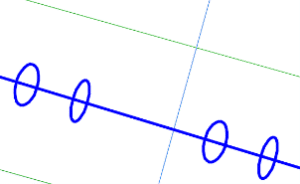
    • Alignment Proximity Band
      Show the distance between an alignment and the parent alignment and use ticks to show alignment segments within the alert distance:

    Subassembly Composer

    If you create your own subassemblies, these new features will benefit your productivity and help to reduce errors.

    • Point, Link, and Shape codes
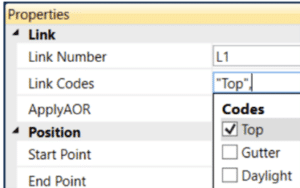
      Define these codes in a dialog and apply them when and where needed.

    • Find and Replace
      Find and replace values almost anywhere in your code.

    • Dynamic Updates
      Change the source definition, and automatically update the instances.

    Pressure Networks

    Since Pipe runs, we continue to get useful features in this area.

    • Connect to Structures
      Pressure pipes can now be connect to pipe network structures and labeled.

    • Appurtenances Don’t Move
      These objects had the nasty habit of moving when the pipe run was edited. This is no longer the case.

    Rail

    These updates bring Civil 3D’s rail tool more in line with U.S. standards..

    • Turnout Blocks
      Turnout symbols can now be inserted perpendicular to the parent alignments.
    • Turnout Abbreviations
      Updated the abbreviation of critical points in the US turnout catalog in line with US regulations.

    Project Explorer

    Improve your reporting.

    • Property Set Objects
      Added support for reviewing property sets in the Project Explorer window.
    • Property Set Review
      Added support for including property sets in object sets, reports, AutoCAD tables, and spreadsheets.
    • Property Set Values
      You can determine the order and visibility of the value, description, and property names. Property set values can be edited.

    Grading Optimization

    Improve your preliminary grading.

    • Pathways
      Objects that represent sidewalks, driveways, and other ingress and egress paths.
    • Ridge Lines
      Objects that represent a linear elevation that directs drainage away from its placement.
    • Isolate Internal Zone Drainage
      You can now isolate drainage objects (drain lines, low points, and ridge lines) within a zone from affecting optimization outside of the zone boundaries.

    Infraworks: Custom Assemblies

    It’s relatively easy to create a custom component road assembly within an Infraworks model.  But how does one save that custom assembly for use later?  Read on to find out!

    The answer depends on how you’d like it to be shared:

    • Export for use in other existing models.
    • Save for use when new models are created.


    Saving the Assembly

    First, to save a custom assembly, simply right click the component road and choose Add to Library.  Choose a station to copy and give the new assembly a name.  The new assembly will appear in the style palette.

    Choose a station to copy and give the new assembly a name.  The new assembly will appear in the style palette.

    Export for Existing Models

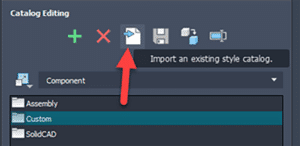
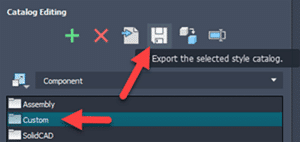
    The individual assembly cannot be exported, but the catalog can.  Select the catalog, in this case, Custom, and click to export to a JSON file.

    The JSON file can then be imported into a different existing model using the import button.  The assembly will be available in the styles palette.

    Save for Future Models

    There is no “tool” for this, but if one copies the appropriate files from and to the correct locations, then it works just fine.  The custom assembly files can be found in the model’s folder path.

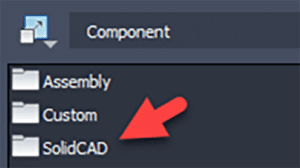
    …model.files\unver\Content\Styles\Component\  .  Possibly in a Custom sub-folder.

    There will be 2 files for each assembly.  A PNG image and a ACItem file.

    Copy these two files to the Infraworks standard folder.  Feel free to create a sub-folder here to place your custom assemblies.  This folder will appear within Infraworks.

    C:\ProgramData\Autodesk\InfraWorks\Resources\LocalLibrary\Styles\Component\

    The JSON file can then be imported into a different existing model using the import button.  The assembly will be available in the styles palette.