• Bluebeam: PROFILES

    What is a profile?

    One of the most essential features in Bluebeam that will help all users to organize themself is maybe one of the less known; Profiles.

    Profiles in Bluebeam are important. It is not just about having a custom interface. It’s more about having an organized tool that will make you more efficient to work and you will be able to deploy at large in your department. In addition to the interface, by exporting a profile, you export everything you customized in Bluebeam (including Tool Sets and Markup list columns). So everybody is unified in their work.


    How to create a profile

    When you start Bluebeam, you will first go to the Revu menu and click to see the menu show up. Then go to Profiles and select Manage profiles:

    A dialog box will open, and you will be able to add a new profile:

    Click on Add… and another window will open (don’t worry there is no more after that)

    Add your name or your service/department name and click OK. Your screen will flash (don’t worry it is not exploding) and now you are in your profile.

    You will notice it looks like the previous one you were in. That’s normal. Revu doesn’t want you to create everything from scratch so it uses the last profile as a canvas you will work on.

    But the first step is done. Let’s customize it:

    How to custom my interface?

    Before customizing your profile, you will need to ask yourself what you need to do with Bluebeam. This little brainstorm will be valuable to know what we will show and we will hide.

    From there you have 3 ways to do it.

    The first will simply consist of right-clicking where the current icons are to bring up the toolbar’s menu.

    Then select from the available menu the toolbars you think you need. When you have done this, the selected bar will be displayed in your interface.

    Now we will see how to create your own toolbar.

    To do this, right-click at the top of the screen to bring up the toolbar menu and select Customize

    A dialog box will open to allow you to customize existing toolbars and create your own toolbar

    In order to facilitate the understanding of this part, we will identify each part and detail them:

    1- Toolbars

    These are all the toolbars that currently exist in Bluebeam and this is also where you will be able to create your own

    2- Items

    These are the tools which are the toolbars that we select in part 1.

    3 – Orders (and Categories)

    This is where all the tools Bluebeam offers are located. These are classified by category

    To create your own personalized toolbar, click on the   icon and a window will show up

    Name your toolbar as you wish and click OK

    After that, we are going to select the tools that we are going to need for our most common tasks and add them to our custom bar.

    The tools that we will put must be the ones we want to have at hand because they are the ones we will use most often

    Finally, let’s see the 3rd and final way to add tools to your custom bar.

    When you navigate the Bluebeam menus to choose a tool, you will notice a pushpin next to the name of the tool. Click on it to bring up the menu of toolbars.

    Select where you want to add this tool (in which bar) and now the tool is available on your toolbar.

    Remember to save everything by going in Revu →Profiles→ Save Profiles before closing Bluebeam.

    Export a profile

    To export a profile and everything in it, go to Revu → Profiles → Manage profiles.

    Select the profiles to export and click on Export. Choose the location where your profile will be exported. Copy/paste it into an email and send it to everyone who will work with it from now on.

    Why Revu Is the Essential Tool for Facilities Teams Leading Return-to-Office Plans

    This article was originally published by Bluebeam, Inc. on the Bluebeam Blog.

    As many organizations across the globe begin to bring employees safely back into the office after months of remote work due to the COVID-19 pandemic, facilities managers are emerging as critical players in the transition. And Bluebeam Revu is essential in making it happen.

    While employees have been busy adapting to working remotely, facilities leaders have been spending much of the last six months preparing for employees’ inevitable return to the office—whenever that may be.

    For many, that day won’t come until later in 2021. Several large companies including Google, Facebook and Salesforce.com have announced that their employees won’t be required to return to company offices until as late as August 2021.

    Others are considering embracing remote work indefinitely. Twitter is giving employees the green light to consider the option, which will allow many of its employees to permanently escape the high cost of living around the company’s home city of San Francisco. Facebook CEO Mark Zuckerberg, meanwhile, has said that the social media company will eventually move toward having half its workforce remote by 2030. The Menlo Park, California-based company also just hired a director of remote work as it plans for the shift.

    Not everyone, however, is embracing the remote work movement. Reed Hastings, founder and co-chief executive of Netflix, recently told The Wall Street Journal that he hasn’t seen any positives from full-time remote work. “Not being able to get together in person, particularly internationally, is a pure negative,” he said.

    A big, but manageable, undertaking

    Organizations are anxious to get employees safely back into the workplace, and determining what that will look like is a complex process, according to Candice Stong, a project manager on Bluebeam’s facilities team. This team manages the construction technology company’s global office portfolio, including its Pasadena, California, headquarters as well as offices across the United States, Europe, the U.K. and Australia.

    “To say it’s been crazy over the past six months is an understatement,” Stong said. “We all work from home now, but, eventually, we’re going to be back in the office. So, we have focused on what that will look like according to the requirements set forth in the various safety protocols.”

    All workspaces are not created equal, and for most organizations, updating the workplace to meet the various public health protocols is necessary. In recent years, many companies embraced open, flexible, activity-based spaces, along with densely populated workstations with assigned seating. Others adopted a flex-work model using “hot-desking.”

    These strategies, which allowed for increased density, have created a challenge given physical distancing requirements in a post-COVID environment. For Bluebeam, clusters of workstations situated closely together wouldn’t suffice to maintain the six-foot physical distance between employees necessary to meet public health protocols. Narrow hallways would have to be re-routed into one-way paths.

    Rules around conference room occupancy and use would need to be instituted. In-office kitchen areas would need to be reimagined, along with the common areas and other informal gathering spaces.

    Additionally, floor markers, as visual cues, ensuring physical distance requirements are met, as well as zones for temperature checks, are markings that were included on the return-to-office plan documents.

    Enabling quick-and-nimble planning

    As the early weeks of all-company remote work settled in, Stong began receiving inquiries from vendors offering to assist Bluebeam with workspace reconfigurations and occupancy management solutions considering the likely post-COVID requirements to come. “With access to Revu, utilizing outside resources to manage the return-to-office workspace planning didn’t seem to make sense,” Stong said she remembered thinking at the time.

    Given the uncertainty of the pandemic and how our workspace would need to adapt to continuous changes in health protocols and government agency requirements, Stong said she needed to be more self-sufficient with creating relevant workspace plans and be swiftly responsive to changes.

    “Being solely reliant on third-party vendors to map out the future of our workspace would take time and money,” she continued.

    The larger situation surrounding COVID-19 was seemingly changing each day, which meant occupancy management and workspace reconfigurations required for a safe return would need a quick-and-nimble approach. An approved plan one week might become obsolete the next.

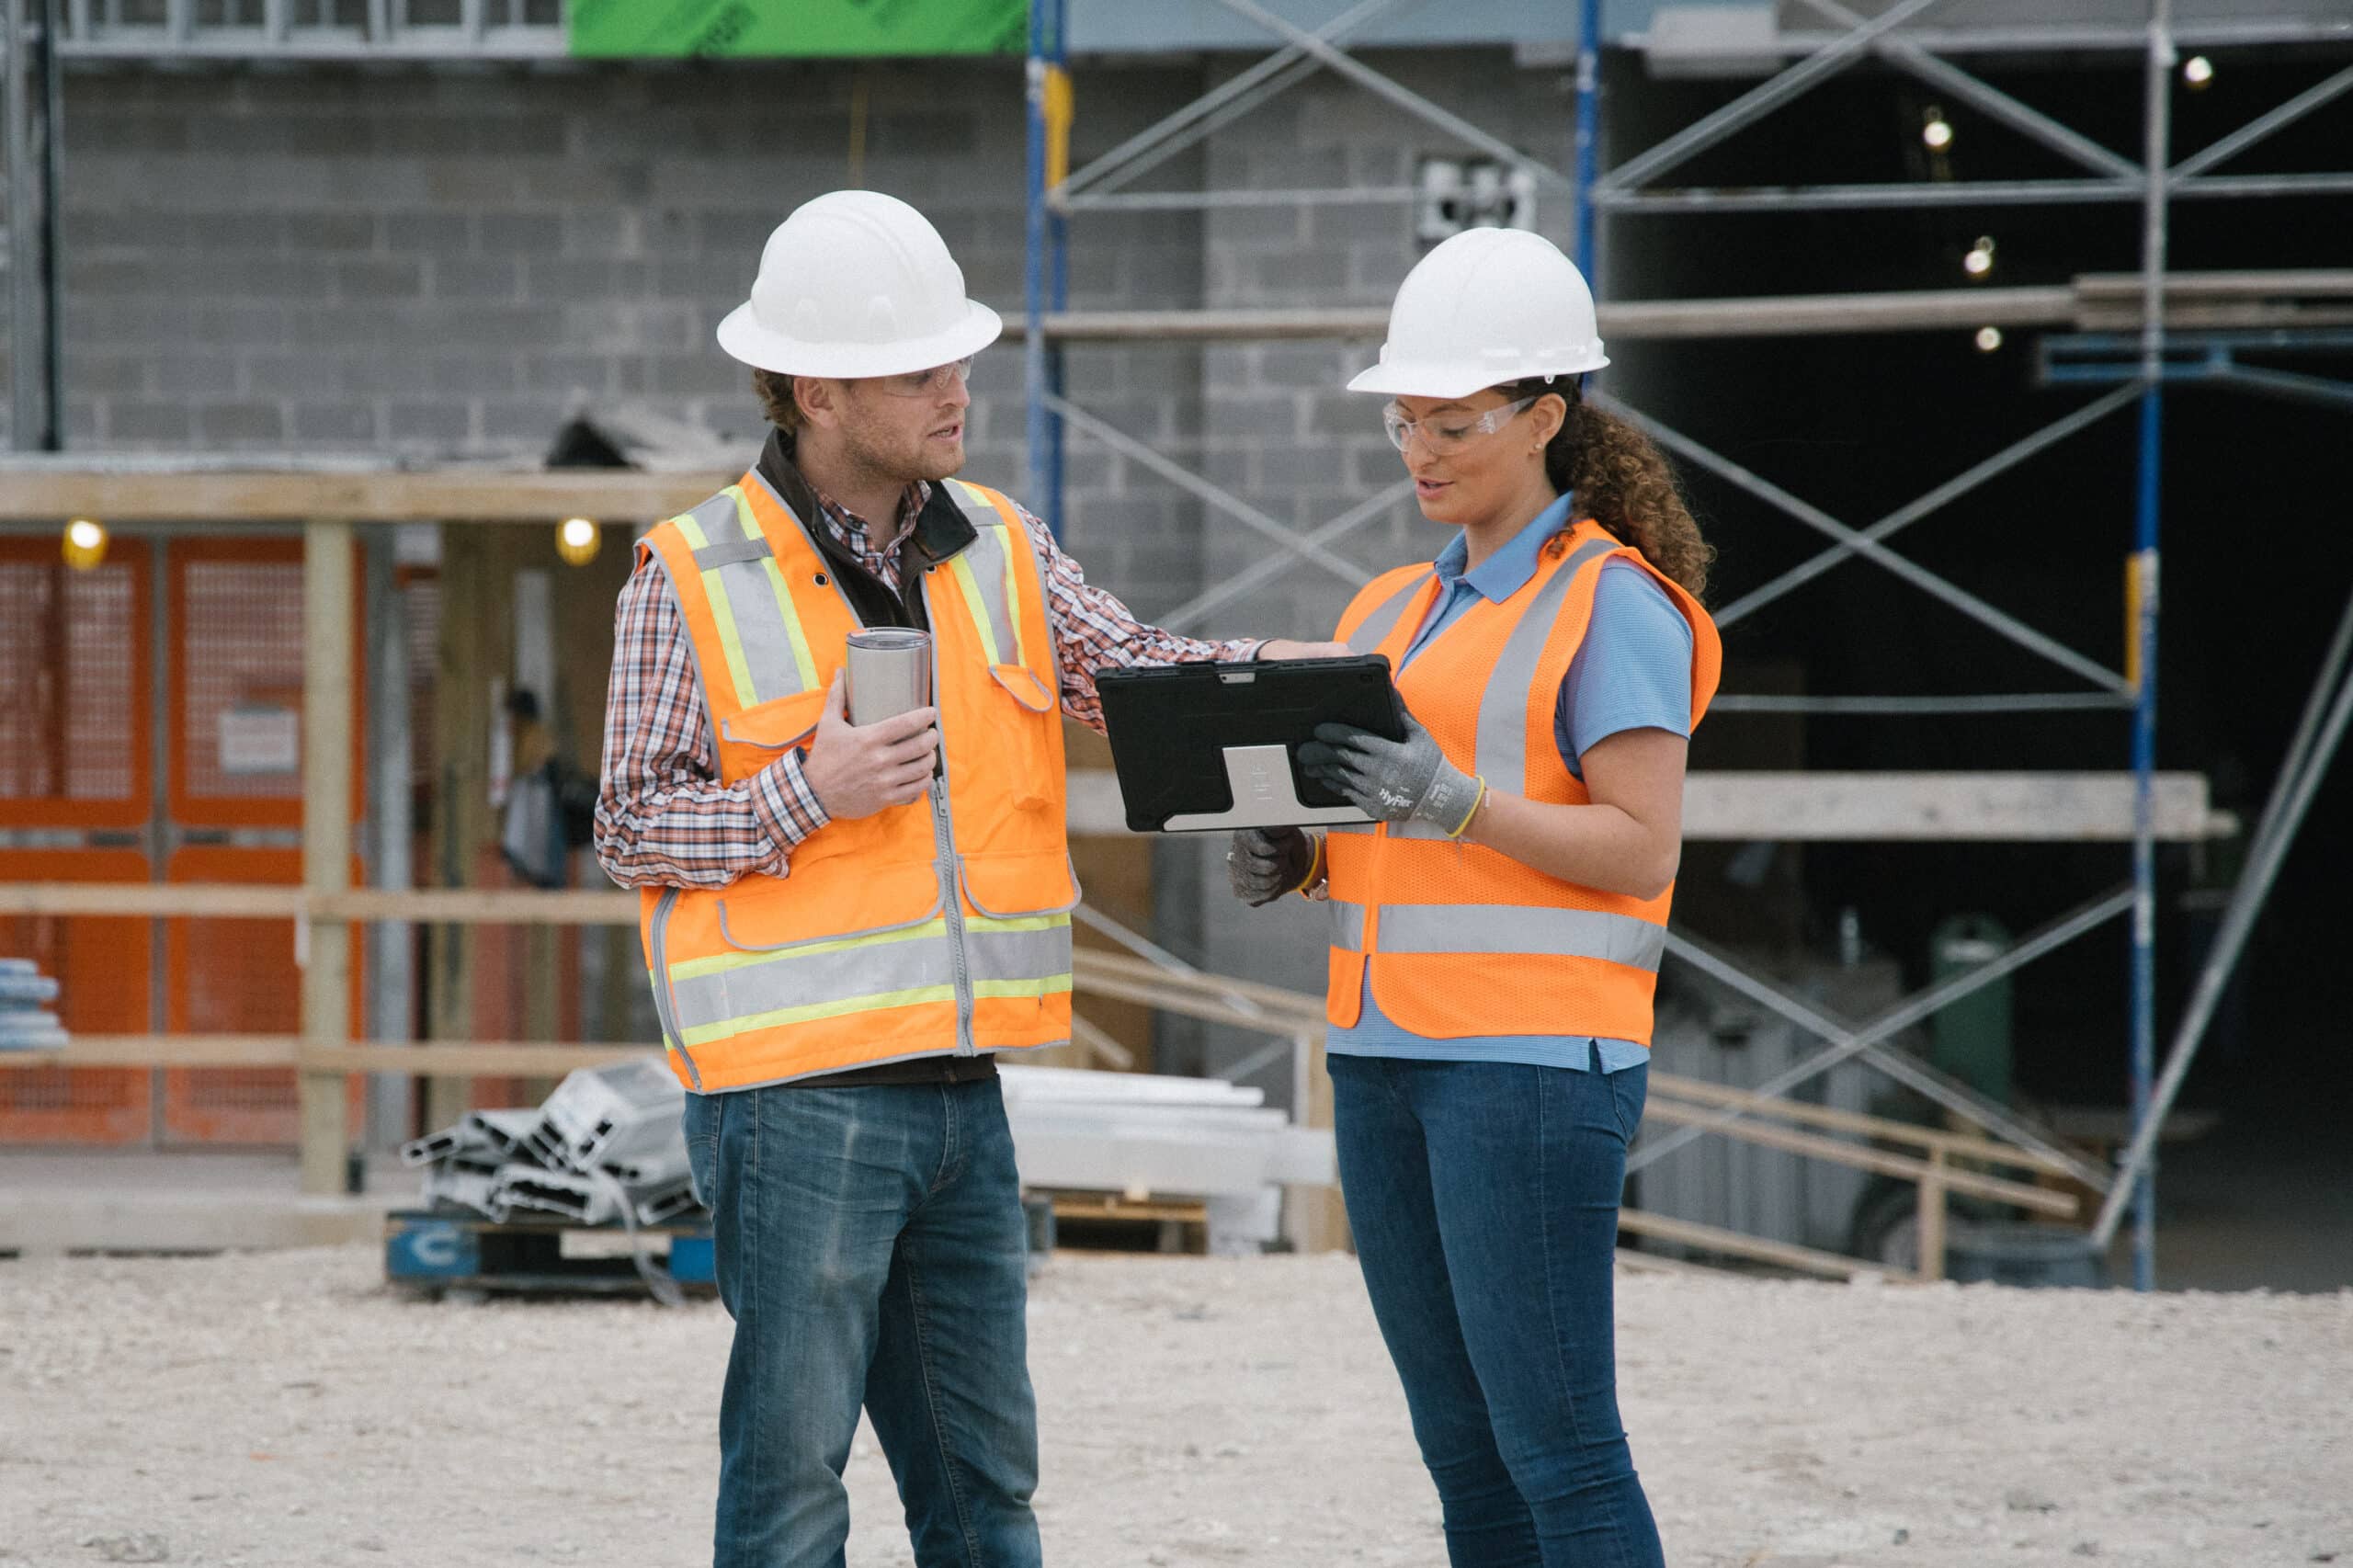
    Even for facilities managers that choose to work with an outside resource, it would be smart for them to collaborate in the reconfiguration effort as much as possible. This way, if and when last-minute changes do come to light, the facilities manager can work with the plan documents themselves to institute the change—all without having to wait for the contractor or architect to respond under potentially tight approval deadlines with regulators.

    “I think the challenge is facility teams now need to know their buildings better than ever,” said Ryan McGuinness, Bluebeam’s North American enterprise sales director, who interacts often with facilities managers at construction and architecture firms. “They’re trying to do whatever they can with the tools they have, but then they also need to communicate that information to the masses.”

    What’s more, facilities managers’ ownership of the return-to-office plan and redesign allows them to take advantage of learning how to use some of the tools their architectural counterparts use to plan and plot out changes. Of course, becoming an expert in the tools architects use for design—like Revit or AutoCAD—is likely unrealistic. Luckily, there is another industry standard tool that is easy to adopt, putting the power in facilities managers’ hands.

    Enter Bluebeam Revu

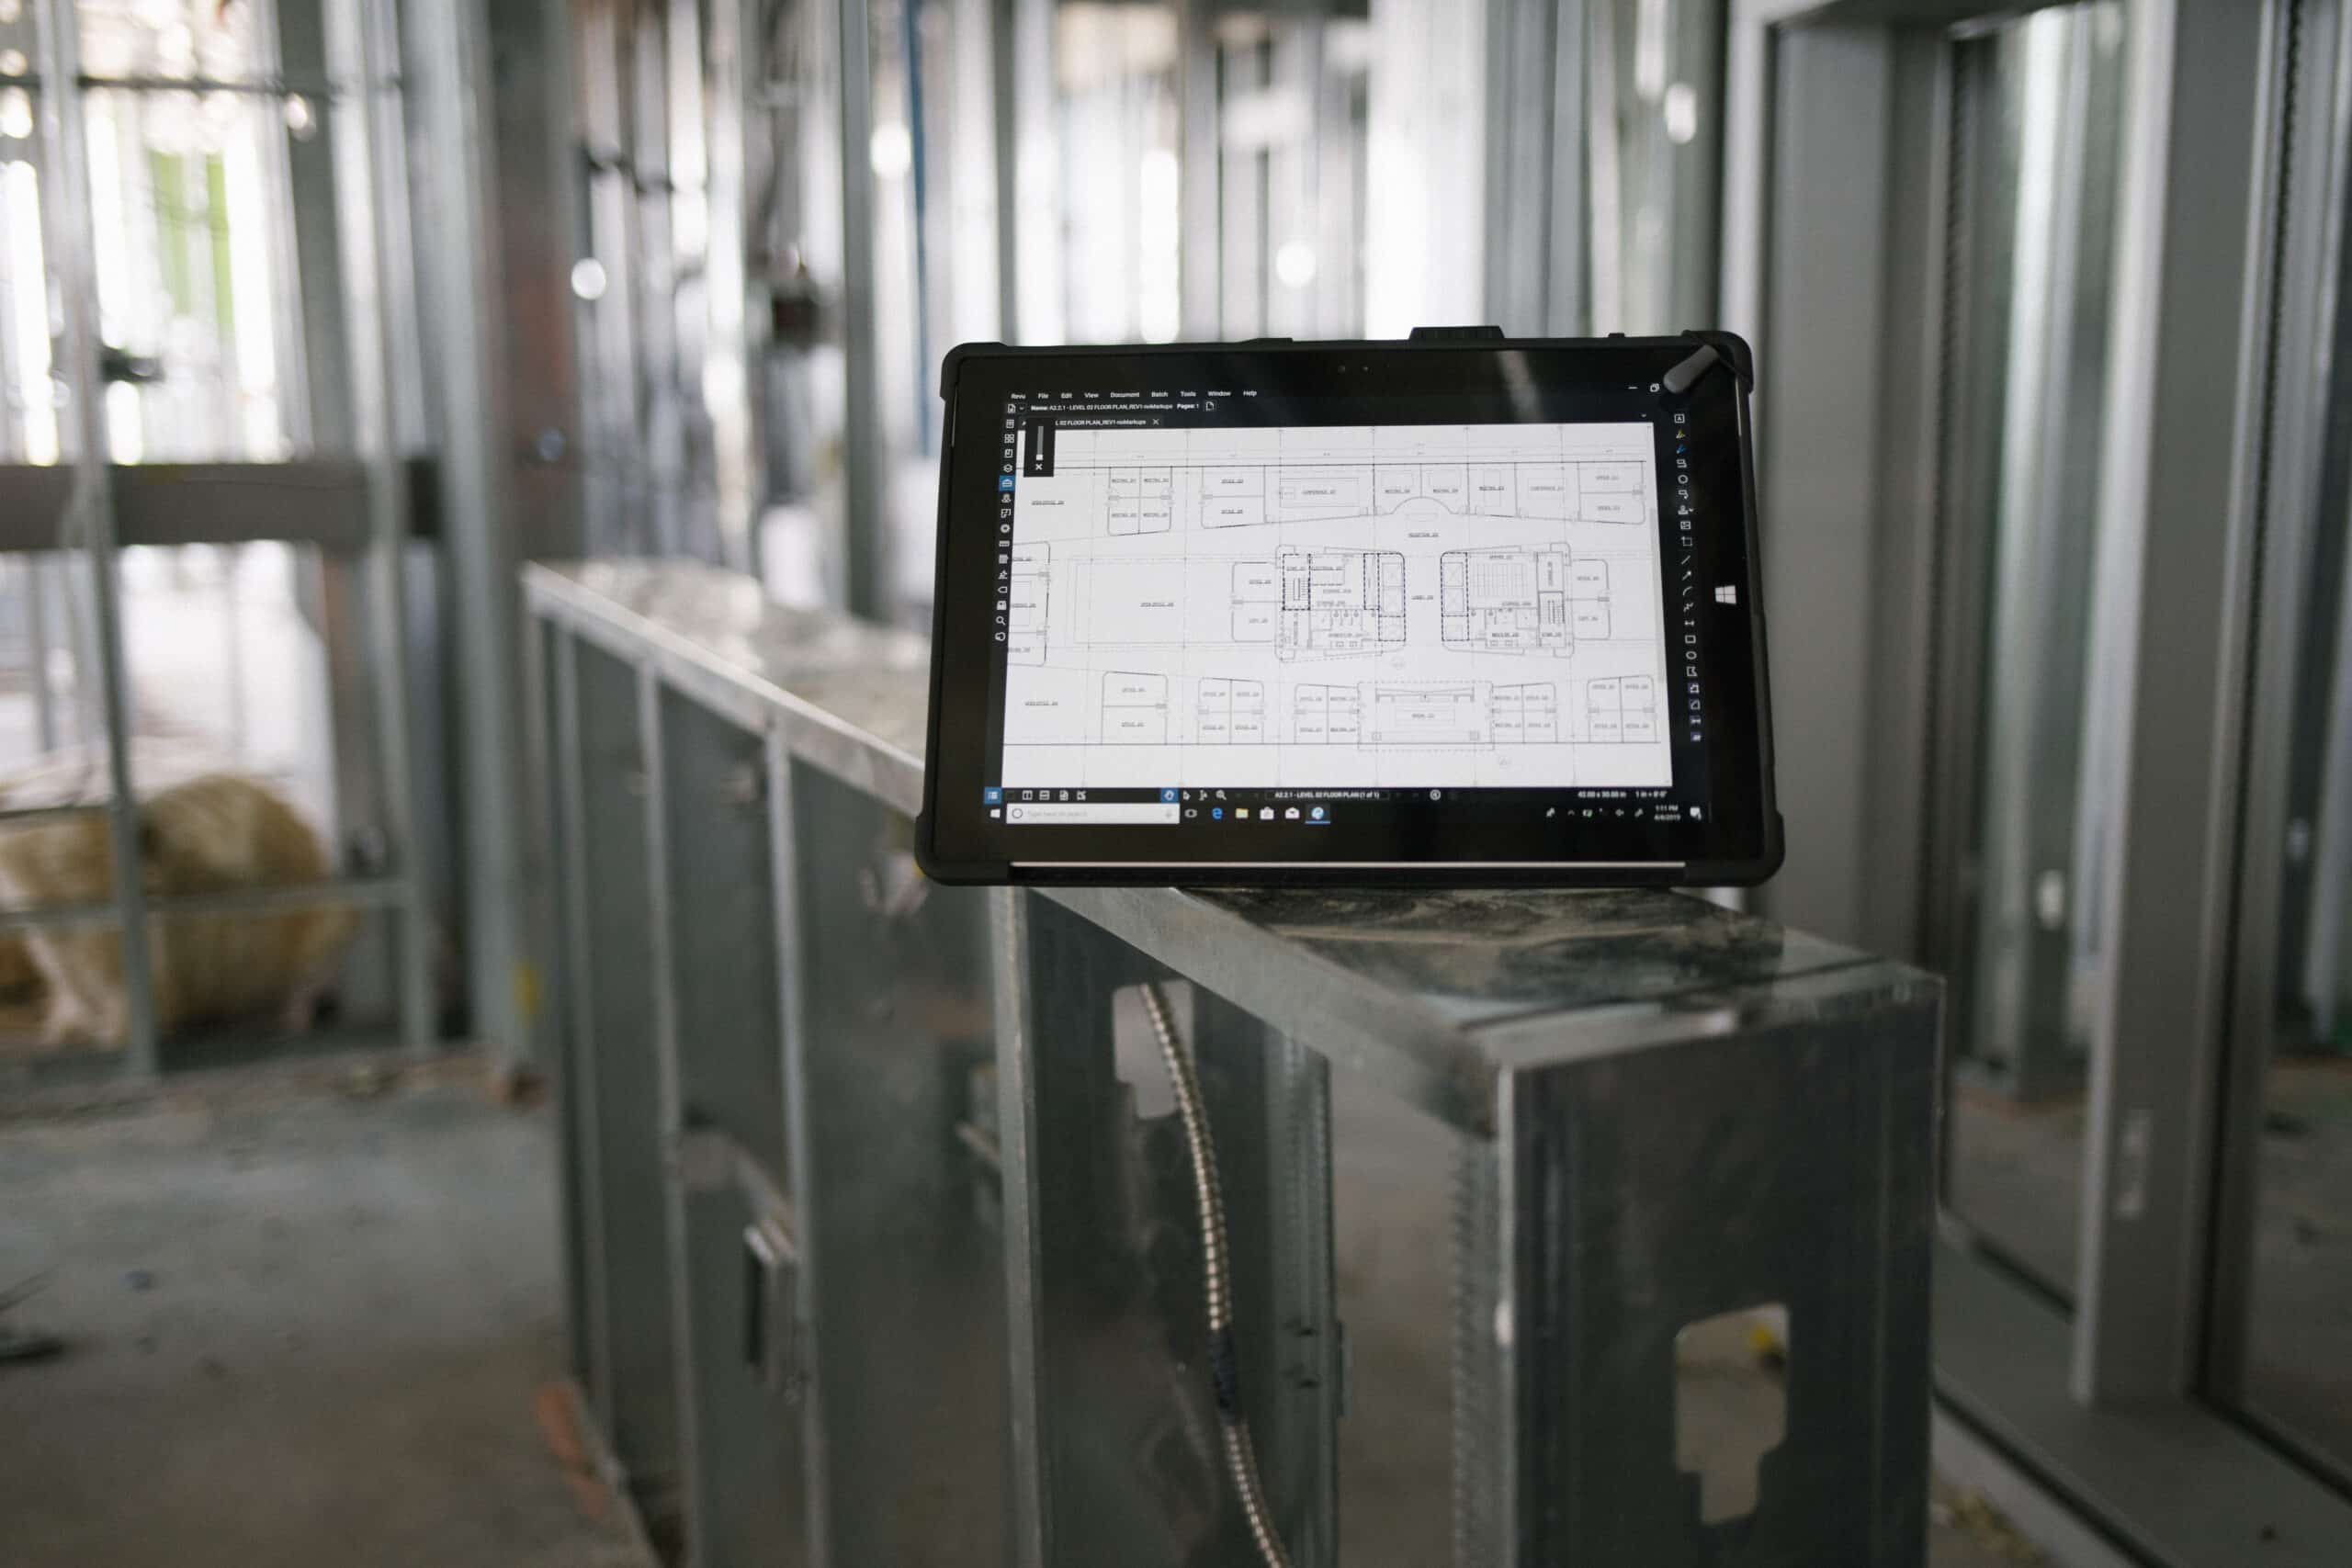
    That tool is Bluebeam Revu, whose intuitive PDF markup and editing capabilities make it a manageable but powerful tool for facilities managers to learn when it comes to creating, managing and communicating return-to-office workspace plans.

    Aside from detailed and industry specific reconfigurations and markups that will need to take place in workspace plan documents, it’s likely that many non-technical company stakeholders will eventually need to view and sign off on any final plans. This makes Studio in Revu, Bluebeam’s cloud-based document management and real-time collaboration portal, a valuable tool for accessible document communication and approvals.

    “I see a lot of our customers being able to use Revu’s advanced markups to give a visual story of what’s going on with their current layout and with what needs to be changed,” McGuinness said. “And then also  being able to communicate that through Studio to anyone involved. Studio is going to give you an audit trail of all those markups.”

    Revu tools for facilities managers 

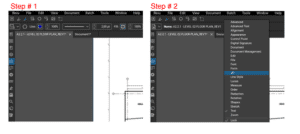
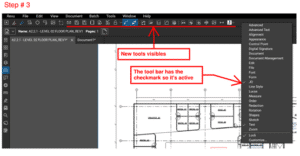
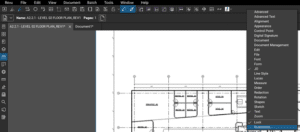
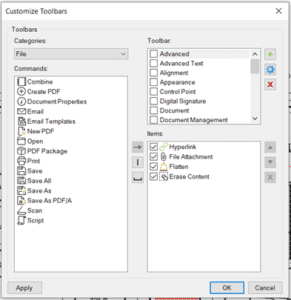
    There are specific tools and capabilities facilities managers should be using in Revu when embarking on return-to-office planning.

    Basic Markup Tools: Simple markup tools like rectangles and circles, etc., can be used to identify and manage occupancy and physical distance requirements, with fill colors to designate, visualize and communicate various seat assignments. “You could do colored rectangles and place them over desks, but they can still have opacity,” said Andrew Gaer, Bluebeam’s technical account management director.

    Custom Line Styles: Revu allows users to create custom line styles to designate different things. For instance, if a facilities manager wanted to present changes in “path of travel” on the return-to-work plan documents for specific hallway traffic, they can use a custom line style that has text in line with that, according to Omar Sheikh, Bluebeam’s senior professional services manager. “It could also be a text box even that says, ‘Temperature Check Station,’” Sheikh said.

    Image Markups: Revu allows facilities managers to take photos of certain things in an office or use web-based images to indicate hand sanitization stations or floor markings and include them in the PDF for employees to view and reference. Gaer said this tool could be used to take pictures of temperature check or hand sanitation stations, for example, so office workers can see exactly where they should look for when they return to the office.

    Sketch to Scale: This allows facilities managers to create shapes such as circles or rectangles to the exact scale needed for an office plan. If a facilities manager wanted to designate an area as off limits, for instance, they could use this tool to create a rectangle with the exact dimensions of the real-life area. Also, if a facilities manager wanted to create a circle designating six feet to mark up areas requiring strict physical distancing protocols, they can use this tool to do it.

    Legends: The markups Legend is able to help facilities managers create a plan document that will ultimately be simple to understand for any collaborators or viewers either marking up, approving the plan document or using the plan when back in the office.

    Calibration: This tool will allow facilities managers to determine the proper scale for the plan document. This will ensure all measurements moving forward will be accurate—an important element considering that proper distancing and spacing is required in a return-to-office plan document.

    Studio: Once an initial draft of the return-to-office plan document is ready for review and additional collaboration, facilities managers can manage the document (or set of documents) in Studio Projects, Bluebeam’s cloud-based document management solution. They can then start a Studio Session to invite several different reviewers or collaborators to add notes and make markups of their own in real-time no matter their location.

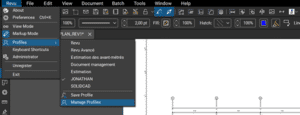
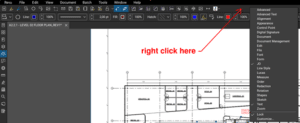
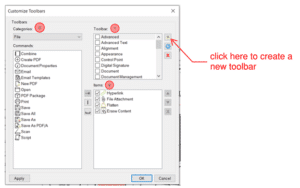
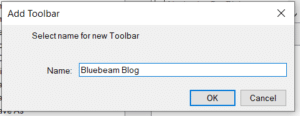
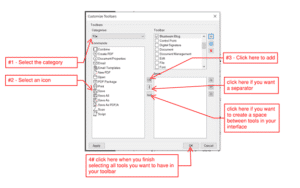
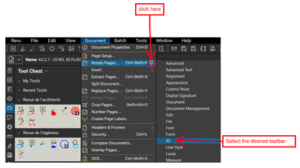
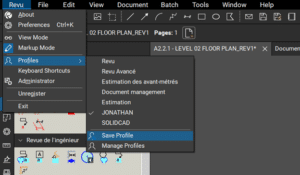
     Tool Set: Facilities managers will likely need to make changes to their plan for multiple locations within their organization, so they’ll want to add these newly created tools to a Tool Chest in Revu so they can easily be accessed for future use.

    On-Demand Access to the Latest Technical Drawings Anywhere

    Having instant cloud-based access to the latest asset information is now a priority for today’s manufacturers, as it maximizes safety and labor efficiency.

    Accurent has added new features and integration tools to ensure maintenance teams have full access to the latest asset information. One of these features includes field access to engineering documents via mobile devices for added flexibility.

    Made for Each Other: Accruent’s Enterprise Asset Management & Engineering Document Management Systems

    Usually, Enterprise Asset Management (EAM) systems keep track of various documents, including work orders and bills of materials. However, field technicians require access to many other technical documents and drawings types linked to these assets.

    Out in the field, a maintenance professional may require the following documents and information in to succeed:

    • Technical drawings, schematics, wiring diagrams
    • Asset manuals and documentation
    • Maintenance and operation procedure guides

    In a standard office environment, it can be a challenge to search for the required documents through various folders and different locations, and while the lack of tools compounds on-site this obstacle. Communicating comments and markups to documents also prove problematic in this scenario.

    Accruent’s Meridian engineering document solution offers integration to asset management tools to streamline access to the latest information and documents. This allows for easy access and a single source of truth for engineering documentation in the field or the office while eliminating duplicate data entry into multiple systems.

    Ensure easy access to accurate, up-to-date engineering documentation related to work orders — download our brochure to learn more.

    Combining the Power of Meridian & Maintenance Connection

    While in the field, a Technician can use the mobile version of Maintenance Connection to document their work via notes, pictures, and videos.  Maintenance Connection’s ability to integrate with Meridian means that this information is also available to the corresponding engineering teams, which improves the collaboration of the latest data.

    Back in the office, Engineers can review, approve, and update technical documents and drawings in Meridian, giving the Technicians the most up-to-date version of this data in real-time.

    As a result of this integration, these teams can:

    • Improve collaboration between departments
    • Spend less time managing information
    • Find the latest data efficiently across multiple systems

    On-demand Anywhere access of your Engineering Documents

    Maintenance technicians now have access to many IoT tools, such as mobile devices, when working on asset management. Accruent’s Meridian Mobile offers an easy-to-use mobile application that gives technicians access to the latest engineering information online and offline.

    The Meridian Mobile app provides the following functionality:

    • Preload the latest asset information before going on-site
    • Technicians can comment and attach photos/documents to the corresponding documents while on-site
    • Synchronize any comments/photos added while offline once a connection is available

    The Meridian Mobile app is available for iOS, Android, or Windows. It is a great tool that allows users to view and approve assets documentation and view their task lists.

    To learn more about Meridian solutions and how they can help your team, please contact the SolidCAD Meridian team.

    Five Ways to Design and Access Masterfully Efficient Digital Dashboards in Revu

    This article was originally published by Bluebeam, Inc. on the Bluebeam Blog.


    Digital dashboards offer teams a centralized, easily navigable hub for critical project documents and information. Don’t create one without making these considerations

    Construction projects are loaded with complexity. Hundreds—sometimes thousands—of documents are assembled and distributed to scattered teams on frenzied jobsites, where dozens of subcontractors are hard at work building off carefully detailed plans. 

    Time is money in construction, which means clear, accurate and expedient transfer of information is paramount to a project’s success. Aside from the hordes of design plans (many now digital) construction workers need to efficiently complete their work, there are several additional resources that they need at their disposal, most of which live on the internet or in other cloud-based tools.  

    Thankfully, the evolution of construction technology, digital transformation and collaboration have made accessing and organizing this information more convenient. Bluebeam Revu is one of the tools that has grown to help construction, engineering and architecture workers in this area. 

    Revu allows users to create customized digital dashboards for their project teams so that all relevant construction documents and supplemental reference information can be neatly organized and accessed through Studio Projects—regardless of whether team members are in the field or in an office. 

    “The whole point of a digital dashboard is to eliminate that file hierarchy of folders and eliminate the time spent looking for files,” said Lillian Magallanes, Bluebeam’s industry alliances manager, who has extensive experience creating digital dashboards.  

    Building digital dashboards in Revu and providing collaborators access via Studio Projects can be as simple as hyperlinking to a few of a project’s most-relevant design documents or as comprehensive as outfitting an intricate web of links using JavaScript to create a one-of-a-kind branded experience. The final product can be used not just by project teams during construction but also by owners and facilities managers throughout the building’s lifecycle.   

    Here are four considerations to keep in mind as users build out digital project dashboards: 

    Start with the end in mind 

    What type of worker will be using the dashboard to retrieve information? 

    Will they be architects or engineers in an office on a desktop computer or laptop? Or will they be field superintendents or subcontractors needing to track down a design spec in the middle of a hot, blistering day on a jobsite?  

    What’s more, aside from the user’s environment, what frame of mind might they be in when looking for the information linked in a digital dashboard? 

    Starting with this end in mind, according to Magallanes, is essential before starting to assemble a digital dashboard in Revu. “The last thing most people involved in a construction project want to do is have to learn something new that is complex just so they can find a file and send it to someone else,” Magallanes said.  

    Map out information and navigation 

    Once the frame of the end-user’s mind has been determined, then it’s time to map out the navigation of where the different hyperlinked buttons and elements of a dashboard will lead. Simple dashboards may only include a handful of buttons leading to the most relevant design documents.  

    More comprehensive digital dashboards, however, may involve a few different layers of navigation that allow users to find and access disparate pieces of information for a project in a few quick clicks, while also linking to tools and resources either found on the web or as part of other cloud-based digital applications.   

    “This is really going to help someone think what levels of information need to be brought up,” Magallanes said.  

    Understanding how information is presented—as well as the user experience of navigating through it—is essential when building an effective digital dashboard.  

    Bolster collaborator access with Studio Projects  

    Creating a simple-to-use project dashboard is only half of what makes it so valuable. The other half is ensuring that the people using it can access it easily and efficiently. 

    This is where Studio Projects, a document management capability in Revu, comes in. After creating and configuring a detailed dashboard in Revu, the most efficient way to make the most out of it is to host it for both internal and external collaborators with ease through Studio Projects 

    Hosting a project dashboard in Studio allows teams to access corresponding documents from the dashboard without having to leave the Studio environment. This makes accessing often-viewed documents faster since those documents are not hosted in a company’s protected server or other cloud-storage service but in a shared Studio Project.  

    Consider making design a priority  

    Some projects may see a digital dashboard as a simple, easy-to-access portal for a few significant project contributors on a jobsite. Others, meanwhile, may decide to build something expansive for a large build where dozens and dozens of subcontractors are using the tool, oftentimes jumping in at the mid-point of a project.  

    Still, for some general contractors, creating a comprehensive digital dashboard is an opportunity to create a branded experience—not just for the subcontractors collaborating on the project, but the building’s owners and facilities managers after the building is fully operational.  

    These situations might call for a more extensive and thoughtful digital dashboard design using enhanced graphic design and web-development tools.  

    “Larger contractors are definitely going to want to invest in creating something beautiful that’s aesthetically pleasing,” Magallanes said, “because that project dashboard is something that is going to the building’s owner, so it’s something that the owner and their team are going to use and remember.” 

    Smaller contractors, however, may not feel like they need to worry about design if they’re simply looking for something functional. But if the dashboard is going to be viewed by other contractors—or even ownersit might be worthwhile to ensure the dashboard is built with the end-user in mind. If the owner will eventually view it, design might be more critically important; if the dashboard is only for workers in the field, basic setup may be more acceptable. 

    Keep it simple    

    Above all, don’t be overly concerned with creating an expansive digital dashboard if the team or project doesn’t require it.  

    The goal of a digital dashboard is, after all, to reduce complexity and the amount of time workers spend looking for relevant project files. The less users have to think when using the dashboard, the better.  

    “We’re reducing learning time, we’re reducing the time looking for files,” Magallanes said. “And we’re also just reducing the number of clicks that people have to get through. We’re trying to expedite the information for the right person at the right time.” 

    Using Meridian Portal to Streamline Cloud-based Reviews

    A typical scenario in today’s work from home reality needs a technical document package to be reviewed by a dedicated team of experts. A document controller accomplishes this by gathering the required hard copies and physically sending them to the appropriate stakeholders around the office using mail.

    This traditional workflow presents some challenges:

    • A resource is required to keep the team on track and to ensure mail delays are controlled, which tends to extend the review process
    • Any feedback made in the late stages of reviews may require more mail transactions, causing delays
    • The team must clearly understand reviewer roles and sign off requirements, or the entire process may slow down due to some people thinking they need to approve things when it is not required.
    • Chasing the hard copies through the mailing process is tough, especially when critical resources are out of the office

    The Digital Approach: Moving your review online for better efficiency

    The Manufacturing sector is quickly moving to digital solutions, especially during this Pandemic. More and more tools are being pushed to the cloud to ensure maximum availability for a home-based workforce and resources in the field.

    The power of cloud-based SaaS Software is coming to light during these challenging times. With less in-house hardware requirements for application, storage, and database management, these solutions allow for more uptime and increased efficiency. The flexibility granted by a fully integrated suite such as Meridian EDMS + Meridian Portal highlights the ease of use of going digital.

    The Meridian suite will provide the following benefits:

    • Full role-based review control throughout the process (Lead Reviewer, Required Reviewer, Optional Reviewer) which will give precise requirements from the Review team
    • Automated workflow-based email notifications to all critical Reviewers to increase visibility and efficiency
    • Cloud-based markups and comments are made on the reviewed technical documents, which are visible to the entire team. Comments are instantly added using the standard conversation reply style and are fully tracked to reduce any bottlenecks

    Engineering document management solutions like Accruent’s Meridian Portal assist engineering teams, and project managers streamline day to day operations by optimizing document reviews and the conversation around them. Online reviews provide instant access to a single source of truth without relying on traditional hard copy prints and packages.

    To learn more about Meridian Portal and how it can help your team, please contact the SolidCAD Meridian team.

    Boost the power of Meridian with Cloud API Integrations

    While Enterprise resource planning and maintenance management platforms are versatile tools that can up productivity and lower operating costs, they normally offer basic engineering document management capabilities. 

    This can lead to users struggling to find the latest engineering documents related to assets. Without robust engineering document management tools, a business can see lower operating efficiency and ROI due to increased downtime, maintenance delays and safety incidents. 

    Meridian Cloud API allows you to unify all your enterprise tools with Accruent’s industry-leading Meridian document management solution to have a complete and efficient solution.

    Combining all these powerful systems will allow your business to better manage your assets and ensure that all your critical data is easily accessible, secure, a tracible throughout: 

    • Enterprise Resource Planning (ERP) 
    • Enterprise Asset Management (EAM) 
    • Computerized Maintenance Management system (CMMS) 
    • Enterprise Document Management (EDM) 

    How can Meridian Cloud API help your team? 

    The Meridian Cloud API enables integrations between your existing ERP, CMMS, or FM solutions and Accruent’s engineering document management solution, Meridian.  

    Meridian supplies a secure, scalable, and accessible repository for all technical and asset related documentation. This solution not only creates a single source of truth for your technical documents, but also meets compliance needs with industry-specific regulations. 

    Page Break 

    With the Meridian Cloud API, you will be able to: 

    • Create traceability between technical documents, assets and emails stored in Meridian 
    • Keep asset information uniform across platforms, creating one single source of truth for data 
    • View a list of all associated documents/information related to an asset in a single space 
    • Reduce duplication of data across multiple systems 

    Download the Meridian Cloud API brochure. 

    How can Meridian Cloud API help your teams? 

    Out of date information and data reduces operating efficiency. Meridian Cloud API will allow your teams to incorporate workflows and data synchronization across enterprise asset tools to maximize uptime and reduce data re-entry. 

    Synchronize critical data across different systems 

    • The ability to synchronize your documentation and assets between all your different tools will allow for fully integrated workflows. Having your companies’ technical documentation tied to their respective assets will reduce downtime and lower the total cost of maintenance. 

    Reduce duplication of data 

    • Utilizing multiple data repositories without sync capabilities will introduce the creation of duplicate entries which is both time-consuming and inefficient and may lead to increased opportunity for human error. This can lead to making costly decisions that rely on out of date information. 

    Whenever maintenance and engineering teams work out of many separate systems, it can lead to work order delays and negatively affect the safety of personnel in the field. 

    Meridian Cloud API integration will ensure your asset data and technical documents are up to date always to avoid these issues. 

    Learn more about Accruent’s engineering document management solution, Meridian. 

    Unify Your Engineering and Maintenance Departments with Meridian Cloud API 

    Meridian Cloud API can link your ERP, CMMS or EAM platform with our document management solution Meridian allowing for an update to date, single source of truth, and complaint Enterprise solution for your teams. 

    The SolidCAD Meridian team is available for your EDM implementation needs. [/vc_column_text][/vc_column][/vc_row]

    Working with Bluebeam Studio Project – Part 2

    Part 2 : How to Basically set-up a project

    Now your project is created, you will need to upload all documents needed for your project which need to be shared with your team or your partners in the project.

    To do so, select between adding a folder, a file or create a new folder with its own structure

    Note: In this part, I strongly recommend using the same folder organization you are using usually in your company. Remember you are creating a copy of your documents where they will be updated. It does not mean it will automatically update the folder on your computer. Only the documents stocked in Project will be.

    From now on, you have uploaded your project files and you are ready to collaborate with Project. But before starting, there are some rule you will need to know in order to understand how to work with it.

    How to Use Projects and Projects with Sessions

    As you should know now, we are working in a document management context. It means there are a bunch of securities and processes to protect every user. Check in / check out is part of it.

    Basically, when you will need to use a document, you will have 3 choices; open it for viewing, open it for working on it, open it to work on it with collaborator.

    The first one does not require to check out the document. As you will not change anything, there is no need to create a new version.

    The 2 others will require every user to check out the document from project to work on it and, at the end of your work, check in the document as new version in order to quickly sum up what you’ve did.

    Checking out a document means you lock the document for edition to other users the moment you are using it until you check in the document in Project.

    When you check out the document, it will appear on the right side of Project’s interface as Pending

    Click on it and start working.

    You will notice a specific icon in your document’s tab. Depending of the status of your document, the icon will change. If you click in this icon while working in a check out document, you will access a menu.

    If other users try to open the document when it is checked out, they will only have the possibility to download a copy on their computer, but they will not be able to overwrite your document (unless doing so manually by the administrator of the Project).

    If you need to work with other people at the same time on a document hosted in project, it’s quite simple. Just, right click on your file and choose Add to a New Session

    Now, Bluebeam will launch the dialog box of Session where you will name your session. You will be able to invite people with email address in the Session interface directly to work with you.

    You will run this session like you did so when you create a Session directly (without using Project) and finish it as usual.

    But this time, you will need to check in the document once the session is over in order to save the new version of your plan in Project. You have two ways to do this;

    Once you finished the session, the icon of your tab will change from a whiteboard  to a Check Out icon .

    Click on it and select Check In. Then write a comment to explain what has been done and Check In.

    Or, you can go back to your project interface and do the same with your document that will be in the right side of the interface under pending.

    You know now how to start and set up a Project with Bluebeam. For sure, there are some advanced options we did not developed in this tutorial (creating group with different rights in the session, make some files viewable by certain user only, synchronizing documents, Managing and supporting Studio Session and Project with Studio Prime, connect Studio Session with BIM 360 …).

    But we will see that in a future article depending of your comments and feedbacks

    Quick FAQ

    What type of document can I upload?

    All type of document. Users who would need to access these files will have to own the software required to run / open the file (except for PDF which will open in Bluebeam)

    What is the limitation of Studio Sessions and Studio Projects?

    Description Studio Projects Studio Sessions
    License Required Host only Host Only
    Bluebeam ID required (free) Yes Yes
    Formats supported All types of files PDF Only
    Max file Size Unlimited 1 Gb each document
    Max files allowed Unlimited 5000
    Max space allowed Unlimited Unlimited
    Max attendees at the same time Unlimited 500
    Scheduled Expiry No Yes


    How much time my documents will be hosted on Bluebeam server after finishing and deleting my project?

    90 days maximum unless you need more time. The save on Bluebeam Cloud Server are not accessible by anybody else (not even Bluebeam employee) and has been created to let user have a chance to download their document if they forgot to do so.

    Why should I put an expiry date in my session?

    It’s your choice to do so. It exists to be part of a process and avoid having to bump a limit because you forgot to close a session. Remember you could use Studio with partners outside your organization. Depending of the size of your project, 500 users can be easily reach. So, you better want to organize a process to avoid the situation.

    Working with Bluebeam Studio Project – Part 1

    Introduction: What is Studio Project

    Studio Project is a cloud-based light document management system that allows people to centralize and access their project data using Bluebeam Revu Interface. Files within Studio Project can be checked out for editing (ex: revisions) and checked back in to create different version of a single document instead of creating multiple duplicate of the same or, overwriting important data.

    Before Starting

    1ST STEP – Create a Bluebeam ID

    In order to be able to use Bluebeam Studio services, you need to create a Bluebeam ID. It’s free and simple.

    Basically, open your Bluebeam Revu, then go in Bluebeam Studio section and click on Sign In

    Right after, the following dialog box will appear fill the form and finish by clicking on CREATE AN ACCOUNT button

    You will have to review the terms of use and click the I ACCEPT button if you agree with these terms. A confirmation email will be sent after to confirm your Bluebeam ID.

    Check your email (and spam box if you don’t see the email in your INBOX after 5 mins) and confirm your Bluebeam ID.

    You are now set to start using Bluebeam Studio.

    Part 1: Creating a Project

    As previously written, Bluebeam Studio Project acts as a single source of truth for all your project documents. So, to maintain this statement, you will need to be able to understand what you can or cannot do with Studio Project. You will also need to know how to set up a project, to configure permissions and to share the information internally or externally.

    To create a new project, go to Bluebeam Studio section and click connect. From there, you have 2 options: creating a Session or creating a Project.

    Now, select Projects and then, click on the + (add) button (as circle in red) and select New Project as shown in the picture below

    After doing so, a dialog box will appear, and you will be asked to name your Project

    Subscribe to our SolidCHAT blog for Part 2.

    How SaaS EDM Solutions makes remote work effective during Covid-19

    Many industries have been affected by the Covid-19 Pandemic including Manufacturing, Utilities, and Transportation. As projects need to stay on track despite today’s challenges, we have all had to assess our normal collaboration strategies to focus on remote work and staying effective.

    Common questions that arise with so many employees working from home:

    • How do we collaborate with both our internal and external partners as we work from home without our usual access to our full suite of tools?
    • How do we confirm the accuracy of information received from external sources?
    • Do we have controls and workflows in place for project document sharing?

    Some companies have adapted quickly to the remote work reality as they have modern SaaS tools in place. They have had little impact on their day to day operations.

    Others are struggling to shift to this new paradigm. They are now forced to look for new collaboration tools to empower their employees and minimize downtime.

    When searching for the right capital project management tool the following questions arise:

    • How do we track project progress and meet compliance standards?
    • Can we control, digitize, and monitor tasks in our typical project workflow?
    • How do we provide access to all technical documentation to various stakeholders?
    • Is there a tool that is easy to learn and to use for rapid user adoption?

    A SaaS EDM application will tick all these boxes and provide the ideal solution to keep your projects on-time and your customers informed.

    Available in either SaaS or Cloud-based offerings, an Engineering Document Management (EDM) suite will provide the following instant benefits:

    • Web-based access to allow maximum flexibility for remote external and internal stakeholders.
    • Bi-directional updates to engineering documents and drawings with full workflow support.
    • Mobile access to all documentation which leads to increased employee collaboration and efficiency.

    A SaaS-based EDM solution will provide an adaptable tool for your remote workforce needs. If you have not implemented an EDM solution, now is the time.

    Accruent’s Meridian Cloud connects Engineering, Management, and Maintenance teams to ensure all documents and asset data are compliant and up to date.

    The SolidCAD Meridian team is available for your EDM implementation needs.

    Collaborating with Bluebeam Studio

    What is Studio?

    Let’s start from here. Most users are not familiar with Bluebeam Studio although it is becoming more and more useful and popular these days. So, let’s dig into to it and take a look at both Studio Session and Studio Project.

    Studio Session:

    A live collaboration tool that allows you to share and annotate your plan with your team with some restriction.

    Studio Project:

    A document management system that allows you to host, share and manage your document with an organized process and management tools.

    So basically, you host your documents in Studio Project and use them in Studio Session to mark them up with your team. Not that complicated, eh?

    Now, let’s jump in to see how to launch a Session and how to set your Project.

    Creating a Session:

    Go to Studio Icon –> Select Session

    Click on + and select New Session or Join Session

    If you decide to join an existing session, enter the Studio ID of this session and click OK

    If you create a new Session, a dialog box will appear

    From there, name your session, and upload one or multiple plans you need to work with.

    Then, in Options, select what you allow your user to do with this (these) document(s) or even if you want, allowing them to upload documents. You can even set an expiration date and hour for the session.

    Afterwards, your session will launch and this dialog box will appear

    It will be here where you will need to invite users to join in your session. You can even add a message to give them a bit of a context.

    If you are using Studio Project and already set Users groups, you can use them in Studio Session (even if the document is not hosted within project).

    Last option, the Address Book. You can use your own address book to invite people.

    Now your session is started, make sure to work on the right document. To check that, you need to have this icon  before the name of your document in the tab like the picture below.

    From there, you will be able to annotate and communicate within Studio Session. However, remember Sessions do not allow for changes to a PDF’s “core content ». It means you can place Markups and delete your own notes, but editing other attendee’s Markups is not allowed. You can think of this as, you are allowed to do “Surface Level” (adding a markup, editing a markup you added in the Session) changes to the PDF, but anything that goes deeper (form fields, adding pages) is not allowed. This is all to maintain the integrity of the PDF while multiple users are all collaborating in real time.
    Note about sessions: you can be invited or initiate multiple session. To leave a session, click on the icon   and select the session to go back in it.

    Finishing the session:

    You finalized your revision with your team and are ready to go so now, it’s time to finish your session to.

    To do so, click on the icon   (#1) and a Dialog box will open. From there, you can overwrite the existing plan or save as new version of your plan.

    Also, don’t forget to generate the report of the session. It will keep all information that have been produced in this session (from markups to messages written in the chat)

    FAQ’s:

    What happens if I have a new version?

    Close the actual session, export all markups (or only the ones you want to bring to the next session) and then re-upload the document in the session.

    Can I erase markups of other users?

    No. It is part of the process to not be able to erase other user’s markups. Remember, it’s also a tool to help you track every notes and changes on plans.

    You will be able to erase markups outside of the session. But there will always be a trace within the Session log.