Efficient file sharing is crucial for seamless collaboration in construction projects. In the realm of Autodesk Construction Cloud (ACC), users have access to powerful tools and features that facilitate the sharing of files among team members and stakeholders. In this blog post, we will delve into three effective methods for sharing files within ACC, namely the Design Collaboration approach, utilizing Transmittals, and leveraging the Sharing feature in Docs. By understanding these methods, construction professionals can optimize their file sharing workflows and enhance project collaboration.
There are three primary methods available within Autodesk Construction Cloud (ACC) for sharing files effectively. Let’s explore each method and understand how they can be utilized to streamline collaboration and ensure smooth information exchange in construction projects.
The first of the three Design Collaboration methods in ACC offers a structured approach to sharing files, allowing for comprehensive review and coordination among consultants before files are consumed. This method minimizes risks and ensures all parties involved have the opportunity to review and confirm the files before proceeding.
To create a new package in Design Collaboration, navigate to the top center tab and expand the timelines. Clicking on the “+” symbol at the end of your company’s timeline will initiate the creation of a new package. Within the package, you can rename the package and add and review sets which contains 2D and 3D views, as well as any models and relevant project documentation such as PDFs, Excel, and Word files.
By clicking “Share” in the top right corner, the new package appears as a circle on the timeline, indicating its availability. Other consultants can access the package, review the files, and click “Consume” to gain access to them. This method ensures that files are securely copied from the package to the shared folder, ready to be reviewed by those consultants.
Once the reviewed, consultants can click “Consume” at the top right of the screen. The act of consuming the package also fills in the circle on the timeline, providing a visual indication that they now have access to those files. As files are consumed, they are securely copied from the shared folder to your team’s consumed folder and are ready to be linked into your project.

Method 2 adds a bit of risk compared to the first method as we are removing the step where the consultant reviews the documents and consumes the package. With this method, a package is created, and the files are copied to the Shared folder in the background. Instead of consuming the package, users are granted permission to view the Shared folder directly, allowing them to link files from this location rather than from the consumed folder. While this method offers more direct access to the files, it may pose challenges in terms of document control and coordination, as there is no opportunity to review documents involved.
Method 3 removes all safeguards and provides immediate access to live work-in-progress models and their updates. This method requires us to grant users permission to view other team folders, enabling real-time access to evolving models. However, it is important to note that this method is not recommended as it lacks the ability to review changes before files are linked into another team’s model. It may lead to potential rework or working in response to changes that are about to be altered, impacting project efficiency.
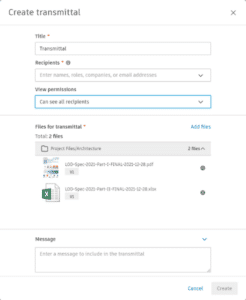 ACC‘s Transmittals feature provides a formal way to share files with other team members, enabling efficient tracking of sent and received files. By utilizing transmittals, project members can maintain better control over file exchanges and communication.
To work with transmittals, we will navigate to transmittals on the left side of the screen under Docs. From there, select “Create Transmittal” to initiate the process. Choose the files you wish to include and customize the transmittal by adding a title, specifying recipients, and including a custom message. Additionally, you have the option to adjust view permissions, allowing transparency regarding the transmittal recipients. Additional files can be added at anytime prior to sending the transmittal.
Every transmittal is assigned a unique ID and keeps track of the sender, recipient, and time of transmission. Furthermore, each transmittal includes the ability to download the files and generates a report containing vital information about the transmittal.
And lastly, within the ACC Docs feature, there are additional methods for sharing files with team members and stakeholders. These options provide flexibility and convenience in distributing project-related documents efficiently.
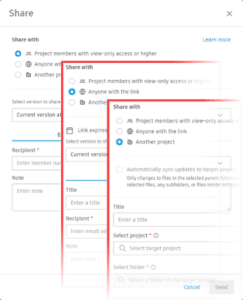 Sharing with Project Members allows you to share files with other project members who already have at least view-only permissions for the file. Simply navigate to the Files section in Docs, select the desired files, and click on the three dots at the top. Choose “Share” to access the sharing options. From there, you can send files to project members via email directly from ACC or generate a shareable link for alternative sharing methods. Additionally, you have the option to include a custom note in the email. You can specify whether the version of the file should reflect the latest update at the time the email or link is sent, or whether it should be the latest version when the recipient opens the email or link. This flexibility ensures that recipients have access to the most relevant file version for their reference or collaboration needs.
Sharing with Anyone expands the sharing scope to anyone, regardless of their ACC access. To utilize this option, project administrators must activate the “share publicly” feature within the project settings. Once enabled, you can share files with external stakeholders or non-ACC users. Similar to the previous method, you can choose to send an email with the files directly from ACC or generate a shareable link. Again, you can include a custom note, and you have control over the file version that recipients will access. It’s important to note that shared links expire after a specified period, typically between 30 to 365 days, ensuring that access is limited to the designated timeframe for added security.
Sharing with Another Project via Bridge offers seamless integration between projects through the Bridge feature. With this option, you can share files directly from one ACC project to another without the need for downloading and re-uploading. This not only saves time but also ensures that files remain consistent across projects. Moreover, you can specify a specific folder in your project that will automatically sync with the corresponding folder in the target project. As updates and changes are made, they will be automatically transmitted to the connected project. This feature simplifies file sharing and synchronization between related projects, enhancing collaboration and information exchange.

In the fast-paced world of construction, effective file sharing is a cornerstone of successful project collaboration. Autodesk Construction Cloud offers a range of robust features to streamline this crucial aspect of teamwork. By leveraging the Design Collaboration methods, Transmittals, and Sharing in Docs, construction professionals can ensure seamless communication, improved document control, and enhanced productivity throughout their projects. Embrace the power of ACC’s file sharing capabilities and elevate your construction collaboration to new heights.
To learn more about the Autodesk Construction Cloud (ACC), feel free to contact us and one of our representatives will reach out to you shortly.


