fbpx
  • Civil 3D: Profile Grade Intersections

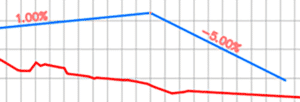
    The goal in this example is to design the profile where each grade is an even number.  It’s not as obvious as you might think.  Thanks to my colleagues Dave Hill and Jae Kwon for pointing out the proper tool.

    Read on to learn more…

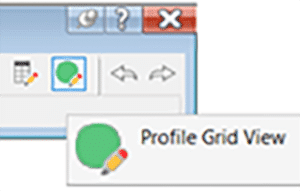
    Begin by modelling the first 2 segments.  I’ll assume you know the best tools for this, but I’ll give you a hint.  Use the Grid View; it’s your friend here.


    To model the last 5% grade is not entirely obvious.  Yes, a 5% tangent can be drawn from the end of the 1% grade, but it doesn’t end in the right place.

    We sort of want to draw backwards from the end of the red profile and then extend the 1% grade.

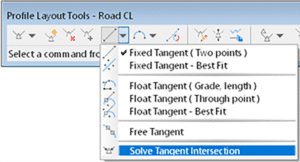
    Use this tool and follow the prompts.  First select the 1% grade, then pick Station and Elevation and the tie-in point.  Then enter the grade, in this case -5% (the grade from the intersected PVI).
             

    C’est voilà.


    Civil 3D: Model Existing Underground Utilities Efficiently

    Civil 3D: Model Existing Underground Utilities Efficiently

    Must you draw existing gas, tel, and other similar underground utilities for your projects?  If you’re not using the technique described below, you’re using too much time!  Read on to find out more.

    Join us at Infrastructure University, session 3, on October 20th for more information about this technique. For now:

    Facts:

    1. For nearly every civil engineering project, we must identify existing features on our construction drawings so they may not be disturbed during construction and so we may design proposed works without conflicting with these existing features. They must appear in both plan and profile.
    2. It can take considerable time to draw and label them in the plan, and even more project them into profile.
    3. When there is an edit to the alignment, the profile locations must be recalculated, taking more time.
    4. Experiments have shown that it can take 84 seconds to draw each utility. Then 26 more seconds each when the alignment is edited.
    5. Using the technique described below, the time is reduced from 84 seconds to 20 seconds. But 0 seconds when the alignment is edited.
    6. For 160 utilities:
      1. 3.7 hours using the manual technique.                   69 minutes each time the alignment is edited.
      2. 53 minutes using the automated technique.         No extra time when the alignment is edited.

    Method

    1. Create pressure network parts lists, one for each utility. Assign styles accordingly.
    2. Create pressure networks, one for each utility. Assign the parts list and label styles accordingly.
    3. Model the existing utilities as pressure networks and project them into profile. The depth below ground can be automated.

    Civil 3D Assemblies: Tool Palette or Block Library?

    Civil 3D Assemblies: Tool Palette or Block Library?

    Civil 3D comes shipped with pre-configured assemblies that may or nay not fit your needs.  We created another BLOG post here to show how to create your own and share them with others in your team.  There is another way…read on.

    The Cole’s notes are:

    • Make a new drawing.
    • Create your assembly in this new drawing placed at 0,0.
    • Insert that drawing into your design and explode the resulting block.

    In the linked article above, we suggested creating a tool palette.  This works well for blocks so they may be placed on the correct layers.  For assemblies, since this block will be exploded, this is not a requirement.  Might there be an easier way?  There is.  You see, tool palettes require a little maintenance.  The trick below does not.

    AutoCAD’s Block Library

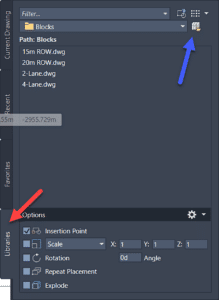
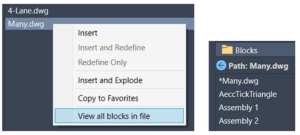
    In Civil 3D 2022 or later, open the new block palette introduced in version 2020.  The option I’m about to illustrate is not available with 2020 or 2021.  You will see two things: a Library tab (red) and a button to select a folder (blue).  Clicking the folder button will prompt you to select a folder containing drawings.  If each of those drawings is an individual assembly, your job is done.  Drag and drop one of those into your drawing and ensure it is exploded.  You’ve just inserted an assembly.

    No maintenance is required.  Just save a new drawing with a new assembly into that folder and the next time AutoCAD is started, you’ll see the new content.  If you prefer to have all assembly blocks defined in a single drawing, that’s fine too, simply right click the drawing and choose…

    Enjoy!

    Tool Palette: Open File or Web Page

    Tool Palette: Open File or Web Page

    Do you have CAD standards document or web page you’d like to make easily accessible to your AutoCAD users?  Does it make sense to create a Tool Palette button for this?  If so, read on.

    Create a tool palette as usual or edit an existing palette.  Add a new tool to it, such as a line.  It will look like this initially.

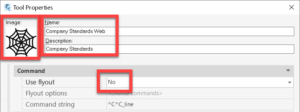
    Edit the properties of that tool and change three things. Reveal your inner artist when creating the icon image. Right-click to change that image.

    Change the command string to do what you’d like the tool to do.  The syntax depends on whether you’d like to open a file or a web page.  The startapp function will use the appropriate Windows app for the selected file type.  In the example below, the PDF will open in Bluebeam Revu because that is my computer’s default PDF application.

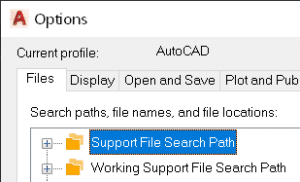
    You’ll notice I have no path defined for the PDF.  The findfile function looks for the file in the AutoCAD Support File Search Path (AutoCAD Options).  As long as you have the intended path defined here, the file will be found.  The path to the file can most certainly be hard-coded if you prefer.

    To open a file:

    (startapp (strcat “explorer file://” (findfile “The Actual File Name.pdf”)))  If the findfile option is appropriate)

    (startapp “explorer file://c:/temp/The Actual File Name.pdf”)  If the hard-coded path option is appropriate)

    To open a web page:

    ^C^CBROWSER;https://www.solidcad.ca/services/;

    My command string looks like this for the PDF option.

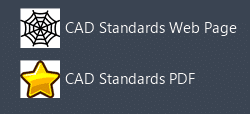
    Here are my two buttons.

    Enjoy!