• AutoCAD 2024

    Well, it’s that time of year again when Autodesk bestows us with the latest release of their flagship drafting application. Click here for Autodesk’s documentation. Read on to see which features speak to this blogger.

    File Format

    This is probably the most-asked question, and I’m happy to say that there is yet again, no format change. We are still on the 2018 format. Happy news for everyone!

    Activity Insights

    Changes or actions made to your drawings are logged in a database so users can verify elements of a drawing’s history. One interesting thing here is that one can see that their drawing has been XREFd to another drawing.

    Pro tip: There is an option in AutoCAD to specify where to place the database; if you’re in a corporate environment set this to a shared folder so edits are tracked for all users that edit the file.

    Smart Blocks

    Place blocks with ease. Machine learning is used to learn how you place blocks. Blocks can be placed automatically in a room corner, for example. Replace blocks with another block and the software will hold rotation and scale values. Replacement blocks are suggested; AutoCAD uses machine learning to suggest blocks similar to the ones being replaced.
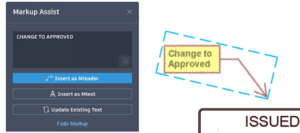
    Markup Assist

    This feature has been enhanced this year to automatically align a markup file (PDF, JPG, PNG, etc.). Also, AutoCAD text can be replaced with markup text as well as fading markups to help track which ones have been addressed by the user.
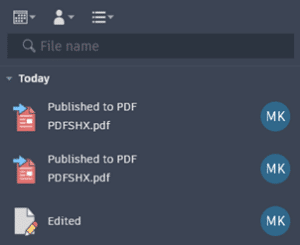
    PDFSHX

    This is a setting in AutoCAD for users who still use SHX fonts such as ROMANS or SIMPLEX. Historically, these old fonts have proven problematic with PDF viewers like Bluebeam Revu. They bloated PDF files and users could not search for text when SHX fonts were in use. PDFSHX is not a new setting. In previous releases, when turned on, it allowed text to be searched even if SHX fonts were in use. Each text object was a unique comment or markup in the PDF editor. Thousands of “markups” could be created, bloating the PDF. This setting now has 3 possible values:

    • 0 = off
    • 1 = the previous behavior
    • 2 = the new behavior. PLEASE use this one. Text is stored as “hidden” comments AND nothing special must happen in the PDF to be able to search. Is the PDF still bloated? In my limited testing, yes, the PDF is bigger when this is set to 1 vs. 2.

    See the Author in the PDF “markups”? (this is the old behavior = yuck!)

    AutoLISP

    LSP files can be loaded and run within AutoCAD LT. There are certain limitations; see the documentation for the list of what is and is not possible. This does not work with AutoCAD for Mac, only Windows.


    To learn more about AutoCAD, feel free to  contact us and one of our representatives will reach out to you shortly.

    Revit: Update Room Finish Schedules with CTC Spreadsheet Link

    Modifying and updating a room finish schedule in a Revit project can be a tedious task. Working in an itemized Revit schedule makes it time consuming to modify data cell by cell. Have you been tasked with this assignment?

    If only Revit can allow you to manipulate large amounts of data in an efficient way. There is a solution! CTC Spreadsheet Link. CTC Spreadsheet Link allows users to export data from Revit to a spreadsheet where the data can be edited and then pushed back into the Revit model.

    CTC Spreadsheet Link allows users to export data from Revit to a spreadsheet where the data can be edited and then pushed back into the Revit model. You can create your own saved settings for repeated workflows. Using the Room Finish Schedule example, you would select your category (Rooms), available parameters (Ex: Number, Name, Wall Finish, Floor Finish, Base Finish, Ceiling Finish) and Sorting (Sort Rooms by Number).

    You can use Excel/spreadsheet like functions. Copy and paste, copy a cell or range of cells by holding down CTRL, you can add formulas to make calculated values and many more.

    What if you are a non-Revit user? CTC Spreadsheet Link allows you to save the spreadsheet to multiple formats (Ex: Microsoft Excel Workbook). Data can be manipulated in the exported native program and then imported back into Revit.

    To learn more about CTC Spreadsheet Link, CTC tools, or if you have any other questions, please feel free to contact us and one of our representatives will be in touch with you as soon as possible.

    CTC Software: The Benefits of Cloud Shared Licensing

    CTC Software has enhanced their licensing model in June 2022, all new licensing is facilitated through Cloud Shared Licensing (CSL) now. This shift to CSL means that moving forward the 2023+ releases of their tool sets will only be available through CSL. It marks a big jump in flexibility and tracking of license sharing and puts CTC ahead of the curve in the industry for license facilitation. All you need is an internet connection and access to their website to use your CTC tools now.

    https://ctcsoftware.com


    What is Cloud Shared Licensing and how is it different from the Network Licensing or Named User Licensing?

    CSL is NOT at all the same as the Named User licensing that most software has migrated to. We can think of CSL as network licensing managed from the cloud. This is preferable to the network licensing because the license manager doesn’t need to be installed on your server and setup time is greatly reduced.

    Named User Licensing ties the license of the product (A seat of Civil 3D for example) to a user’s email, this is intended to restrict the use of that product to that single user among other thing. CSL is still a pool of licenses that you would use a login to access. So 100 employees could have logins to access a pool of 10 licenses, but each license can only be used by 1 person at a time.

    What does this change mean for my company and me using the tools?

    As mentioned above, this will allow you to have access to your CTC tools with a CTC Account login and access to internet. No need to even be connected to your company network to pull a license from your pool of CSL license.

    Importantly, CSL will still allow compatibility with the latest 5 versions of your Autodesk software.

    On the IT and license management side of thing, CSL is incredibly easy to setup, manage, and report on license usage. Through the CTC website we can access the license portal to set up and assign licenses to user groups, borrow licenses to access offline, revoke licenses, setup auto-renewals, and manage roles & admin rights associated with your CTC products.


    How do I manage my licensing now?

    Accessing the licensing portal is done through the https://ctcsoftware.com website and clicking on the person icon next to the shopping cart.

    After logging in, you will be directed to the portal dashboard where you can navigate to licensing to see all your CTC products.

    From here you can invite user, add them to user groups, assign roles, and assign access to your various products.


    From within the Autodesk software once the tools are installed on the work station, the user ill just have to click on one of the darker colored tools to bring up the “Product and Licensing Information” dialog box.

    Once you click the Cloud Shared and click Apply, it will bring you to the Sign In window to enter your CTC Account credentials. You will only be required to sign in the first time you access the tools and will give you access to all the tools that you are assigned to in the licensing portal.

    The new Cloud Shared Licensing is the future for CTC Software and I hope this article has shown you some of its benefits. CTC has done a great job with a couple webinars linked below to explain the picks and clicks in more detail for setup and management of the license portal, so I would encourage you to watch them as well.


    Note for their Network and Standalone end of life:

    May 1st, 2023: You will no longer be able to buy Network or Standalone Licenses. Only new seats of CSL.

    May 1st, 2024: You will no longer be able to renew existing Network or Standalone Licenses. This marks the point where CTC tolls will only be available as CSL.


    Resources:

    CTC YouTube Channel:

    A Comprehensive Introduction to Cloud Shared Licensing https://www.youtube.com/watch?v=JH9X_6PA3Zw

    Administering Cloud Shared Licensing
    https://www.youtube.com/watch?v=hg_TnV1wimI

    Revit MEP and CTC– Schedule XL

    Having troubles keeping your MEP notes from Excel in Revit up to date? Schedule XL is the right tool for you.

    Schedule XL allows you to create schedule views (drafting view or schedule view) within Revit from your Excel worksheets. Simply create an Excel file with your MEP notes in the format you’d like and push that information to your Revit project.

    Within Revit, select the CTC Schedule XL tool and add your Excel file that you’d like to be placed in the project.

    Once added, you can override/preserve any graphics or formatting of the Excel file

    As you make your modifications to the graphics, select “OK” and Schedule XL will create a new Revit view for you. Place the view onto the desired sheet.

    As your Excel notes update and change, you can use Schedule XL  to verify if your project has the latest updated notes. Schedule XL has a “Status” feature to indicate if your Excel note files are up to date. With the “Status” showing “Out of Date”, simply click “Update” to apply the new changes.


    Schedule XL is a great tool for including outside data from other sources (Excel) to be a part of the Revit environment. With a simple Excel to Revit workflow, you can get any information across to a project with minimal effort. Schedules can also be configured to automatically update when the Revit project is opened if the original spreadsheet has changed.