• Mastering Point Clouds in Civil 3D: A Three-Part Guide to Efficiency: Bonus Part

    This is a bonus article in the Point Cloud series. Click to view: 

    Article 1 

    Article 2 

    Article 3 

    With all this talk about decimation and removing many of those original points in the cloud, how does one know if they’ve removed too many points? Here is how I do it. 

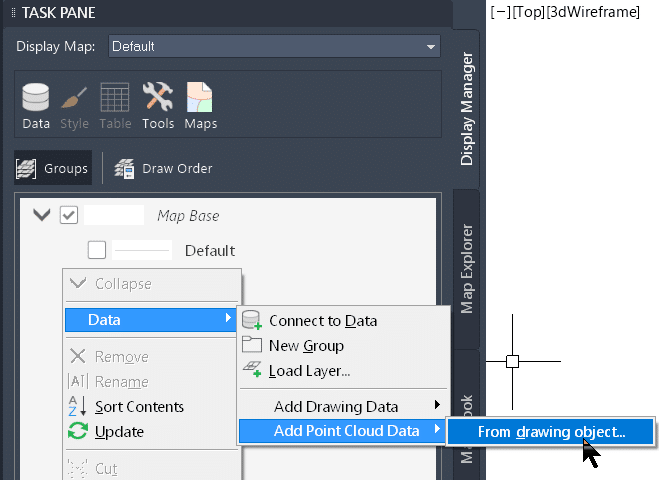
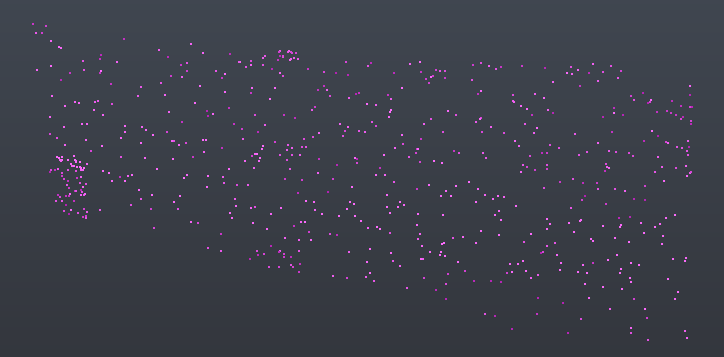
    • Insert the point cloud into Civil 3D.
    • Make a surface from the original point cloud, but only a small subset, so it’s not too big.

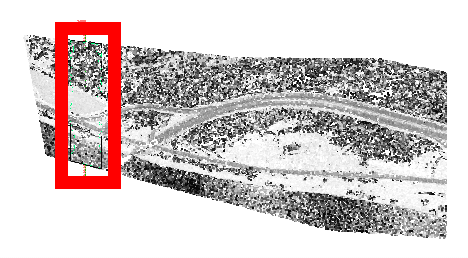
    • Make a surface from the decimated classification using the same red border as above. This so you can tell how many points are used for each surface within that area. 
    • Make an alignment and profile sampling both surfaces and have a look. The blue is the original, the red is the decimated cloud. Some of it is bang on and some of it isn’t. You get to decide if you have decimated too much.

    Are there any other ways to decimate that are better? VRMESH and Pix4D are expensive applications that do this, but I have limited experience with them. Civil 3D, however, has one more trick up its sleeve. 

    • Make a new surface and paste the original point cloud surface into it. Yes, the big one, but remember that it’s only using the points within the red border. 
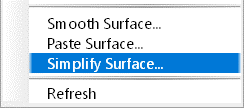
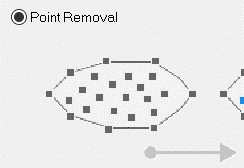
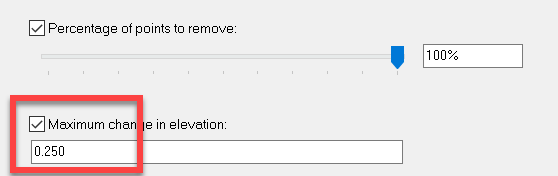
    • Use the Simplify Surface editing tool. The highlighted number is where you can experiment. The bigger the number, the more points will be removed.

    • Sample this new surface in the profile view with the other 2 and compare. The purple profile was created with this new surface. That surface contains about the same number of points as the one created using the decimated cloud from Recap. It is closer to the original.

    What does this mean? Is Civil 3D’s Simplify Surface tool better than Recap’s “Intelligent Decimation”? In my experience, I find that yes, it can give me a better result. But not always. Even in this same dataset, there are areas where the decimated cloud is closer to the original. The red line below. 

    Here is my philosophy. This works best for me. Your mileage may vary depending on your point cloud. 

    1. If a cloud has 80 million points, it is more efficient to decimate it using Recap before it ever comes into Civil 3D. 
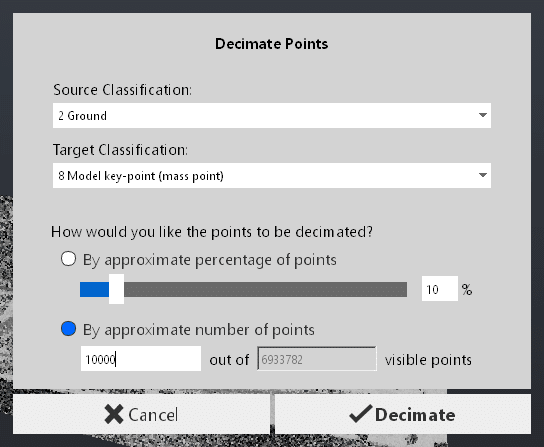
    1. Decimate in Recap, but maybe not as much as you would like. E.g., if I think  1 million points is the right number for my Civil 3D surface, I will decimate to 2 or 3 million. 
    1. After modeling the surface, use the Simplify tool to get the surface down to that 1-million-point mark, or whatever your intended number is. 

    Click here to download the sample files. 

    Mastering Point Clouds in Civil 3D: A Three-Part Guide to Efficiency: Part 3

    Most survey and design firms these days rely on point cloud data to some degree. It is often faster, easier, and safer to survey using aerial or ground-based scanners compared with traditional survey methods. 

    “But these clouds clog up my Civil 3D drawing when I make a surface.” You say. I’m here to tell you that they don’t have to! The dataset is always huge, tens or even hundreds of millions of points. When the deliverable is a surface model in Civil 3D, 3 things must happen. 

    This is the third and final in a series of three articles outlining how Autodesk Recap and Civil 3D are used to carry out these tasks. Click here for the first article in this series. Click here for the second. 

    Task 3: Import to Civil 3D and model a surface. You may already know this step, but since Recap has been used to classify and decimate the points, there is a new task in Civil 3D. 

    Once the point cloud has been attached, all the points will show, and it seems logical to go here and ensure that ONLY the decimated points (Key) are visible so we can model the surface using only those points. 

    Yes, only the Key points are visible, but when we try to model the surface, Civil 3D is using all 15 million of them, not the 10,000 that was specified during the decimation process. Autodesk is aware of this “defect”. When or if it will be rectified is unknown. 

    But don’t fret, there is a workaround. 

    Turn on the map Workspace (MAPWPACE) and create a new layer from the point cloud. 

    Filter the Key points in that new layer. 

    Then create the surface normally. Only the Key points will be used. 

    Stay tuned for the BONUS article… Yes, you read that right. There is one more. 

    Mastering Point Clouds in Civil 3D: A Three-Part Guide to Efficiency: Part 2

    Many contemporary survey and design companies now utilize point cloud data to a certain extent. Surveying through aerial or ground-based scanners is frequently quicker, more convenient, and safer compared to conventional survey techniques.

    “But these clouds clog up my Civil 3D drawing when I make a surface.” You say. I’m here to tell you that they don’t have to! The dataset is always huge, tens or even hundreds of millions of points. When the deliverable is a surface model in Civil 3D, 3 things must happen. 

    This is the second in a series of three articles outlining how Autodesk Recap and Civil 3D are used to carry out these tasks. Click here for the first article in this series. 

    Task 2: Decimate (thin) the data. Reduce the number of points to a number that Civil 3D can use. Attempting to model a surface using 80 million points is an exercise in futility! 

    Recap 2024.1 can do this! There are a couple of options; I prefer the second. I like to dictate the number of points that will exist in the decimated cloud. Recap will “intelligently” decimate the cloud so as not to remove too many of the important points. 

    If you have any more questions about Civil 3D points clouds please contact us at info@solidcad.ca

    Civil 3D points clouds

    Civil 3D points clouds

    There will be a new classification in the Project Navigator. 

    Civil 3D points clouds

    And the decimated points will be coloured magenta. 

    Civil 3D points clouds

    Click here to download the sample files. And stay tuned for the third article…

    Mastering Point Clouds in Civil 3D: A Three-Part Guide to Efficiency: Part 1

    Most survey and design firms these days rely on point cloud data to some degree. It is often faster, easier, and safer to survey using aerial or ground-based scanners compared with traditional survey methods. 

    “But these clouds clog up my Civil 3D drawing when I make a surface.” You say. I’m here to tell you that they don’t have to! The dataset is always huge, tens or even hundreds of millions of points. When the deliverable is a surface model in Civil 3D, 3 things must happen. 

    Unfortunately for you, the reader, you’ll need to wait for the whole story as this is only the first in a series of three articles outlining how Autodesk Recap and Civil 3D are used to accomplish these tasks. 

    Task 1: Isolate the ground points. Points that do not fall on the ground such as buildings, trees, and overhead power lines and their poles must not be used to model a surface. 

    Recap 2024.1 can do this! It’s easy as there are only a couple of options to choose from. Really, in my experience, the default option is often the best. 


    There will be a new classification in the Project Navigator. 

    And the ground points will be coloured brown. 

    Click here to download the sample files. And stay tuned for the second article… 

    If you have any more questions about Civil 3D points clouds please contact us at info@solidcad.ca

    AutoCAD – Editing with Groups & Layers

    AutoCAD – Editing with Groups & Layers 

    Trying to edit geometry that is overlapping or right next to multiple objects can sometimes be challenging. 

    We can simplify the process by doing the following: 

    • Lock the layers of the geometry we don’t want to modify
      Any object that is part of a locked layer cannot be modified (move, copy, delete, etc.)
       
    • Group together different objects, blocks, geometry, etc.
      Grouped geometry becomes one single object that is easier to manipulate


    ]For any questions reach out to your sales rep or contact us at info@solidcad.ca 

    AutoCAD and Civil 3D: New Tool for Migrating Files to Autodesk Docs

    Read until the end to see which extensions for Civil 3D are now available for download!

    If you use AutoCAD and especially Civil 3D and you use Autodesk Docs and the Autodesk Construction Cloud (ACC), then you should consider this tool.

    From the download site:

    “It provides guidance throughout the whole data migration process including data integrity checks, fixes, and uploading. It enables you to clean up data integrity issues so that the uploading process can be completed successfully and efficiently while keeping files as a single source of truth.”

    Interestingly, it is only available at the Autodesk App Store, but it is free.

    This tool will help fixe those pesky “Related Data” folders as it identifies potential errors before upload, and it provides a mechanism to repair them.

    Highly recommended.

    Civil 3D: 2024 Extensions Released

    For any questions reach out to your sales rep or contact us at info@solidcad.ca

    AutoCAD: 2024.1 Update

    The AutoCAD team has updated the 2024 release and there are some cool new features. Use Autodesk Access to install it or go to manage.autodesk.com and download it. Check out the release notes to read the official documentation. Read on to find out more.

    Here is Autodesk Help. Here are the release notes.

    • Autodesk Assistant

    AI-guided self-service and options to contact support from within the product. Find solutions to product questions, request a callback if needed, or create a support case. It’s only available in English.

    AutoCAD 2024.1 Update AutoCAD 2024.1 Update

    Markup Assist and Import

      • Markup Assist now can detect and identify markups in flattened PDFs.
      • The Markup Assist icon on the Trace toolbar indicates when Markup Assist is in the process of detecting markups.

    AutoCAD 2024.1 Update


    • Trace
      • When a drawing does not contain any traces, the Traces palette has been updated to make it easier to create a new trace or import markup.
      • COPYFROMTRACE, allows you to copy objects from a trace into the drawing, now provides command line feedback about scale factor when copying objects from a trace layout to a viewport.
    • Activity Insights
    • Some of the drawing event labels have been updated for clarity.

    AutoCAD 2024.1 Update

    • File Open
      • Improved file open performance when opening a drawing that contains large numbers of annotation scales. Large numbers of annotation scales can occur when there are lots of drawing references that might pull in additional annotation scales.
    • Pan and Zoom
      • General performance improvements when using pan and zoom commands.

    For any questions reach out to your sales rep or contact us at info@solidcad.ca

    Civil 3D: 2024.1 Update

    The Civil team has updated the 2024 release and there are many cool new features. The Civil 3D updates include the AutoCAD update, but they don’t include the Map 3D update, so don’t forget to install that too.

    Use Autodesk Access to install it or go to manage.autodesk.com and download it. Read on to find out more.

    Official documentation for the Civil 3D 2024.1 update

    Official documentation for the Map 3D 2024.0.1 update

    Official documentation for the AutoCAD 2024.1 update

    This is not an exhaustive list; please refer to the documentation for a complete list.

    • Subassemblies
      • Import custom subassemblies without creating a tool in a palette.

    Civil 3D Update

      • Add subassemblies from the Prospector.

    Civil 3D Update

        • Replace a subassembly by selecting a new PKT file.

    Civil 3D Update

    •  Corridors
      • Create transitions across regions.
      • Copy and paste transition sets.
      • Better highlighting to identify areas in a transition.
    • ArcGIS
      • Save back changes to AutoCAD objects.
      • Improved support for arcs
      • Improved performance.
      • Layers are alphabetically sorted.
    • Pressure Networks
      • Pipe runs are less likely to become detached from their underlying pipe run alignments. Added warning messages that are displayed when the pipe run status is not correct after editing the pipe run.
      • Move and rotate pipe runs with AutoCAD MOVE and ROTATE commands.
      • Property set compatibility.
      • Automatically swap a tee for a wye when gip editing the pipe run.
    • Gravity Networks
      • Connect pipes and structures to parts within other networks.
      • The Text-For-Each component can now be added to band styles.
    • Project Explorer
      • New Subassembly category with many new and usable options.
      • Export slope patterns to 2D.
    • Rail
      • Added the ability to create cant on spiral or tangent entities by adding user-defined curves in the Cant Curve Manager dialog box.
    • API
      • New content for corridor transitions and gravity networks.
    • Dynamo
      • Core updated to 2.18.
      • Player updated to 3.0.

    For any questions reach out to your sales rep or contact us at info@solidcad.ca

    Autodesk Software Downloads

    History has indicated that when downloading Autodesk software, one must also manually choose to download and install the appropriate updates for said software. This is often a point of contention as it’s an extra step. “Why can’t the updates be rolled up into the downloads?” you may ask. Well, starting September 19th, and slowly until Mid-October, downloading applications WILL include the most recent updates. No extra step!

    But I did say it was “often” a point of contention; it isn’t always. Some organization need to control the versions installed on their users’ computers. This paragraph is for you. Simply put, the latest updates WILL be part of the downloads soon and you may not have the option to choose an application with an earlier update. So far, there’s limited information and I can’t provide you with answers to your inevitable questions like “Can I choose not to have updates rolled into the download?” and “Will I be able to remove the updates once the app has been installed?”

    Once the new plan has been rolled out, I hope to be able to answer these for you. Stay tuned.

    Autocad Update

    For any questions reach out to your sales rep or contact us at info@solidcad.ca

    WHAT’S NEW IN REVIT ARCHITECTURE 2024.1

    BY: Mahsan Omid

    The latest version of Autodesk Revit (2024.1) is just out!

    Soon after the last release of version 2024 in April this year, Revit 24.1 continues to promote some of the most intriguing and much awaited enhancements. This release includes features and enhancements for data management, visualization capabilities, more accurate documentation, design efficiency and reduce re-work. Let’s take a look:

    Search and zoom in the project browser.


    The latest update introduces improved zoom functionality in the Project Browser by utilizing the CTRL key + mouse scroll. This allows users to easily zoom in and out, providing a seamless and consistent zooming experience throughout the application.


    2- Up/Down navigation after searching in Project Browser

    Explore Project Browser search results using the Up and Down arrow keys. Get faster to a selected search result.

    3- Apply Area Rules setting

    In Revit 2024.1, Revit now remembers the “Apply Area Rules” settings shows up in options bar when creating or modifying Area Boundaries. The remembered values is stored in the Revit.ini files, under the ‘AreaBoundary_ApplyAreaRule’ variable.

    4- Add visual style in type preview

    To better visualize how an element is displayed in your model, apply a visual style to the element in the Type Properties dialog.

    Use the control in the lower left corner of the preview pane of the Type Properties dialog to change the visual style of the preview.

    5- Site Design- Simplify Toposolid

    You can adjust the number of internal points in a Toposolid by inputting the percentage of points to preserve.

    Input number ranges between 0-100% Revit will provide instant point number changes responding to the input text. Input 0% will remove all the internal points, but please note the points on boundary will be preserved and remain untouched during the simplify process.

    6- Site Design- Add Split Line enhancement and Chain Line Selection

    Now users can have consistent behavior between Add Point and Add Split Line

    Split Line Enhancements

    You can create Chain lines Along the surface with the same offset to create Path along the existing Topo. ​You can create Chain lines with Absolute height to easily shape the Topo to a flatten area.

    Chain Selection on Split Line

    In the previous version of Revit, you were limited on selecting the uppermost split line in a triangulation facet, or select a triangulation facets. ​

    In Revit 2024.1, you can Chain select any split lines. The splines do not need to form a closed loop. You can also modify the elevation of a chain line selection at once.

    7- Export Patterns to a .pat file

    In Revit 2024.1 you can export drafting and model patterns from your model to a PAT file.

    In the Fill Patterns dialog, accessed from the Manage tab, select a pattern or multiple patterns to export to a PAT file. The exported file contains pattern definitions of each pattern selected. Drafting patterns and model patterns must be exported to separate PAT files.

    8- Performance improvement on placing

    Provided a fix to reported lag when placing, pasting, and moving floor-based families and room, area and space tags

    9- Enhance Link IFC fidelity

    Autodesk is using ATF (Autodesk Translation Framework)  to better support the resolution of external geometry for large IFC models, and accurately represent geometry edited with Boolean operations.

    10- Change text alignment property for multiple selected elements using the ribbon

    This improvement allows users to the control text alignment property for multiple selected text elements – this could be done previously in the properties palette, but that was difficult for users to discover and had difficult drop downs without icons.​

    11- Warning for Delete Views in workshared models

    Deleting views in a workshared environment cannot be undone.

    To prevent any accidental loss of data, Revit now displays a warning for deleting views from the Project Browser. The warning message can be optionally disabled.

    If you want to learn more about Revit feel free to Contact us