• How to Create Intelligent Custom Labels with Expressions in Civil 3D

    Introduction

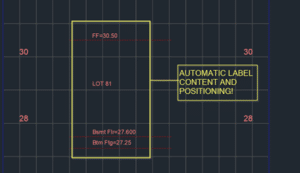
     Figure 1 – Dynamically Labelled Basement Elevations

    Today we see how we can make labelling much easier and consistently accurate in Civil 3D. “Expressions” are used to create user properties that can automate a lot of label text generation and positioning as well. The expression techniques used here are useful for every kind of custom Civil 3D labels. There are several labelling methods:

    1. Manual text
    2. Dynamic block (with attributes)
    3. Civil 3D Labels (with Expressions)

    To set up the easiest labelling workflow, Civil 3D labels with expressions is usually the way to go. We spend a bit of time setting things up, but once it’s setup, it takes little time to do the labelling and even less time to update any changes. Dynamic blocks with attributes and parameters can be just as good, but we’ll save that discussion for another time.

    Sample Use Case

    In this example, we just want to input the finished floor elevation, how far down the other elevations are, and what lot number we are labelling. We want the label to take care of the rest, including calculations and label positioning.

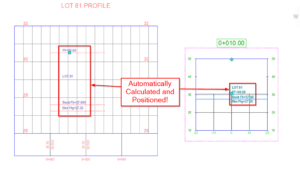
    It can be done for either profile views or section views. A sample DWG is available for download so that you can see exactly how everything was set up. For now, we will go over some high-level notes on what was done.

    Profile View Implementation

    • The finished floor is represented by a TIN surface. The TIN surface is simply defined by a rectangle breakline that’s at the finished floor elevation.
    • The actual label is done as a “Lines” label of the FF surface profile, on a profile view.
    • To set up a label style properly, we first need some expressions setup- BsmtFlrOffset (-2.9): how many meters down from FF the basement floor is
    • BsmtFlr ({Tangent Start Elevation}+BsmtFlrOffset): calculated basement floor elevation
    • BtmFtgOffset (-3.25): how many meters down from FF the bottom of footing is

    BtmFtg ({Tangent Start Elevation}+BtmFtgOffset): calculated bottom of footing elevation

    • ViewScale (2): The viewscale of the profile view. 1:500 = 1000/500 = 2.
    • PVExaggeration (10): Vertical exaggeration of the profile view.
    • LabelPosition1 (BsmtFlrOffset*ViewScale*PVExaggeration/1000): Y offset used to position the basement floor label. It takes into account the view scale (1:500) and the vertical exaggeration (x10).
    • LabelPosition2 (BtmFtgOffset*ViewScale*PVExaggeration/1000): Y offset used to position the bottom of footing label.
    • LabelPositionLot (LabelPosition1/2): Y offset used to position the lot number label. Half way in between FF label and the basement floor label.

    Sample drawing has four label components:

    • FF elevation label: use the “Tangent Start Elevation” property, attached to the feature.
    • Basement floor elevation label: uses expression BsmtFlr, positioned by expression LabelPosition1 for its Y offset.
    • Bottom of Footing elevation label: uses expression BtmFtg, positioned by expression LabelPosition1 for its Y offset.
    • Lot number text label: Since the profile is named with the lot name (LOT 81). Positioned by expression LabelPositionLot for its Y offset.

    It takes some initial setup, but once that’s done, all it takes is just applying a Lines label in the profile view and that’s it! Elevations and label positions are automatically calculated and positioned. The only adjustments that might have to be made is editing some expressions to note what elevation offsets, view scale, and exaggeration are used.

    Section View Implementation

    The implementation is essentially the same as the profile, with a few differences.

    • Major Offset label type is used
    • Sections actually have “Drawing Scale Conversion” property available out of the box. If the scale is 1:200, “Drawing Scale Conversion” property is 1/200 = 0.005. This makes section labels automatically position correctly for all scales unlike the profile ones!

    Conclusion

    Civil 3D label expressions can help us set up all sorts of custom labelling that automates calculations as well as label positioning.

    It takes a little bit of investment to get used to, but once you set up one or two, it becomes fairly easy and can greatly expand the capabilities of your template. That in turn, helps everyone not only save time, but be more consistent, as dynamic labels help us avoid forgetting label updates as designs change. Navisworks has the ability to open various file types. It can also read embedded data if the proper object enabler is installed. Fortunately, Autodesk has one specifically for Plant 3D. You can download the 2021 version here.

    Here’s an example of a Plant 3D model in Navisworks without an object enabler. You can see that some shapes aren’t displayed properly, and it is not reading the embedded data.

    Here is the same Plant 3D model with the object enabler installed. All the components are displayed correctly, and the embedded data is being displayed in the properties section.

    With the Plant 3D model in Navisworks, the file can now be saved as an NWD file and delivered to external parties. All they need is Navisworks Freedom to view the file, which can be downloaded for free from Autodesk.  This is one of many features available in Navisworks. Apart from a robust 3D viewer it can perform tasks such as clash detection and animation.

    If you would like to learn more, Navisworks training is available as a supplementary course to SolidCAD’s Plant 3D course curriculum. Please email us at contact training@solidcad.ca.

    In the next blog, we will look at how to utilize the Navisworks plug in within Plant 3D. Stay tuned!


    Autodesk Desktop Connector Update

    Autodesk Desktop Connector 

    Autodesk regularly updates the Desktop Connector with fixes to defects and some basic functionality updates; this update is no different, but there is one major feature update which has been on users’ wish lists for a while.

    Users can now change the location of the Workspace to another fixed drive location. This will be very welcome to many IT departments. Formerly, the Desktop Connector would only save to the user’s local C Drive. Many users’ C Drives are not large enough to accommodate the added load of storing files locally when using the Autodesk Construction Cloud. IT can install larger file drives onto users’ computers since the Desktop Connector can now store files on a drive other than C. 

    Click here to see the documentation and to download it.

    Enjoy!


    Common CMMS Data Misses: How to Improve Capital Asset Planning and Total Cost of Ownership

    One fundamental responsibility of all service department leaders is to properly manage the assets under their charge until they reach end-of-life and must be disposed of. Able stewardship includes capital asset planning and the ability to determine the total cost of ownership (TCO) of those assets – and successful capital asset planning and TCO processes depend in part upon an appropriately maintained CMMS.

    With a modern computerized maintenance management system (CMMS), you can take the available data values, calculate each cost area, and derive an accurate TCO for leadership planning. Coupled with precise in-service and end-of-life values, leadership now has a comprehensive, responsive and accurate capital planning tool that becomes a valuable commodity within your organization.

    Capital Assets and TCO: The Basics

    Before we explore which CMMS components are necessary for capital planning and TCO calculations, first let’s look at what we mean by a “capital asset.”

    • There are dictionary definitions such as “long-term assets either tangible or intangible (as land, buildings, patents, or franchises),” according to Merriam-Webster.
    • There are governmental definitions like 26 U.S. Code § 1221 (IRS Code), which has more “it is not” than “it is.”
    • A general business definition could be an asset that has an acquisition cost of $5,000 or more, a useful life of more than one year, and use that contributes to revenue and/or profit for the business.

    In my experience, most organizations have an internal definition used by the accounting department, and that’s what you’ll likely use when planning for capital asset disposition and replacement.

    On the TCO front, total cost of ownership is a calculation of all costs associated with the asset. This will include the acquisition/original cost, operational costs and overhead costs for each asset. In CMMS-speak:

    Operational costs are items such as:

    • Fuel and other costs to operate the asset (vehicles, generators, boilers, etc.)
    • Chemicals needed for proper production activities (chlorine, ash, phosphate, etc.)
    • Materials/parts needed for scheduled and reactive service events
    • Labor costs
    • Contract/vendor costs

    Overhead costs include items such as:

    • Costs of the physical building/grounds the asset is in
    • Utilities costs in support of the operational environment
    • Administrative costs (clerical, records management, training/licensure, regulatory oversight, etc.)

    Performing Proper Capital Planning and TCO Analyses

    Consider this example. An analysis of 74,500 asset records produced the following results:

    • 60% have no in-service dates
    • 78% are missing acquisition cost
    • 93% lack residual cost information
    • 38% have no maintenance/service costs (and the other 62% don’t necessarily have full costs listed)
    • 40% are missing labor/time costs
    • A mere 8% have material/part costs

    Critical data values like the acquisition/original cost and resale values must be known to calculate TCO; without these pillar values, no true cost analysis can be performed. But all the listed values should be available for a complete capital planning or TCO analysis. Capital planning is forecasting ahead when an asset will need to be replaced, anticipating that expense, and amortizing it over the life of the asset.

    Without those critical date and cost values, proper planning is difficult if not impossible.

    When it comes to TCO, if your team is not accounting for the materials/parts used during service or maintenance activities, you lose a large expense in the TCO. Inaccurate or missing labor costs will skew a TCO and make it look like your TCO is much lower than reality. If assets are covered under contracts, those costs must be associated with the individual assets and properly accounted for in operational costs. For instance, if you’re using $500 a week in chemicals to treat potable water but your team is not connecting them to the asset consuming them, then the TCO calculation becomes inaccurate.

    A common formula for TCO is:

    (Acquisition cost + [operating cost + overhead costs]) – salvage value/resale value

    Improving Planning with the Help of Your CMMS

    Now that we’ve covered what goes into capital planning and TCO calculations, it begs the question: Why don’t most CMMS systems contain these values?

    My experience has been that many of these data values are provided at time of purchase, but they are not entered into the CMMS because the enterprise does not have the proper processes in place. Unfortunately, this forces service department leadership to rely on other departments (like accounting or materials management) for these values or to make a best guess.

    But properly updating a CMMS with critical data values, such as the date the asset was placed into service, can enable those values to serve as the basis for projected replacement and annual depreciation values. Documenting an asset’s expected end-of-life allows you to budget properly for the costs to replace it.

    Here at Accruent, we are committed to helping organizations optimize facility and asset maintenance. Our solutions are designed to help you automate work orders, increase equipment reliability, streamline maintenance operations and costs, improve inventory accuracy, and maintain industry-specific regulatory compliance. Learn more about Accruent CMMS software.

    Batch Hyperlink Will Blow Your Mind

    This story was originally published by  on the Bluebeam Blog.

    Imagine pointing to an entire folder and subfolders of drawings and bringing the section cuts, elevations and plan notes to life (from 2021).

    One of the most challenging objectives when transitioning from paper documents to digital is overcoming the comfort we developed flipping through a set of physical drawings. There’s just something intuitive about keeping a finger on the plan sheet while you quickly jump back and forth looking at the sections or detail sheets.

    After all, our fingers have been saving pages since we were first introduced to coloring books as children. It can also be difficult to navigate through digital plan sets if they are not created properly.

    In addition to using AutoMark to update digital page labels, possibly the most powerful tool to ease document navigation is Batch Hyperlink in Bluebeam Revu. I’m always excited to show this to experienced users who don’t know this tool exists. To be fair, it is only available in the Extreme version of Bluebeam Revu. If you have Revu Extreme and don’t know about Batch Hyperlink, get ready for an eye opener!

    So, what is Batch Hyperlink and what does it do? Imagine pointing to an entire folder and subfolders of drawings and bringing the section cuts, elevations and plan notes to life. When you’re looking at a plan and want to look at a section cut on a different sheet, you simply click on it and you’re there.

    You can use the Previous View Button to quickly jump back to the plan sheet.

    You don’t even have to place your finger on those pages. Remember those times you thought, “If I only had a few more fingers?”

    As a bonus, if your cover sheet has a Sheet Index, you’ll notice that it has come alive with links to every page in the set.


    If you work with small-format fabrication drawings where the drawing number is actually the piece mark number, you could also use Batch Hyperlink. In the case of steel fabrication, you might have 11×17 drawings with a mark number and bill of materials.

    All these assembly mark numbers are then referenced on an erection plan or elevation. Revu will find those mark numbers as if they are section cuts and connect each piece on the plan to the sheet with the fabrication drawing.

    As with every tool in Bluebeam Revu, there are several creative ways to use Batch Hyperlink.

    Civil 3D Assemblies: Tool Palette or Block Library?

    Civil 3D Assemblies: Tool Palette or Block Library?

    Civil 3D comes shipped with pre-configured assemblies that may or nay not fit your needs.  We created another BLOG post here to show how to create your own and share them with others in your team.  There is another way…read on.

    The Cole’s notes are:

    • Make a new drawing.
    • Create your assembly in this new drawing placed at 0,0.
    • Insert that drawing into your design and explode the resulting block.

    In the linked article above, we suggested creating a tool palette.  This works well for blocks so they may be placed on the correct layers.  For assemblies, since this block will be exploded, this is not a requirement.  Might there be an easier way?  There is.  You see, tool palettes require a little maintenance.  The trick below does not.

    AutoCAD’s Block Library

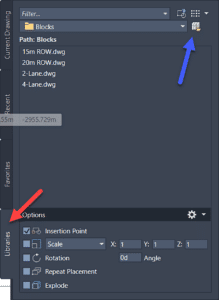
    In Civil 3D 2022 or later, open the new block palette introduced in version 2020.  The option I’m about to illustrate is not available with 2020 or 2021.  You will see two things: a Library tab (red) and a button to select a folder (blue).  Clicking the folder button will prompt you to select a folder containing drawings.  If each of those drawings is an individual assembly, your job is done.  Drag and drop one of those into your drawing and ensure it is exploded.  You’ve just inserted an assembly.

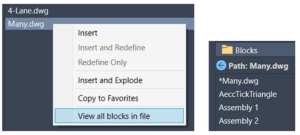
    No maintenance is required.  Just save a new drawing with a new assembly into that folder and the next time AutoCAD is started, you’ll see the new content.  If you prefer to have all assembly blocks defined in a single drawing, that’s fine too, simply right click the drawing and choose…

    Enjoy!

    Security in the Clouds: Pressing Cloud-Based CMMS Concerns and How Industry Leaders Are Addressing Them

    With data breaches and ransomware attacks becoming more common – and more severe – by the day, it’s understandable to have concerns or confusion about security and cloud applications. This includes your computerized maintenance management system (CMMS).

    The good news? Many common security concerns simply aren’t applicable to modern cloud-based CMMS systems. Here’s everything you need to know about cloud security and your CMMS system.

    The Bigger Context: Understanding The Cloud And Cloud CMMS Systems Today

    General Cloud Facts Today

    The term “the cloud” usually refers to a network of servers, each of which has a specific function or purpose. So, rather than your information being stored in your in-house hard drive, it is stored on these servers. When individuals or companies move something to the cloud, they are generally making a switch from hardware to cloud-based infrastructure-as-a-service (IaaS) or software-as-a-service (SaaS).

    The reason for this? In general, cloud-based tools can offer more scalability, efficiency, security, and agility than their on-premise counterparts. This can facilitate digital transformation and company-wide modernization. It can also facilitate work in a multi-site or remote environment – which is more vital than ever in the wake of COVID-19.

    Looking with more detail, consistent cloud SaaS benefits include:

    • Increased Security: Cloud-based systems are generally managed by vendors or providers, and these teams are vigilant about staying on top of patches and other security protocols. What’s more, these updates are generally automated, which can take a significant strain off your IT team.
    • Improved Scalability: Hardware is expensive and difficult to scale. Cloud systems, on the other hand, have unmatched scalability and flexibility, both of which can facilitate technological growth as your company evolves.
    • Maximized Connectivity: It is easier to connect SaaS-based systems thanks to tools like APIs. This makes it easier to store and manipulate data across devices, technologies and websites.
    • Lower Software Price: Hardware generally requires a significant up-front cost for purchase installation, as well as high maintenance fees. Cloud solutions, on the other hand, run on monthly or annual subscriptions, leading to a lower up-front cost.
    • Higher Availability and Reliability: If you have a strong vendor, your cloud solutions can have faster uptime, more availability and increased reliability.

    Cloud-Based CMMS Systems

    All of this is certainly true when it comes to cloud-based CMMS systems. There are also many additional benefits that can come with deployed a cloud-based computerized maintenance management tool. These include:

    • Mobile capabilities: With a cloud-based CMMS, you simply need a device and an internet connection to be able to access your software. This allows technicians to upload photos, update work orders and access other vital information directly at their point of need. This is particularly vital in the multi-site post-COVID manufacturing world we live in today.
    • Increased scalability: With a cloud-based CMMS, you can scale your systems according to your team’s current bandwidth and needs. You can also add or remove users as the makeup of your team changes, which is important for uptime and controlled access to your mission-critical data.
    • More user-friendly systems: With a cloud-based CMMS like Maintenance Connection, security updates and system upgrades are automatic, hands-off processes. All you need to do is log in and accept the update – and sometimes, even this part is automated. Plus, your important information is automatically backed up on a regular basis, and if you have a system malfunction, your vendor should provide support and troubleshooting assistance.
    • Increased cost-effectiveness: There are both short-term and long-term cost-savings associated with a cloud-based CMMS deployment. Immediately, there are lower up-front deployment costs. In the long term, there are lower software maintenance costs and decreased security risk. Additionally, more software availability means increased team productivity and efficiency over time.
    • Increased productivity: This deserves its own point. Because users simply need to log in to begin working on a cloud-based system, employees across departments will immediately be able to access their assets, parts and inventory, work orders, reports, cost tracking, scheduling, purchasing, etc. This means immediate efficiency and up-time.
    • Faster disaster recovery: With a cloud system, automatic and managed back-ups are included in your monthly subscription, and your data is continuously backed up to multiple servers in multiple locations. Even if you have one server failure, then, your information will still be available elsewhere.

    Common Security Concerns With Cloud-Based Computerized Maintenance Management Systems

    So, what’s the hold-up? What security concerns do people still have about a cloud-based CMMS – and is there any validity to any of these concerns? Well, many concerns are baseless with modern tools, including the idea that a cloud-based CMMS is inherently more vulnerable to security attacks. That said, there are some common security concerns that you should consider. These include:

    Poor Visibility

    As we mentioned, cloud software allows access from many devices, locations and users. This is a huge benefit of a cloud-based CMMS system, but it can also introduce confusion and poor visibility, particularly if you are unclear about this infrastructure and what your users are accessing, viewing and downloading. This is a definite concern to consider when choosing your cloud-based CMMS.

    Compliance Concerns

    Industries like manufacturing, oil & gas and healthcare are highly regulated, which means that you must adhere to strict and ever-changing compliance requirements. Careless or unclear data transfer in the cloud can make this difficult – as can lack of clarity into where your data is, who has it and how it’s being used. The right software won’t have this lack of visibility.

    Insider Threats

    No, you likely don’t have double agents working in your organization and trying to break down your security. That said, lack of training and negligence could open your organization up to vulnerabilities. You have to make sure that your employees, contractors and business partners have the information they need to keep your technology safe.

    Insecure APIs

    Application user interfaces, or APIs, are often built into web or mobile applications to connect disparate tools or systems. The problem? External-facing APIs can be a cloud security risk, providing a gateway from which cybercriminals can enter your system and access your data. This must be kept top-of-mind.

    A Misconfiguration Of Cloud Services

    If your system isn’t configured correctly, it could cause your data to be manipulated, exposed or even deleted. Make sure that your CMMS vendor knows this and knows how to prevent issues like mismatched access management or insecure default security and access management settings.

    Poor Cloud Security Strategy

    You can’t put the cart before the horse – or, in this case, you can’t rush to get a cloud CMMS deployment live before you’ve developed a comprehensive CMMS security strategy. This is a common mistake and one you should avoid.

    How To Effectively Secure Your Modern SaaS CMMS Systems

    Address Your Concerns Proactively

    To maintain your cloud-based CMMS security through deployment and beyond, it’s important that you keep the above concerns top-of-mind and address them as you choose your CMMS vendor and move forward with your cloud deployment and maintenance. That means having processes in place to:

    • Protect your data while it is in transit and at rest
    • Identity and user authentication, including SSO
    • Compliance and security integrations
    • Maximize your visibility and control over your systems
    • Protect your assets and your team
    • Maximize team and personnel security
    • Vet your vendor (more on this below)

    Ultimately, this can help your organization:

    • Ward off growing cybersecurity threats
    • Avoid any major data breaches or data loss
    • Maintain business continuity
    • Avoid compliance and auditing concerns

    You Can’t Forget Your Best Practices

    Another important key is to find a system – and a vendor – that takes a comprehensive approach to their CMMS security. Overall, you and your vendor must keep several things top of mind, including:

    • Identity and access management: An identity and access management (IAM) system – including things like multi-factor authentication and defined user access policies— should always be in place to help you control access to information.
    • Physical security: Make sure that your vendor is doing what they can to prevent access to the hardware housed in their data center. This includes having uninterrupted power supplies, CCTV, fire protection and more.
    • Encryption: Encryption encodes your data assets when they’re at rest and in transit, thereby providing another level of data security.
    • Vulnerability and penetration testing: During this testing, your own team will try to hack into your system to check for vulnerabilities or security issues.
    • Firewalls: Next-generation firewalls have many features that are needed in a modern context, including IP blocking, packet filtering, domain name blocking and port blocking.
    • Threat intelligence, monitoring and prevention: Threat intelligence systems, intrusion detection systems (IDS) and intrusion prevention systems (IPS) help alert your team to attacks so you can effectively respond.

    Train Your Team

    When it comes to CMMS security, your users will always be your first line of defense – and possibly your biggest weakness. Make sure that your team consistently knows:

    • How to spot malware
    • The risks of insecure practices
    • Any industry-specific training needed for advanced users
    • The importance of user access best practices

    Final Thoughts

    The cloud isn’t inherently insecure, and you can have a successful cloud CMMS deployment without increased security risk. That said, it’s important that you have your CMMS security infrastructure in place and that you’re aware of key risks and considerations to keep top of mind.

    Ready to learn more? Reach out to one of our sales reps or click here to read more.

    30 AutoCAD Tips & Tricks for Civil Infrastructure prof

    Ready to power up your AutoCAD skills?

    You can do this with one simple step: download this free AutoCAD eBook for Civil Infrastructure Professionals to discover popular tips from pros from the industry.

    This book is made possible by a number of SolidCAD expert power users in collaboration with Autodesk, and it covers everything you need to know about Printing, Configuration and Performance, Efficiency, Accuracy, and Blocks and XREFs, Annotations, and more.

    These time-saving tips will change the way you work, and help you uncover command options, keyboard combos, and new functionality to work more efficiently, save time and automate your workload.

    Download today by filling out the following form below.

    Contact

    null


    Recap: 2023 Release

    Recap: 2023 Release

    Autodesk has just released their Point Cloud management application, Recap 2023.  Click here to join the live webinar on April 19thClick here for Autodesk documentation.  Read on to find out more.

    Here is the new feature:

    Autodesk Docs

    Store point clouds in Autodesk Docs and share them with stakeholders.  The Autodesk Viewer has been enhanced to allow Point Clouds to be viewed, measured, and annotated within an internet browser.

    Infraworks: 2023 Release

    Infraworks: 2023 Release

    Autodesk has just released its Civil visualization and analysis application, Infraworks 2023.  Click here to join the live webinar on April 19thClick here for Autodesk documentation.  Read on to find out more.

    Here are some of the new features:

    Parametric Content

    Easily check for updated content from the styles palette.

    The Infrastructure Parts Editor plugin for Inventor is no longer required, point to any Inventor Part or Assembly, and it will be added as a new style.

    Structural Bridge Design

    Bi-directional workflow between structural analysis and the parametric bridge model has been enabled.

    Command Search

    Use simple terms to search for the commands you need when you need them. And, this tool keeps a history of your past actions, making it even simpler.

    Cloud Credits

    Cloud credits are no longer required for Watershed Analysis and Profile Optimization.

    Civil 3D: 2023 Release

    Civil 3D: 2023 Release

    Autodesk has just released its flagship Civil Engineering modelling application, Civil 3D 2023.  Click here to join the live webinar on April 19thClick here for Autodesk documentation.  Click here for the 2023 help page.

    Read on to find out more.

    There are several useful new features, but I know the question on almost everyone’s mind is “Has the format changed?”  The answer, happily, is no!  2018 is still the native format for drawings saved with AutoCAD and Civil 3D 2023.  Backwards compatibility has been maintained.

    In no particular order, check out some of the new features and enhancements:

    2022.1 Update

    All the features from the 2022.1 updates are included in 2023.

    Performance

    Significant performance enhancements are reported.

    Grading Optimization

    • Help Center – get assistance in the form of tutorials, sample files, and workflows.
    • Progress Bar – see visual cues about the progress.
    • It’s available for download now!

    Project Explorer

    • Display custom notes and quantities.
    • It’s available for download now!

    Geotechnical Modeler

    • It’s available for download now!

    Pressure Networks

    • Keyword Search – search for parts to model.
    • Property Sets – show in profile view labels.
    • Profile Editing – reduce PVIs and other enhancements.
    • Cut Length – specify a cut length if none is defined in the catalogue.

    Rail

    • CANT – label enhancements.
    • Catalogue – replace a catalogue when modified.

    Additional Updates

    • Corridor Targets – target multiple surfaces, dynamic target layers.
    • Property Sets – dynamically updates with changes to the corridor.