Many users create PDF files from AutoCAD products as PDF seems to be the standard digital format. There are three issues you may run into and some settings to consider if you use Bluebeam Revu as well as AutoCAD.
Viewports
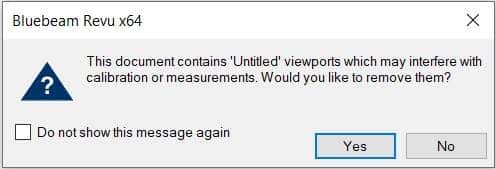
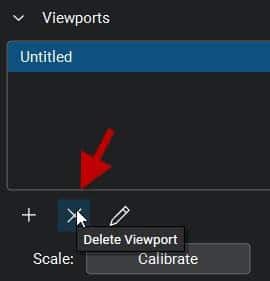
First, you may see this message when opening PDF files using Bluebeam Revu (not the free viewer) which were created from AutoCAD using Autodesk’s DWG to PDF print driver. These “viewports” are artifacts contained within the PDF file to which Bluebeam Revu alerts you when you open a file containing them. ALWAYS say yes to removing these artifacts. If you don’t, they will very likely affect the accuracy of any measurements you make in Revu. If you skip past this message without selecting Yes, the viewports can be removed from the PDF in Revu’s measurement panel.
Why do they exist in the first place? It seems to be an issue with Autodesk’s DWG to PDF.pc3 file. PDF’s created using Bluebeam’s PDF printer do not contain these anomalies. Here is an Autodesk discussion group thread discussing these viewports. Interestingly, it indicates that these viewports can cause an issue when measuring using Adobe Pro, but there appears not to be a solution there, where Revu does indeed catch the existence of them.
Searchable Text and SHX Fonts
The second issue is searchable text. Many AutoCAD users still use Autodesk SHX fonts. There are several reasons to avoid using SHX fonts; not the least of which is that when a PDF is created containing them, that text will not be searchable when opened in any PDF reader software. If you want your recipient to be able to search text, and you very likely should, do not use SHX fonts in AutoCAD. Use a True Type font, such as Arial instead. This is with one exception. With Bluebeam Revu, SHX text is in fact searchable, but you must enable “Search Markups”. More detail about this I the section below “Odd Markups”.
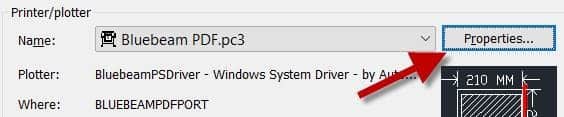
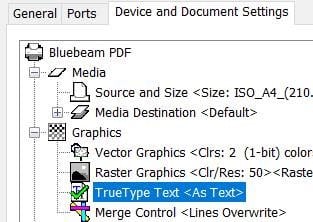
If you’re a Bluebeam Revu user with the CAD version or better, and you prefer to use its PDF print driver instead of Autodesk’s, there is an option to enable SHX fonts as outlined in this article. Better, do use a True Type font as mentioned above, but there is one more setting you must enable. A PC3 file must be created using the Bluebeam print driver and then this option set in the printer properties in AutoCAD. It defaults to TrueType as graphics and your text will not be searchable if it’s not changed.

Odd Markups in Revu
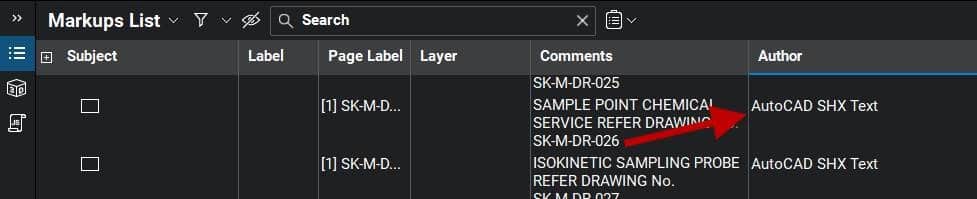
Lastly, using Bluebeam Revu (not the free viewer) to open a PDF created by AutoCAD using its DWG to PDF printer, you may see “markups” already contained in the PDF. There will be one markup for each text object in the file, indicated by the AutoCAD SHX Text author. That adds up to a lot of markups if it’s a file with many text objects. This can affect the performance of the file within Revu and they will definitely be in the way when creating normal markups. These markups are only required if you need to search SHX text; they cannot be deleted with Revu tools. They can be Flattened in Revu prior to adding your own usual markups, or they can simply be filtered out if you don’t wish to see them. Don’t worry, the text in the PDF will not disappear. I do not have access to Adobe Pro to see if this is an issue there as well.
These “markups” are created when printing from AutoCAD using the DWG to PDF driver and it is an Autodesk feature. In AutoCAD, there is a variable named PDFSHX. Turned on, a value of 1, enables these “markups” in the PDF file which results in searchable text. Turning it off will result in no “markups” and non-searchable SHX text. Here is an Autodesk document outlining this feature. SHX text may or may not be searchable depending on the PDF reader in use. For example, the Bluebeam Revu free viewer cannot search SHX text, but the paid version can.
This issue does not occur with PDFs created in AutoCAD using Bluebeam’s printer driver.