• AutoCAD 2023: New Release

    AutoCAD 2023: New Release

    It’s that time of year; Autodesk has just released the 2023 version of their flagship drafting application, AutoCAD.  Read on to discover some of the new features.

    Click to peruse Autodesk documentation.

    Compatibility

    Likely one of the most common questions is about compatibility.  AutoCAD 2023 remains in the 2018 format.  There is no need to save files to previous versions unless your recipient is using 2017 or earlier.

    Markups

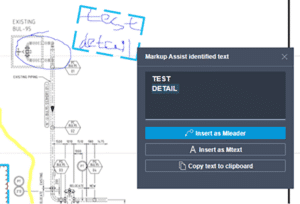
    I’m intrigued by this feature more than any other this year. PDF markups are ubiquitous in our industry, but there were few tools to help manage them.

    In AutoCAD 2023, PDF markups can be overlaid and displayed more easily, and they can then be imported as a trace layer and converted to AutoCAD objects. Markup assist will use text recognition to add AutoCAD text, multileaders, and revision clouds from the PDF markup. Image file formats are also supported if the PDF is scanned and marked with coloured pens.

    Insights

    Machine learning provides tips and tricks when and where you need them.  AutoCAD generates macro insights based on your unique command usage.

    LISP

    LISP apps can be loaded and run within the AutoCAD web app.

    General

    The command line is visible within each active floating window.

    Count has been updated to enable easier navigation and selection.

    The Sheet Set Manager has been given a performance boost and has a new interface in Autodesk Docs.

    ANNOSCALEZOOM controls mouse zooming in paper space.

    MTEXT objects can be converted to MultiLeaders.

    TRACE is now available on AutoCAD desktop, not just in the web app. You can contribute to other users’ traces.

    2D Graphics performance has been enhanced. Zoom and pan performance has been increased up to 50 times with many true type text objects, long polylines, and solid hatches. 

    The new TRAVERSALTHREAD system variable controls this.

    A new 3D graphics system (GSF) has been introduced and it promised to increase performance.  GSFENABLE is the new variable that controls this. It is ON by default. To experience the benefits of this, use the visual styles named Shaded or Shaded with Edges.  FASTSHADEMODE is a new variable that controls this behaviour.

    CUTBASE is a new command (Cut with base point found in the right-click menu) to allow the selection of a base point when cutting objects from a drawing.

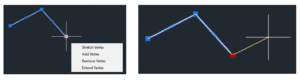
    Add a new vertex to the end of a polyline with the extend vertex option

    Autodesk Docs: Public File Sharing Links

    Autodesk Docs: Public File Sharing Links

    Do you use Autodesk Docs?  Would you like to create a link for an external customer to download a file?  Does this customer NOT use Autodesk Docs?  If so, read on.

    Public link creation in Autodesk Docs is off by default.  This means that your recipient must own Autodesk Docs and be logged in to view or download a file you have shared.  You’re presented with this option when sharing a file or folder by default.  Note the disabled public link option (Anyone with this link).

    To enable public links, go to Doc and Files.  Then click on Settings.


    Once enabled, here is how the sharing form appears.  The public link option is enabled, and the link can be copied and sent to anyone.

    Enjoy!

    Civil 3D: Sharing Assemblies

    Civil 3D: Sharing Assemblies

    So, you’re the technical team lead for your Civil Engineering firm, and you need to share amongst your team some Civil 3D Assemblies.
    You know how to create an AutoCAD tool palette, and you know that this is the best place to share assemblies – but you’ve tried, and it’s not working.

    If you’d like to learn how this is done read on.
    Palettes can be exported and then imported onto users’ machines, but when an assembly is edited, the creator must export again and then all the users must again import. This is not efficient.

    The Hard Way

    The method that Civil 3D uses to store assemblies on a palette works well, but to set it up is a bit of a bear.  Open this document to see the full details.  Here is a summary:

    • When an assembly is dragged to a tool palette a new DWG is created on your system. For my system this is:
      C:\ProgramData\Autodesk\C3D 2022\enu\Assemblies\Metric
    • You can create a tool palette with custom assemblies, sure, but you need to make these drawings available to your users. Usually, this means copying them to a network shared folder.
    • Even when you make them available, the DWG path must be defined in an ATC file that defines the palette, This is XML programming language and it can be difficult to find and disastrous if an error is made.

    The Easy Way

    I won’t say this is “The Best” method, but I believe it to be the easiest, quickest, and most foolproof method; and it’s the one I choose to use at this time.

    I won’t go into detail about how to perform each of these steps; it is assumed you know the technique. The short answer is that each assembly will reside in its own DWG file and that file will be stored in the shared network folder. That file will be a block in the tool palette.

    Open a drawing that conforms to your Civil 3D standards. Possibly one that already contains your desired assembly. 

    1. If the assembly has yet to be created, create it. 
    2. Ensure it is on the desired layer. Assign the desired code set style to it. Move it from its insertion point to 0,0. If this last step is skipped, the assembly will not be inserted properly later.


    3. Save the drawing to your shared network folder.


    4. WBLOCK and select the assembly and subassemblies together.  Ensure the insertion coordinates are 0,0,0 and provide the file name.  Click OK to create the drawing.


    5. Create a new tool palette or set current the destination palette for your new assemblies.  Drag the newly created drawing into the palette.

    6. To use the new assembly, drag it from the palette into a new drawing.  This will be a block, however.  It will need to be exploded once.

    7. You may suggest turning on the Explode option in the tool to avoid the explode step.  Indeed, I thought of that as well.  Problem is, this is what you get!


    That’s it.  Once the assemblies have been created, it takes about 45 seconds per assembly to add to the palette.  If edits are required, simply open the appropriate DWG, make the edits, and save.


    Autodesk Desktop Connector Update

    Autodesk Desktop Connector 

    Autodesk is spending many resources getting their cloud system tweaked just right.  Yet another version of the Desktop Connector has been made available.  Read on to find out more.

    We present version: v. 15.2.0.1634!

    You may download it here: downloaded.

    Discover more about it here: Release Notes.

    Notable features are:

    • Not new, but updated:  Check your files for integrity before uploading using the Reference Explorer.
    • Navigating folders in Windows Explorer and Civil 3D is much faster.


    Infraworks: Custom Assemblies

    It’s relatively easy to create a custom component road assembly within an Infraworks model.  But how does one save that custom assembly for use later?  Read on to find out!

    The answer depends on how you’d like it to be shared:

    • Export for use in other existing models.
    • Save for use when new models are created.


    Saving the Assembly

    First, to save a custom assembly, simply right click the component road and choose Add to Library.  Choose a station to copy and give the new assembly a name.  The new assembly will appear in the style palette.

    Choose a station to copy and give the new assembly a name.  The new assembly will appear in the style palette.

    Export for Existing Models

    The individual assembly cannot be exported, but the catalog can.  Select the catalog, in this case, Custom, and click to export to a JSON file.

    The JSON file can then be imported into a different existing model using the import button.  The assembly will be available in the styles palette.

    Save for Future Models

    There is no “tool” for this, but if one copies the appropriate files from and to the correct locations, then it works just fine.  The custom assembly files can be found in the model’s folder path.

    …model.files\unver\Content\Styles\Component\  .  Possibly in a Custom sub-folder.

    There will be 2 files for each assembly.  A PNG image and a ACItem file.

    Copy these two files to the Infraworks standard folder.  Feel free to create a sub-folder here to place your custom assemblies.  This folder will appear within Infraworks.

    C:\ProgramData\Autodesk\InfraWorks\Resources\LocalLibrary\Styles\Component\

    The JSON file can then be imported into a different existing model using the import button.  The assembly will be available in the styles palette.


    Civil 3D: PPK Extension

    Many of our customers desire the ability to transform Civil 3D data between coordinate systems.  This was challenging or impossible…until now!  Read on…

    It is available for Civil 3D 2019-2022.  Read more about this extension here.

    The Autodesk® PPK Survey Extension 2022 for Civil 3D® provides an interface for importing GPS data (in RINEX format) for analysis, reporting, and converting it to coordinate geometry points in an Autodesk Civil 3D drawing. Once installed, users can access the Autodesk PPK Survey Extension 2022 for Civil 3D commands via the Autodesk Civil 3D Toolbox.

    Under COGO Points Transformation Tools:

    • Coordinate System Transformation
    • Vertical Datum Transformation

    Under GNSS Data Processing:

    • Post Process Kinematic Survey

    Autodesk Desktop Connector Update

    We are excited to share with you the highlights of the latest Autodesk Desktop Connector update!

    Enhancements are:

    • Folders Shared using Autodesk Drive are now visible on the desktop when using Desktop Connector.
    • When using Autodesk Collaboration for Civil 3D, an XML configuration file can be used to prevent a drawing’s reference template file from being uploaded when saving or dragging and dropping the drawing to Autodesk Docs.
    • AutoCAD 2022.1 will no longer create bak, dwl, dwl2 files when the dwg was opened from the workspace. For AutoCAD releases prior to 2022.1, Desktop Connector will add dwl and dwl2 files to the ignore list so they will no longer be uploaded.
    • In Autodesk Drive web, ‘My Data’ cannot be renamed or deleted. To match that behavior, Desktop Connector has removed those commands when right clicking on ‘My Data’.
    • Unnecessary “Checking Latest Version” dialog showing up during AutoCAD dwg compare workflow.

    There have been significant changes to folder sharing.  If you have folders shared, it is recommended to educate yourself on the new behavior.

    The new behaviour is outlined here and here.

    For more information, visit this link.


    Previews… More like Pro-views: Professional Revit Family Previews the Easy Way Using the Free Family Preview Generator

    When you are looking at inserting a family, you will want to get the most amount of information about the family file in the shortest amount of time. Without tools like HIVE you are limited to 2 sources of information, the name of the family and the preview image.

    Figure 1. Multiple preview directions in the Door Family Folder on my computer

    You can control the family naming convention for your company, so why not do the same with the preview image.

    Do you know how the preview image for a Revit family is defined? Its very simple, it’s defined in the File Save Options for the family:

    Figure 2. Setting the thumbnail manually

    The default in the Generic Model Template is that the Active view/sheet is used for the Thumbnail. This means that anytime you save the file you need to make sure that the view is setup for the presentation you want to see, this takes time and if most often overlooked.

    The Family Preview Manager from CTC enables you to control the preview image for multiple files:

    Figure 3. Free tools have the lighter tool image

    It is also one of the Free tools within the CTC BIM Manager Suite.

    Settings for the tool are found within the Options.

    There are general settings for things like whether to create backup files as well as which item should be hidden, for example, text and reference planes.

    Then there are Appearance settings and here you can select the View direction, Style, Detail level and more. So here you can define that it will be in the Realistic graphic style from the 3D Left Front Top view with the Fine Detail level. You can define the Default Appearance which will be for any categories that do not have an Appearance Template defined.

    Appearance Templates are then used for any catalogs that will not use the Default Appearance, for example Tag categories would be best saved in a Plan View rather than a 3D Isometric view.To use an appearance template, setup the template then assign categories to it. Note that you can assign templates for different hosting methods of families, this is important when you think of the orientation of content when face or wall based.

    You can select between the Active Family Document or multiple family files with the Document Batch option, however, Active Family Document will of course require that you have a family as the current open file.

    Once you have selected the files to be processed you will have the option to overwrite the family or save to a new location, I recommend using the save to new location when you are testing the tool, once you are comfortable with the results then use the Overwrite Family option.

    The end result of this tool? Consistency in your family library, all with a free tool from CTC, here is the link to download the tool:

    https://www.ctcsoftware.com/bim-manager-suite-trial/

    Earthworks Processor Alternative Use Cases – Mapping Borehole Information

    Earthworks Processor is a great tool in the CTC CIM Project suite for automating hours of surface creation and manipulation for the purpose of calculating dynamic and accurate earthworks quantities. With the use of a finished grade surface, existing grade surface, and simple closed polyline “regions”, Earthworks Processor will create 6 different surfaces including a stripping surface, earthworks volumes surface, and a subgrade surface. As well as offer bound volume outputs in the form of tables and labels.  

    Today I want to talk about an alternative use for EWP. A dynamic way to calculate volumes and map profiles of points of interest from borehole data. This data could be anything from tops or bottoms of contaminant plumes to bedrock mapping, to volumes of loam that cannot be used for backfill. Borehole data of such points of interest is generally represented in depths from the existing surface, not elevations, and it can be tedious to get correct elevations mapped out.  

    EWP only requires the existing surface and some closed regions identifying depths of the unsuitable backfill (in this case). I have mapped this out as depth contours in the capture below. 

    These depth contours are derived from the borehole data, but without manually calculating, there is no efficient way to turn these depths into true elevations.

    EWP can take these depths and run them through its processing to produce surfaces relative to the varying elevations of the existing surface as well as get you accurate volumes that will be dynamically updated as new borehole information is added to the design. In this scenario it’s the polyline region with the depth of 0 (or the extents of the unsuitable fill) that will give us the volume of unsuitable fill that we are looking for.

    This whole process from mapped estimated depth contour polylines to dynamic volumes and surfaces is about 5 mins. The power and ROI of EWP is even more apparent when additional borehole information is added. Depth contours are modified, and EWP is rerun, and surfaces and volumes are updated in seconds.

    I would like to acknowledge Jae Kwon, another Civil Technical Consultant on our SolidCAD team for this alternative EWP workflow. I hope this blog post earned your time today and helps you save time on future projects as well.