• Canadian Flag Proudly Canadian Owned and Operated
  • How Sets in Revu Simplifies Document Management

    This story was originally published by Rob Dunn on the Bluebeam Blog.

    Digitally creating PDF drawings and sharing them for review and markups through the cloud saves lots of time for professionals in the architecture, engineering, and construction (AEC) industry. But constantly organizing and tracking the huge volume of files and folders created daily is a challenge.

    When team leaders or project managers need the right set of drawings in the right hands in a quick and organized fashion, that can require picking through hundreds of drawings in dozens of folders and sorting or tagging those files into an entirely new folder—which might be replaced next week anyway. And, if anyone errs in updating a drawing or folder, that can cost time to discover and correct.

    Deepak Maini, national technical manager at Cadgroup Australia, is an expert on Bluebeam Revu, as well as a strong advocate for using Sets.

    Maini described Sets as “a collection of multiple PDF files, organized, categorized and displayed in a single view.” He continued: “So, all of the PDFs could be located in separate folders, but the Sets feature allows the document to be displayed as a single document in specified sort order. It’s the most efficient way to work with drawings that cannot be merged because of digital signature or other PDF security reasons.”

    Think of how many sources for drawings go into a project; you’ll probably immediately think of the structural team, the services team, and the architectural team—but that’s leaving out quality and safety, inspections, BIM collaboration, document management, and many other teams that need to access or provide drawings.

    It’s imperative that every team is clear on which drawings and files are the most up to date when they need them, without every team having to continually track changes and revisions for every document.

    Sets organize files without refiling

    Sets in Revu offer a straightforward solution to this challenge that eliminates the need to constantly create new folders to organize files—or the endless clicking that can go into checking what files are up to date across different folders.

    Sets allow users to quickly add and organize PDF files according to both preset categories such as Architectural, Mechanical, Plumbing (MEP), and others, as well as create custom categories.

    Individual files or entire folders can be added, as can files that can’t be merged due to digital signatures or PDF security, because you’re not actually merging the PDFs into a new file. Each drawing remains in its original folder, but the Sets function allows users to view files or make changes (depending on permissions) without creating any further information infrastructure.

    Simply put, you can view or alter files across numerous folders from a single column or window, and you don’t have to endlessly find, drag and organize drawings into new folders.

    You can use Sets to add individual Files, entire Folders, or Folders with selected Subheaders.

    Using sets is simple

    To use Sets in Revu, open the Sets function to create New Sets. Add individual files, and then choose from the Options menu how you want your files organized as thumbnails—by file name or preview, which you can change anytime.

    Next, choose the Categories under which your files fall; built-in categories include General, Civil, Landscape, Structural, and others that are universal to the building and design industries, or you can create your own.

    Once you’ve created your Set and assigned Categories, it’s time for Tags. This is where Sets offer a tremendous advantage in organizing your files.

    You can add as many Tags as you like to files in a Set. So, you might Tag a drawing or file for the purpose of sharing with a particular field installer, or to keep track of drawings for teams coming on different days of the week, or to organize drawings for the review of a safety inspector. Again, drawings can have numerous Tags, but they never leave their original file; they’re simply viewed and edited through Sets.

    Select your own Tags to customize your Sets for unique purposes or viewers and attach as many Tags as necessary to files in your Set.

    The Sets advantage

    Once you’ve created a Set, you have an easily navigable and sortable group with thumbnails, and you’re ready to put your Set to work. The primary functions of Sets include:

    • Uploading a PDF file in a Set to Studio Projects in Revu and setting permissions for viewing or editing
    • Marking up or revising drawings and PDF drawings
    • Incorporating new drawings or PDF drawings
    • Superseding drawings, which are automatically Stamped as SUPERSEDED in their original folders, so there are no issues of drawing redundancy or errors over which drawings are most current
    • Allowing comparisons and overlaying of PDF versions of the same drawings, and tracking changes
    • Exporting the markups list as PDF, CSV or XLS, or printing PDF drawings
    • Creating a drawing log as a PDF, CSV or Excel file, saving time from the tedious process of creating and maintaining one manually
    • A drawing is automatically stamped as SUPERSEDED when changes are made

    Sets have so many useful functions that Maini is surprised its use isn’t more widespread.

    As Maini described it: “I just think that this is one of those features, it’s actually really powerful. Within five to seven minutes, I was able to put together an entire drawing set. In the real world, if people are trying to access all these drawings, they must go through different folders. They must look at all these files. Plus, making sure that they always have access to the latest version of the documents, especially when they must print them, is an absolute nightmare. Whereas this feature, it’s a powerful feature, but not too many people use this and not too many people are aware of this.”


    Dynamic Duo – AutoCAD Plant 3D and Navisworks: How to view Plant 3D data in Navisworks

    In a data driven world, information can be the currency that can make or break your project. Misinformation, or the lack of, can cause delays and costly errors in a project’s life cycle.

    AutoCAD Plant 3D is a powerful process-piping design tool. Each piping component placed in Plant 3D has useful data embedded in it. This data is crucial for the plant’s overall design. However, this data can only be viewed within the Plant 3D application.

    In plant design, data will pass through many hands and in various stages of the project. How do we then share this information to external parties like clients, fabricators or constructors who don’t have the Plant 3D application?

    This is where the dependable sidekick comes to the rescue. Navisworks!

    Navisworks has the ability to open various file types. It can also read embedded data if the proper object enabler is installed. Fortunately, Autodesk has one specifically for Plant 3D. You can download the 2021 version here.

    Here’s an example of a Plant 3D model in Navisworks without an object enabler. You can see that some shapes aren’t displayed properly, and it is not reading the embedded data.

    Here is the same Plant 3D model with the object enabler installed. All the components are displayed correctly, and the embedded data is being displayed in the properties section.


    With the Plant 3D model in Navisworks, the file can now be saved as an NWD file and delivered to external parties. All they need is Navisworks Freedom to view the file, which can be downloaded for free from Autodesk.

    This is one of many features available in Navisworks. Apart from a robust 3D viewer it can perform tasks such as clash detection and animation.

    If you would like to learn more, Navisworks training is available as a supplementary course to SolidCAD’s Plant 3D course curriculum. Please contact training@solidcad.ca

    In the next blog, we will look at how to utilize the Navisworks plug in within Plant 3D. Stay tuned!

    Machinage Piché

    Success Stories

    Machinage Piché

    Machinage Piché specializes in the design and manufacturing of automated equipment for the wood processing industry. Over the past 40 years, their company has carved out a place for itself with an international clientele thanks to its cutting-edge expertise. They provide tailor-made solutions to optimize each stage of secondary wood processing. Each of their solutions stands out for its ingenuity, efficiency, and unparalleled performance.

    Machinage Piché has a long history with SolidCAD, dating back to the early 90s, and continued before SolidCAD, when they worked with Cansel and continued this relationship through the recent merge back in 2017.

    Improving design-to-manufacturing processes with AutoCAD, Inventor Professional & Vault!

    The Challenge

    Machinage Piché was facing difficulties with slow and inefficient design-to-manufacturing processes which delayed their production deadlines. The software they were previously using also made it impossible to create detailed views for production at the speed they were expecting especially for their clients. In addition, they also had only one contact person with their previous provider which made it difficult for them to receive quick responses and support to their urgent queries.

    With Machinage Piché’s rapid growing success, and swift expansion across the United States in the past 5 years, they found themselves in need of a reliable partner with adequate resources to support their ever-growing projects.

    The Solution

    Machinage Piché knew they needed to upgrade their systems processes and therefore reached out to our team an assessment of their current workflow and identify potential areas of improvement. SolidCAD’s software experts helped them explore various Autodesk products, and specifically the features of Inventor that Machinage Piché’s team were not previously aware of. With Inventor’s professional-grade 3D mechanical design, documentation and product simulation tools, Machinage Piché immediately found the software to be faster and far superior in addressing their needs.

    With the help of our highly skilled team and extensive resources, Machinage Piché underwent a reevaluation of their needs, and workflow assessment resulting in the implementation and standardization of AutoCAD LT, AutoCAD Mechanical, Inventor Professional and Vault Office for 3D users as well as personalized training for their team.

    The Results
    • Since implementing these solutions, Machinage Piché has noticed an increase in collaboration between teams and in productivity due to the faster and more flexible
    • Using Inventor, along with the training they received from our team, has helped them decrease drawing time by 50%
    • The Design Centre with AutoCAD and Inventor has been more successful in optimizing their production, allowing the company to reach their deadlines 25% faster
    • Machinage Piché has access to more resources now with SolidCAD and can get timely responses to all questions and requests.

    Testimonial

    We are very satisfied in our long-standing partnership with SolidCAD. They are quick to respond to our requests, the staff are very knowledgeable, and the prices are competitive. We feel that the people at SolidCAD are motivated, take pride in their work, and stay up to date on the latest technological trends. We would recommend anyone else facing the same challenges we were to reach out and request a demo to explore vast potential of SolidCAD’s resources and skills.
    -Guy Ayotte, Project Manager / IT Manager/ 3D Integration Manager at Machinage Piché

    Products & Services Used

    Similar Projects

    Northern Transformer Corporation

    Discover how NORR enhanced team performance and training with Pinnacle Series and SolidCAD’s support—unlocking smarter onboarding, improved software adoption, and a stronger learning culture across the organization.[...]

    D-Wave

    D-Wave Quantum Inc. (D-Wave) is the leader in the development and delivery of quantum computing systems, software, and services. It is the only quantum computing company building both annealing and gate model quantum computers and…

    3D-P

    3D-P consists of a team of mining and positioning technology experts. It was created to bring innovative thinking and new technologies to the mining industry. They have since evolved to bring this approach to several…

    Autodesk Desktop Connector Update – February 13, 2023

    We are pleased to share with you the highlights of the latest Autodesk Desktop Connector update!

    New Feature and Enhancement:

    • Autodesk Construction Cloud drive now supports the View Online capability in Desktop Connector

    Resolved Issues

    • Users will experience faster performance when Opening DWG files that exist locally
    • Changes to how files are marked read-only which will significantly reduce occurrences of “File in use” category of errors
    • Improved messaging to provide better awareness when a file is opened if the file is locked by another user
    • Improved messaging in workflows which will result in files being sent to the recycle bin
    • When DWG files are opened from the Desktop Connector workspace, transient files (ex. bak, dwl, dwl2) will no longer be created
    • Desktop Connector will ignore activity initiated by Sophos anti-virus (SavService)

    For more information, visit here.


    Wrangle that Sheet: Making Revit Sheets Layout Easily with Free Tools from the BIM Project Suite

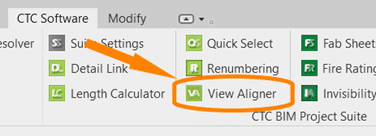
    The CTC BIM Project Suite is geared towards users doing the project work, the included tools aim to make everyday project work easier and more efficient that using Revit tools alone. There are 5 free tools accessed from the ribbon while working in Revit, as well as Revit Properties which is access from the File Explorer to allow you access to Revit file properties, such as the Revit version. The paid version of the Project Suite has an additional 13 tools to add to the Revit workflow. The 2022 release of CTC BIM Project Suite saw the addition of a new free tool, View Aligner.

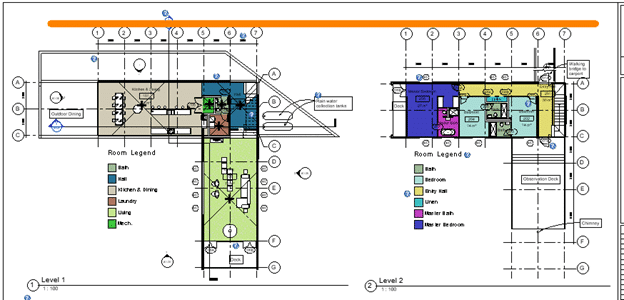
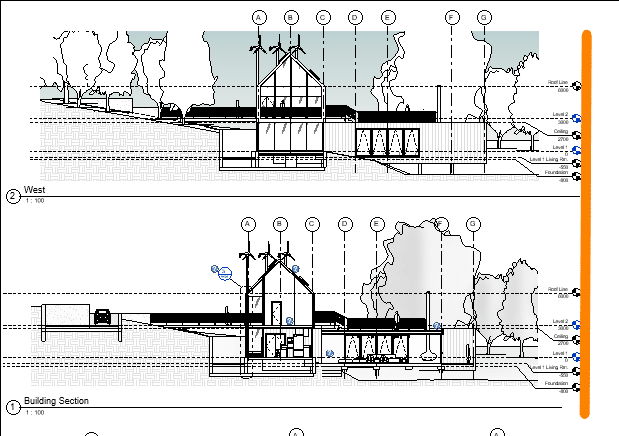
    This tool allows you to select any view on a sheet and align the other views to it based on your project needs. The greatest advantage to the View Aligner tool is that it works across sheets.

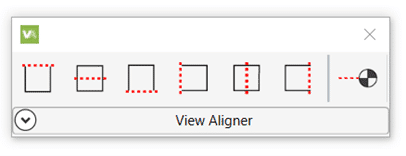
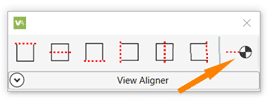
    When selected from the tools on the ribbon the floating tool bar appears and can be repositioned to a convenient location.

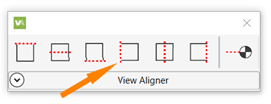
    You have the option of 7 alignments, based on the crop boundary of the views. You can align by each edge; top, bottom, left or right, by either horizontal or vertical centerlines, or by levels.

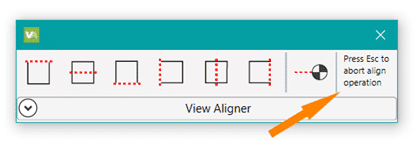
    Upon selection of the desired alignment, instructions for ending the operation appear at the end of the toolbar.

    If you click back on the toolbar before pressing Esc you will need to click back into the view (so the toolbar goes white again) before you can press Esc to exit.


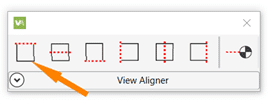
    Align Horizontally by Top Edge

    • Select the Align Horizontally by Top Edge icon.
    • Select the view with the position you want to align to.
    • Every view you click will now align horizontally top edge to top edge of the crop region.
    • Press Esc to complete the operation.

    To keep crop regions the same size for all plan views, use a scope box to control the edges.

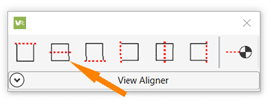
    Align Horizontally by Centerline

    • Select the Align Horizontally by Centerline icon.
    • Select the view with the position you want to align to.
    • Every view you click will now align horizontally centerline to centerline of the crop region.
    • Press Esc to complete the operation.

    For details that don’t show the crop region try using centerlines to get the massing relatively aligned then adjust view names for a nice symmetrical look.

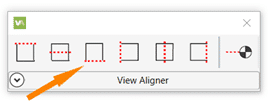
    Align Horizontally by Bottom Edge

    • Select the Align Horizontally by Bottom Edge icon.
    • Select the view with the position you want to align to.
    • Every view you click will now align horizontally bottom edge to bottom edge of the crop region.
    • Press Esc to complete the operation.

    Align the bottom of images to help determine the spacing for other elements on the sheet.


    Align Vertically by Left Edge

    • Select the Align Vertically by Left Edge icon.
    • Select the view with the position you want to align to.
    • Every view you click will now align Vertically left edge to left edge of the crop region.
    • Press Esc to complete the operation.

    Align images along the edge of a page for a nice crisp line.


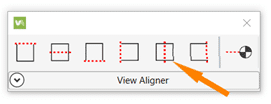
    Align Vertically by Centerline

    • Select the Align Vertically by Centerline icon.
    • Select the view with the position you want to align to.
    • Every view you click will now align vertically centerline to centerline of the crop region.
    • Press Esc to complete the operation.

    Vertical alignment by centerline works best with the unrelated views that Revit can’t snap alignment to.


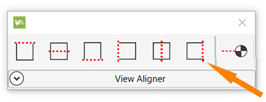
    Align Vertically by Right Edge

    • Select the Align Vertically by Right Edge icon.
    • Select the view with the position you want to align to.
    • Every view you click will now align Vertically right edge to right edge of the crop region.
    • Press Esc to complete the operation.

    Using a right edge alignment (or left) for elevations results in a cohesive look when grid bulbs for all views are aligned to the same side.


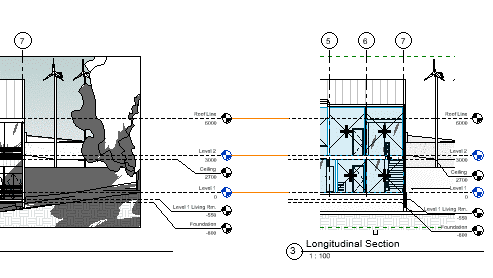
    Align By Levels

    • Select the Align by Levels icon.
    • Select the view with the position you want to align to.
    • Every view you click will now align by levels.
    • Press Esc to complete the operation.

    To use this alignment the scale of the views must be the same.


    TIPS:

    • Use the View Alignment tool to align ‘like’ items.
    • Assign a scope box to the crop regions to make alignment quicker.
    • Open each sheet you will be working on before starting the tool to use alignment across the sheets. You cannot access the project browser once the tool is active. Use the view tabs to flip between sheets to align the views horizontal across each sheet, then do the same to align vertically.

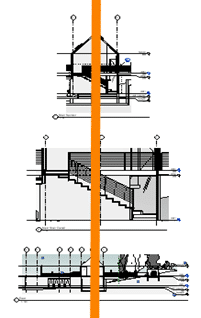
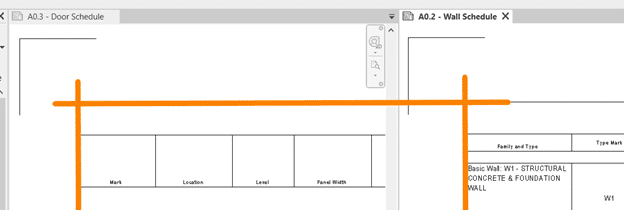
    • Alignment works best on views of the same type. As seen below when you align an image and a schedule the space between visible content and the outermost edge of the crop boundary are not the same so despite being aligned the appear “off”.

    Get your 2022 release of CTC BIM Project Suite and try the FREE View Aligner tool on your next project. Reach out to us at info@solidcad.ca

    Effective Data Structure is Key for Success in Today’s Digital Workplace

    Digital transformation is essential for any business looking to navigate the post-COVID world that exists today. Before the pandemic, the focus on digital transformation was high but has increased due to a large portion of the labor force relying on easily accessible data at home. 

    At the heart of any successful digital transformation project is accurate data structure. 


    What Is Digital Transformation? 

    Digital transformation refers to the process of shifting operations, data, and tools commonly available in offline or non-interactive environments to a completely digital solution. Digital transformation can yield the following benefits: 

    • Increased visibility to data trends will lead to an improved understanding of the customer experience and an uplift in sales 
    • Provide reports that highlight improvement opportunities within common workflows that reduce costs and increase efficiency 

    While the benefits of digital transformation have been on display for many years, some businesses view this practice as a lower priority. Specifically, asset-heavy organizations are reluctant to change and move their information online or revamp their technical infrastructure. Instead, these businesses prefer to continue maintaining older and outdated systems to minimize the impact on existing day-to-day operations. 

    How COVID-19 has Pushed Digital Transformation to the Forefront

    With the onset of the pandemic, organizations have needed to scramble to enable remote operations, social distancing, and continue to maintain assets across multiple sites and locations. Suddenly digital transformation is now a requirement for many businesses. 

    This has been a difficult transition period for organizations that didn’t have an existing plan in place. Effective data structure has emerged as an essential piece of this transformation.  

    Digital Transformation is Built on Strong Data Structure 

    Well governed and structured data is the basis of a well-executed digital transformation. The amount of data can be overwhelming for asset-heavy organizations and found in different sources such as: 

    • Work orders 
    • Asset data and maintenance records 
    • Data coming in from various other mission-critical tools – i.e., EDMS or CMMS solutions 
    • MRO inventory data 
    • Pen and paper documentation 

    Unstructured Data Can Lead to Long Drawn-out Digital Transformation 

    Most organizations have their data spread over different locations and tools. This data can also be inaccessible by various teams and generally unstructured. Here are a few reasons why: 

    • Knowledge is often spread by word-of-mouth with no documentation available 
    • Data consists of a combination of paper, on-premise, and cloud-based tools. This inconsistency leads to incomplete information, poor document version control, and more 
    • Existing digital solutions work independently of each other with little integration 
    • Day-to-day digital workflows are not standardized or governed for good data structure 

    Incomplete Data Leads To Poor Asset Structure 

    If your asset-intensive organization has poor data quality, this will affect your asset structure. All the information surrounding an asset (i.e., documentation, compliance, maintenance plans, etc.) will be affected by default, which can lead to: 

    • Incomplete data sets 
    • Out-of-date information 
    • Trouble maintaining industry compliance 
    • Higher costs to maintain data infrastructure 
    • Data security issues 
    • Increased risk of a digital transformation project failing 

    Once a weak data structure exists, the related issues will carry over into other complementary solutions. The lack of robust and available data will affect other data-driven automation and Industrial Internet of Things (IIoT) projects. These solutions require a complete and comprehensive data structure to build and implement successfully. 

    How to Ensure your Data and Asset Structure is Correct 

    To set up your business for a successful Digital Transformation, you can improve your data structure by focusing on accurate data, robust data structure, and data governance. 

    1. Review Your Current Data

    Reviewing your current data should be the first step for improving the existing data structure. This requires that you answer vital questions about your data itself, including: 

    • What data do you have? 
    • What information are you collecting regularly? 
    • How and where is the data used? 
    • What does that data tell you about your customers, about your KPIs, about your business? 
    • Identify missing data opportunities. Where are there currently gaps in your data needs? 

    Leading off with a review of current data will help your team understand your data and what you do with it. 

    2. Organize your Data with the Appropriate Tools

    The next step is to use a well-structured tool to import your data. Using a tool that can assist with proper data structure, governance, and analytical insights will ease your path to digital transformation by: 

    • Providing automation of workflows to increase data entry efficiency and ensure data accuracy by avoiding human error 
    • Confirming your data initiatives are standardized and repeatable 
    • Guarantee that your organization can easily manage your information’s flow, quality, and governance, which is key to any compelling insights or transformation efforts 

    Selecting the right solution will vary by your organization’s industry, data sources, and required integrations. The right tool will provide a broader view and understanding of your data as a whole to your entire team. 


    What Types of Tools fit best For Asset-Intensive Organizations? 

    Two tools covering these requirements are a computerized maintenance management system (CMMS) and an electronic document management system (EDMS). Ideally used together, an EDMS and CMMS solution will work in sync and provide increased functionality as a whole. 

    Most successful asset-heavy organizations already use a CMMS or EAM solution for their maintenance tracking needs. It allows you to digitize and automate maintenance operations to deploy preventive maintenance strategies better, develop better maintenance practices, stay organized, and ultimately save time and money. While this is a significant first step into modernizing your digital data footprint, a CMMS system alone is missing essential functionality for maintaining your data structure in other areas (i.e., technical drawings and documentation). This functionality is where an EDMS solution excels. 

    Pairing an EDMS with a CMMS solution is the winning combination that empowers your team with the following benefits: 

    • A fully connected digital single source of truth with high availability 
    • Automation across multiple tools to improve efficiency and data accuracy 
    • Easy to manage data governance over the entire technological stack 

    In a post-COVID world, organizations that complete digital transformations and modernize their operations will pull past competitors relying on legacy systems. But making the transition begins with reliable data and solid asset structure as a first step. 

    To learn more about Meridian solutions (EDMS and CMMS) and how they can help your team, don’t hesitate to get in touch with the SolidCAD Meridian team.  

    Assign Point Layers by Note Column with Dynamo

    In this vlog, our Civil/Infrastructure Technical Product Specialist, Jae Kwon, will demonstrate how to assign point layers by Note Column with Dynamo application.

    Autodesk Dynamo is a programming environment that requires no programming experience. Dynamo enables designers to create visual logic so they can explore a wide range of parametric conceptual designs using logic, simple data and analysis without the need to create a physical prototype.

    This vlog will cover a demo of:

    • Problem to solve
    • No out of the box solution available
    • Dynamo script breakdown
    • Dynamo player, script run and result review


    Civil 3D 2022.0.1 CIM Suite Tools Updates from CTC

    We are excited to announce that our partner CTC Software released Civil 3D CIM Project and Manager Suites, version 22.0.1. It is now released and can be accessed on the CTC website.

    This update saw a lot of fixes and enhancements to new products released in 22.0.0 and before.

    Below are release notes:

    22.0.1 8/17/2021 CIM Project Suite Pipe Planner Bug Fix Fixed a variety of issues causing Pipe Planner to error out or crash. Improved application speed performance. Fixed issues with exporting to external spreadsheets. Fixed issues with importing external spreadsheets.
    22.0.1 8/17/2021 CIM Project Suite Pipe Planner Enhancement Added support for formulas in user-defined empty columns and rows. Added properties filter search bar. Added interactive selection of export starting cell. Improved part renaming, allowing old names to be reused on new part names within the same operation. Added new right-click options to edit the middle table. Misc. enhancements and performance improvements.
    22.0.1 8/17/2021 CIM Project Suite Pipe Designer Enhancement Improved part renaming, allowing old names to be reused on new part names within the same operation.
    22.0.1 8/17/2021 CIM Project Suite Label Genie Enhancement Added option to manually select anchor objects in drawings.  Added option when labeling layouts to create a unique layer for each layout.
    22.0.1 8/17/2021 CIM Project Suite Label Genie Bug Fix Fixed an issue where layout-specific labeling was not respecting exact viewport extents.  Fixed an issue where segment labels were not following the assigned layer. Fixed misc. issues with specific drawing files.
    22.0.1 8/17/2021 CIM Project Suite Earthwork Processer Bug Fix Fixed an issue where errors occurred if existing or proposed surfaces were empty or not overlapping one another.  Fixed an issue where earthwork region polylines that were significantly small would not offset and cause the app to error.
    22.0.1 8/17/2021 CIM Project Suite Data Wizard Bug Fix Fixed an issue where survey figures caused Data Wizard to error.
    22.0.1 8/17/2021 CIM Project Suite Parts Swapper Bug Fix Fixed an issue where parts not found in the parts catalog were causing Parts Swapper to file.
    22.0.1 8/17/2021 CIM Project Suite Corridor Mapper Bug Fix Fixed an issue where changes to assemblies would cause the app to error.
    22.0.1 8/17/2021 CIM Project Suite CIM Project Suite Bug Fix Fixed an issue where custom subassemblies were breaking when CIM Project Suite was installed.
    22.0.1 8/17/2021 CIM Manager Suite Template Tracker Bug Fix Fixed an issue where pressure network band styles were causing Template Tracker to error out.
    22.0.1 8/17/2021 CIM Manager Suite CIM Manager Suite Bug Fix Fixed an issue where custom subassemblies were breaking when CIM Manager Suite was installed.

    Whelan Construction

    Success Stories

    Whelan Construction

    Whelan Construction is a general contracting and construction management organization that specializes in end-to-end construction services. They serve Metro Vancouver, Fraser Valley, and Squamish-Lillooet regions and specialize in Institutional, Healthcare, Light Rail, Airport, Renewable Energy and Building Performance Upgrade projects in the region of $1,000,000 to $25,000,000.

    Based in Vancouver, B.C., Whelan Construction has Irish roots. Founder, Brian Whelan, emigrated to Canada in 2013 and—from one west coast to another. Brian has successfully led the construction of $400,000,000 worth of projects including airport, healthcare, residential, institutional, marine, pharmaceutical, light industrial, retail, and commercial projects.

    How Autodesk Construction Cloud has helped start-up Whelan Construction win bids over competitors

    The Challenge

    As a start-up company, Whelan Construction faced challenges in identifying the right solutions and systems that would ensure a smooth and consistent workflow process to deliver end-to-end construction services for all stages of a project.

    Outside of the solution requirements, one of the biggest challenges that Whelan Construction’s founder, Brian Whelan had experienced, was selecting a suitable project and field management software package for a small to medium sized construction company, a package that seamlessly connects the field and office.

    The Solution

    Given Autodesk’s extensive product portfolio, SolidCAD helped Whelan Construction to determine the right software solutions that goes together with their needs and the construction industry’s best practices requirements.

    With Autodesk Construction Cloud, specifically, Autodesk Docs, Build, AutoCAD, and PDF solution Bluebeam, Whelan Construction now has a common environment for all project-related data all while helping to manage projects with minimal resources and complete project entries in one platform.

    Bluebeam allowed project partners to be able to mark up and collaborate on the same documents in real-time. While, Autodesk Docs + Build, one of the industry’s leading solutions made it easy for Whelan Construction’s team to work with other project stakeholders, have connected workflows, increased transparency, and track construction progress throughout the entire lifecycle of their projects.

    Moreover, Whelan Construction took one-on-one training with SolidCAD on the Docs + Cost Management component of the Autodesk Build to connect project management and field execution data to cost activities to understand root causes and scope cost impacts.

    The Outcome
    • Whelan Construction is now able to ensure projects stay on track; improve collaboration and reduce miscommunication, potential errors, and rework. With the ability to track all issues in one place and reduce costly rework, Whelan Construction can now keep projects on schedule all while being able to manage project data and project bids.
    • Aside from that, they can now develop very detailed proposals with an ability to give the preview on designs and project development stages as required, providing them a competitive edge when winning bids.

    As a result, Whelan Construction was able to apply the skills obtained from training to compile professional and successful bids.

    SolidCAD continues to be a resource in helping Whelan Construction grow as a construction company in this competitive market.

    Testimonial

    SolidCAD has been fantastic in providing my new company with support for Autodesk Docs and Build, Bluebeam, and AutoCAD. Ian was great to deal with when organizing the right package and considering the most economical plan for a small start-up construction company. Andrew went above and beyond and provided classroom sessions for Autodesk Docs and Build. He has been brilliant and treated our company like partners, so much so that I now have three licenses on the books. I started using AutoCAD R14 a long time ago and have always trusted Autodesk products. This was one of the reasons I chose Autodesk Docs and Build, one for reputation, and two the turnkey management services that the product does is fantastic.
    I would highly recommend using the SolidCAD team.
    -Brian Whelan, Construction Manager at the Whelan Construction

    Similar Projects

    Paper Excellence

    PAPER EXCELLENCE

    Paper Excellence is a diversified manufacturer of pulp and paper, including printing and writing, packaging, and specialty papers. We believe in the enduring value of wood-based products in global markets and have built a large…
    Quinn Digital

    Quinn Digital Asset Protection Inc. Customer Success Story

    Quinn Digital Asset Protection Inc. has been in the business of protecting property, product, and people assets since 2006, but our team of over 30 professionals has many decades of experience in the asset protection…

    Starline Windows

    Starline Windows is an industry leader in the design and manufacturing of architectural aluminum window systems, as well as residential vinyl windows and doors for over 50 years. They have completed thousands of contracts and…

    New Product Alert: SolidCAD launches their newest tool MAKE Productivity for Autodesk PowerMill®

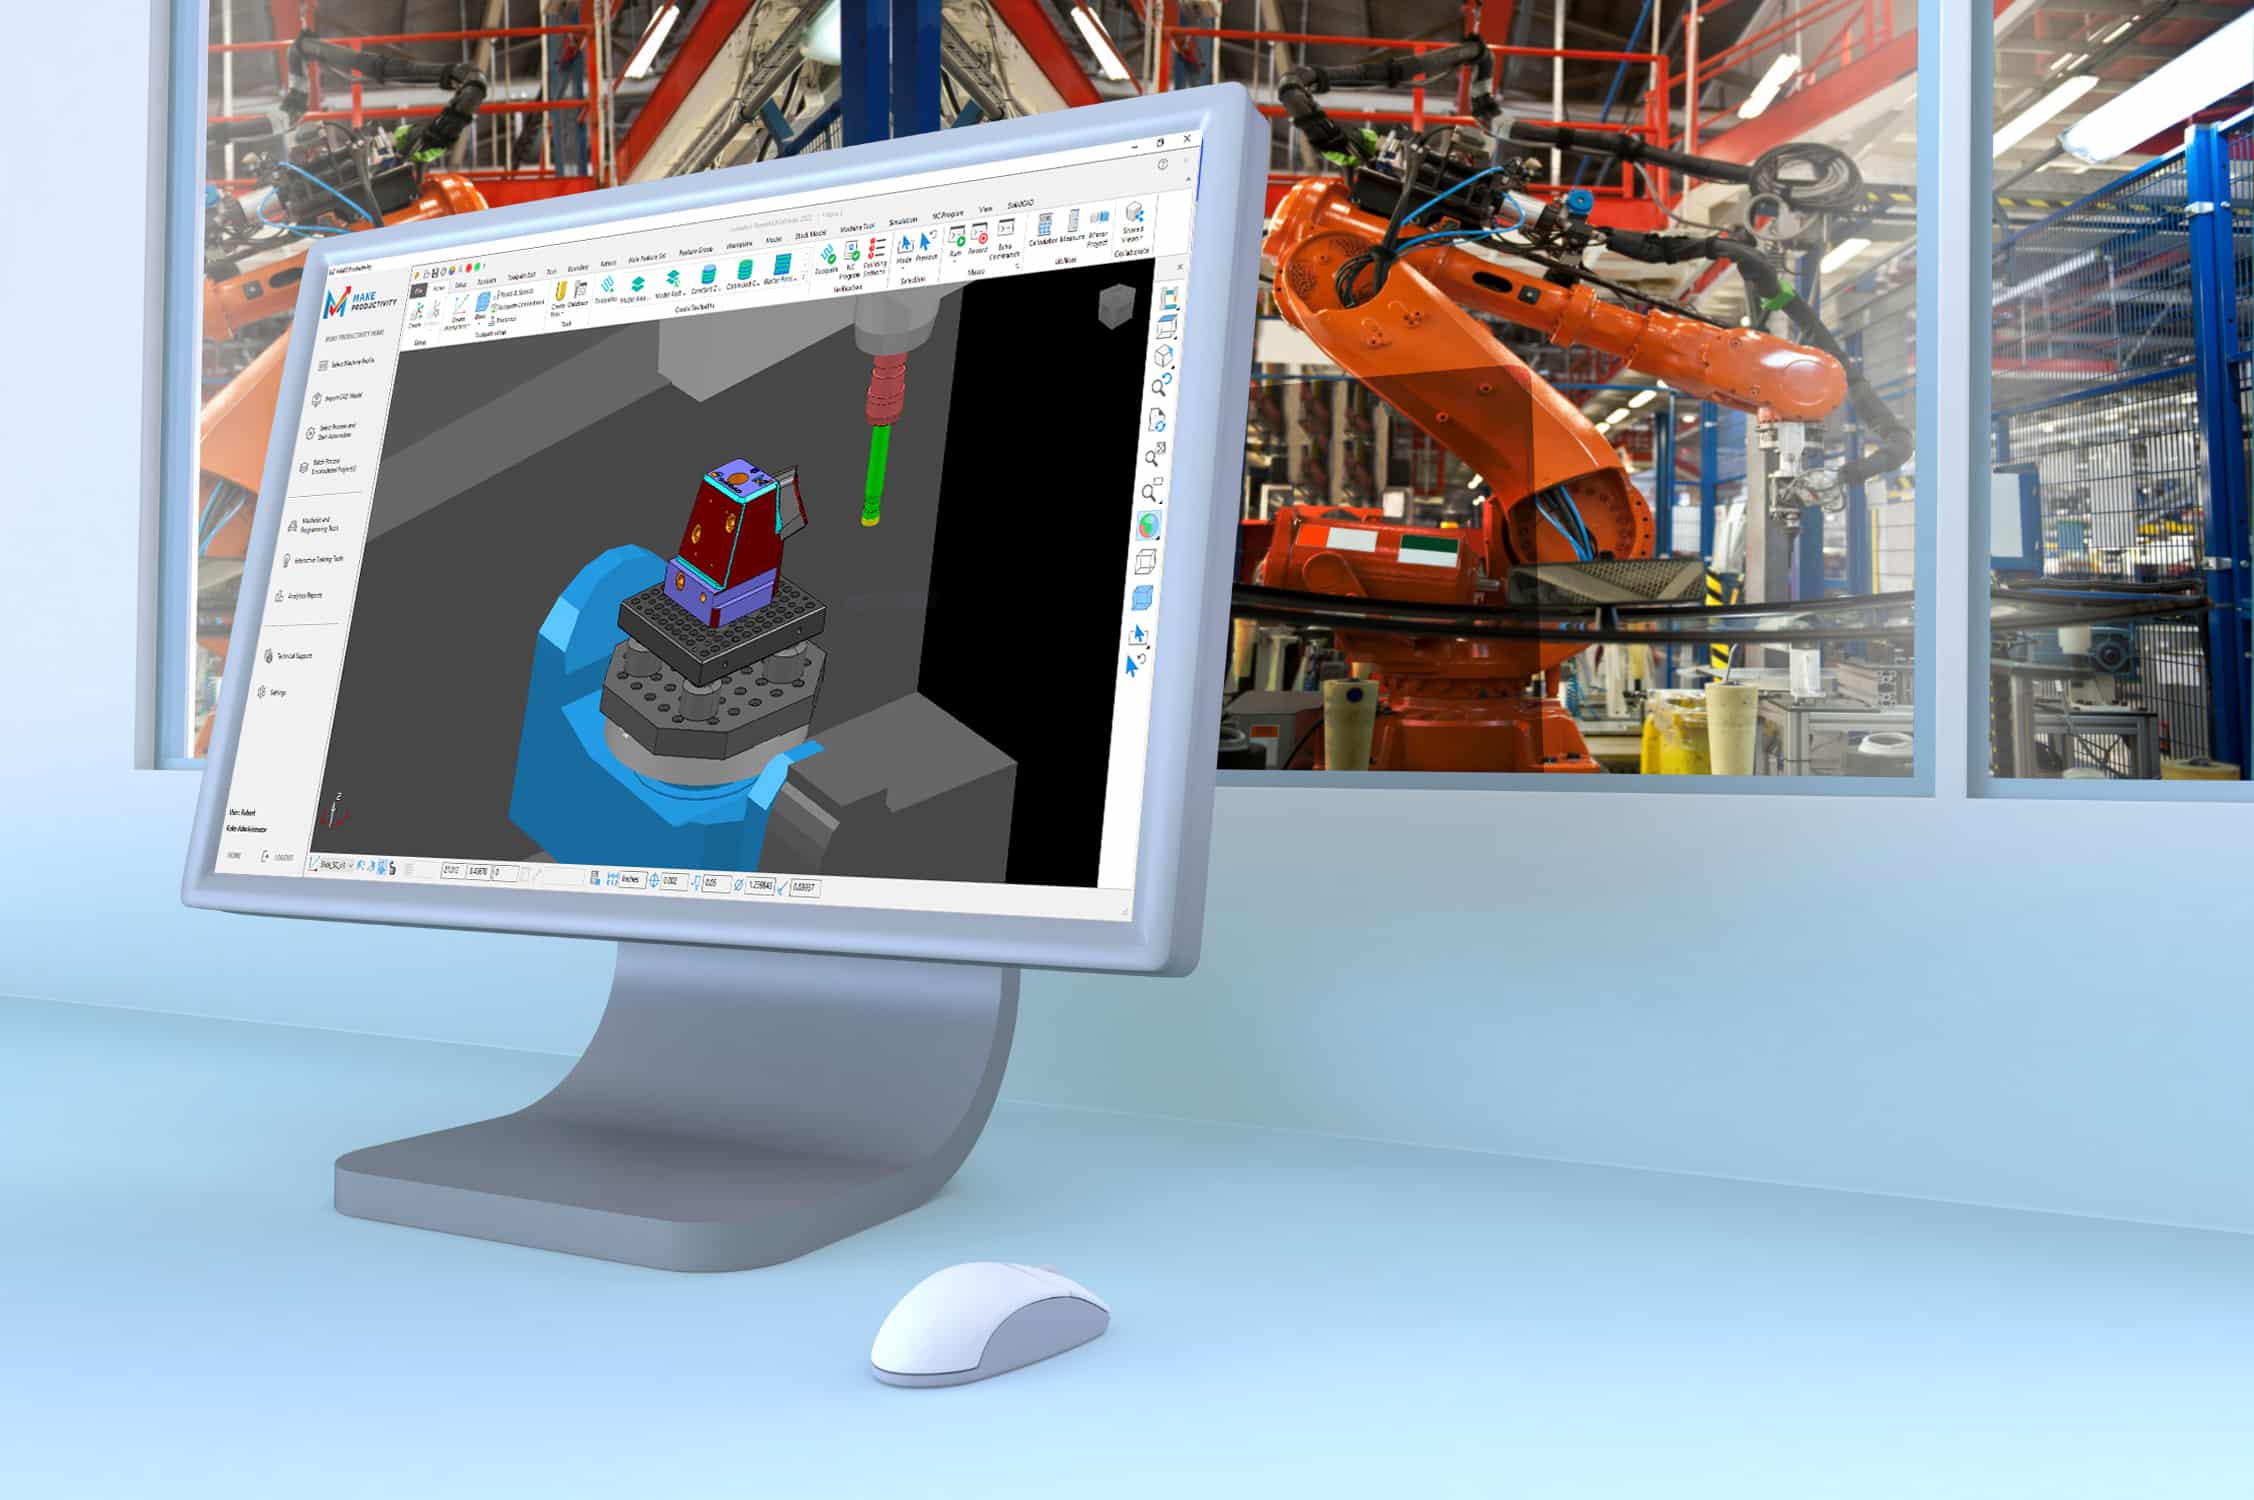
    TORONTO, ON August 23, 2021 – Today, SolidCAD, Canada’s largest professional services company and Autodesk Platinum Partner, announces the launch of their newest product, MAKE Productivity. MAKE Productivity for PowerMill® is a best-in-class tool to boost CAM programming productivity, provide incredible staffing flexibility to overcome skilled labour shortages, and optimize machine scheduling and utilization by programming well ahead of run-time.

    Equipped with a suite of calculators and tools for daily programming, MAKE Productivity provides endless capabilities for automating simple and complex multi-axis manufacturing processes, along with “on-demand” digital learning modules and training content for the user’s self-directed learning plans.

    MAKE Productivity can allow users to automate 90-100% of their complex finish programming by using the guided workflow. Paired with Autodesk’s PowerMill® Ultimate, this product allows for simultaneous 5-axis programming automation and enhanced machine simulation of NC programs, tool changes, and laser cycles. Users can now optimize after-hours license use by creating a batch calculation queue for “lights-out” calculation of multiple projects.

    “SolidCAD is responding to our customer’s needs for a robust and customizable solution to automate their complex CAM programming processes.” says Robert Kobielski, Sales Manager of Advanced Manufacturing at SolidCAD. “MAKE Productivity is providing the enhancements and value-added tools for which our customers have been requesting, and we are pleased to have developed this collaboratively to suit these needs.”

    SolidCAD offers two versions of the product that work with Autodesk’s Standard or Ultimate versions of PowerMill®. With MAKE Productivity and PowerMill® Standard, users will have the ability to rapidly create NC code for high-speed 3-axis machining, 3+2 programming, 2.5D milling, turning, and toolpath safety verification. While MAKE Productivity and PowerMill® Ultimate will have all the standard features plus machine simulation, tool change and laser cycle validation, and access to full 5-axis programming with automatic collision avoidance, robot programming, electrode programming, hybrid manufacturing, and more.

    To learn more about this product, visit SolidCAD’s website at https://www.solidcad.ca/products/solidcad-products/make-productivity/ or join SolidCAD for a webinar that will showcase MAKE Productivity  on Tuesday, September 21 at 3:00 pm ET, by clicking here.

    SolidCAD will also be attending this year’s Canadian Manufacturing Technology Show (CMTS) from October 4-7, 2021, in Toronto at the International Centre. Stop by to get a first look in-person of MAKE productivity at Booth #2631.

    E-mail us at make@solidcad.ca to learn more.